Note
Access to this page requires authorization. You can try signing in or changing directories.
Access to this page requires authorization. You can try changing directories.
JSON (JavaScript Object Notation) is a format for storing and transferring data. Each JSON object is a collection of name/value pairs that can be defined when created. JSON is useful with Office Scripts because it can handle the arbitrary complexity of ranges, tables, and other data patterns in Excel. JSON lets you parse incoming data from web services and pass complex objects through Power Automate flows.
This article focuses on using JSON with Office Scripts. We recommend you first learn more about the format from articles such as JSON Introduction from W3 Schools.
Parse JSON data into a range or table
Arrays of JSON objects provide a consistent way to pass rows of table data between applications and web services. In these cases, each JSON object represents a row, while the properties represent the columns. An Office Script can loop over a JSON array and reassemble it as a 2D array. This array is then set as the values of a range and stored in a workbook. The property names can also be added as headers to create a table.
The following script shows JSON data being converted to a table. Note that the data is not taken from an external source. That is covered later in this article.
/**
 * Sample JSON data. This would be replaced by external calls or
 * parameters getting data from Power Automate in a production script.
 */
const jsonData = [
  { "Action": "Edit", /* Action property with value of "Edit". */
    "N": 3370, /* N property with value of 3370. */
    "Percent": 17.85 /* Percent property with value of 17.85. */
  },
  // The rest of the object entries follow the same pattern.
  { "Action": "Paste", "N": 1171, "Percent": 6.2 },
  { "Action": "Clear", "N": 599, "Percent": 3.17 },
  { "Action": "Insert", "N": 352, "Percent": 1.86 },
  { "Action": "Delete", "N": 350, "Percent": 1.85 },
  { "Action": "Refresh", "N": 314, "Percent": 1.66 },
  { "Action": "Fill", "N": 286, "Percent": 1.51 },
];

/**
 * This script converts JSON data to an Excel table.
 */
function main(workbook: ExcelScript.Workbook) {
  // Create a new worksheet to store the imported data.
  const newSheet = workbook.addWorksheet();
  newSheet.activate();

  // Determine the data's shape by getting the properties in one object.
  // This assumes all the JSON objects have the same properties.
  const columnNames = getPropertiesFromJson(jsonData[0]);

  // Create the table headers using the property names.
  const headerRange = newSheet.getRangeByIndexes(0, 0, 1, columnNames.length);
  headerRange.setValues([columnNames]);

  // Create a new table with the headers.
  const newTable = newSheet.addTable(headerRange, true);

  // Add each object in the array of JSON objects to the table.
  const tableValues = jsonData.map(row => convertJsonToRow(row));
  newTable.addRows(-1, tableValues);
}

/**
 * This function turns a JSON object into an array to be used as a table row.
 */
function convertJsonToRow(obj: object) {
  const array: (string | number)[] = [];

  // Loop over each property and get the value. Their order will be the same as the column headers.
  for (let value in obj) {
    array.push(obj[value]);
  }
  return array;
}

/**
 * This function gets the property names from a single JSON object.
 */
function getPropertiesFromJson(obj: object) {
  const propertyArray: string[] = [];

  // Loop over each property in the object and store the property name in an array.
  for (let property in obj) {
    propertyArray.push(property);
  }

  return propertyArray;
}
Tip
If you know the structure of the JSON, you can create your own interface to make getting specific properties easier. You can replace the JSON-to-array conversion steps with type-safe references. The following code snippet shows those steps (now commented out) replaced by calls that use a new ActionRow interface. Note that this makes the convertJsonToRow function no longer necessary.
  // const tableValues = jsonData.map(row => convertJsonToRow(row));
  // newTable.addRows(-1, tableValues);
  // }

     const actionRows: ActionRow[] = jsonData as ActionRow[];
     // Add each object in the array of JSON objects to the table.
     const tableValues = actionRows.map(row => [row.Action, row.N, row.Percent]);
     newTable.addRows(-1, tableValues);
   }

   interface ActionRow {
     Action: string;
     N: number;
     Percent: number;
   }
Get JSON data from external sources
There are two ways to import JSON data into your workbook through an Office Script.
- As a parameter with a Power Automate flow.
- With a
fetchcall to an external web service.
Modify the sample to work with Power Automate
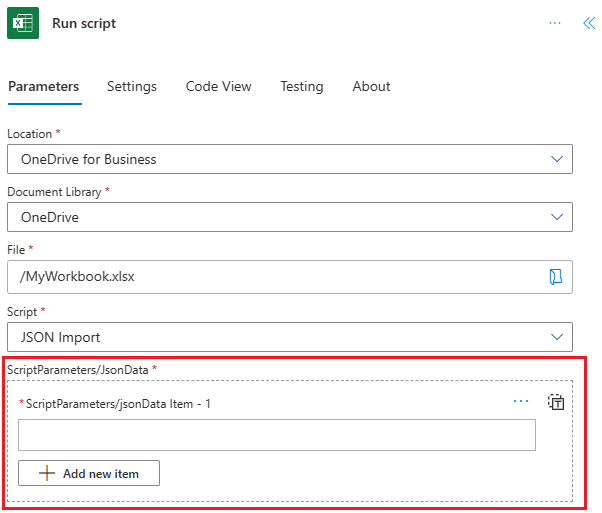
JSON data in Power Automate can be passed as a generic object array. Add an object[] property to the script to accept that data.
// For Power Automate, replace the main signature in the previous sample with this one
// and remove the sample data.
function main(workbook: ExcelScript.Workbook, jsonData: object[]) {
You'll then see an option in the Power Automate connector to add jsonData to the Run script action.
Modify the sample to use a fetch call
Web services can reply to fetch calls with JSON data. This gives your script the data it needs while keeping you in Excel. Learn more about fetch and external calls by reading External API call support in Office Scripts.
// For external services, replace the main signature in the previous sample with this one,
// add the fetch call, and remove the sample data.
async function main(workbook: ExcelScript.Workbook) {
  // Replace WEB_SERVICE_URL with the URL of whatever service you need to call.
  const response = await fetch('WEB_SERVICE_URL');
  const jsonData: object[] = await response.json();
Create JSON from a range
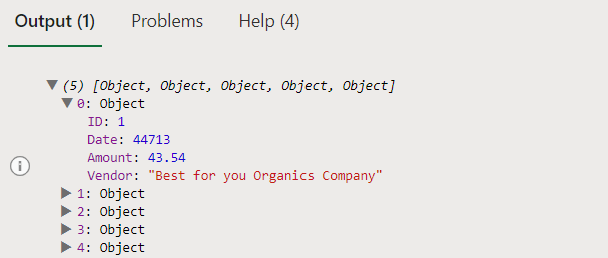
The rows and columns of a worksheet often imply relationships between their data values. A row of a table conceptually maps to a programming object, with each column being a property of that object. Consider the following table of data. Each row represents a transaction recorded in the spreadsheet.
| ID | Date | Amount | Vendor |
|---|---|---|---|
| 1 | 6/1/2022 | $43.54 | Best for you Organics Company |
| 2 | 6/3/2022 | $67.23 | Liberty Bakery and Cafe |
| 3 | 6/3/2022 | $37.12 | Best for you Organics Company |
| 4 | 6/6/2022 | $86.95 | Coho Vineyard |
| 5 | 6/7/2022 | $13.64 | Liberty Bakery and Cafe |
Each transaction (each row) has a set of properties associated with it: "ID", "Date", "Amount", and "Vendor". This can be modeled in an Office Script as an object.
// An interface that wraps transaction details as JSON.
interface Transaction {
  "ID": string;
  "Date": number;
  "Amount": number;
  "Vendor": string;
}
The rows in the sample table correspond to the properties in the interface, so a script can easily convert each row into a Transaction object. This is useful when outputting the data for Power Automate. The following script iterates over each row in the table and adds it to a Transaction[].
function main(workbook: ExcelScript.Workbook) {
  // Get the table on the current worksheet.
  const table = workbook.getActiveWorksheet().getTables()[0];

  // Create an array of Transactions and add each row to it.
  let transactions: Transaction[] = [];
  const dataValues = table.getRangeBetweenHeaderAndTotal().getValues();
  for (let i = 0; i < dataValues.length; i++) {
    let row = dataValues[i];
    let currentTransaction: Transaction = {
      ID: row[table.getColumnByName("ID").getIndex()] as string,
      Date: row[table.getColumnByName("Date").getIndex()] as number,
      Amount: row[table.getColumnByName("Amount").getIndex()] as number,
      Vendor: row[table.getColumnByName("Vendor").getIndex()] as string
    };
    transactions.push(currentTransaction);
  }

  // Do something with the Transaction objects, such as return them to a Power Automate flow.
  console.log(transactions);
}

// An interface that wraps transaction details as JSON.
interface Transaction {
  "ID": string;
  "Date": number;
  "Amount": number;
  "Vendor": string;
}
Export JSON with fetch
Much like importing data with fetch, you can send data from your workbook with a similar command. A POST command takes any stringified JSON data and sends it to the specified endpoint.
To see this in action, replace the console.log(transactions); line in the previous sample with the following code. This issues a POST command to a testing server, then reads the data back.
  const response = await fetch('https://jsonplaceholder.typicode.com/posts', {
    method: 'POST',
    body: JSON.stringify(transactions),
    headers: {
      'Content-type': 'application/json; charset=UTF-8',
    },
  });
  const jsonData: object[] = await response.json();
  console.log(jsonData);
Use a generic object
The previous sample assumes the table header values are consistent. If your table has variable columns, you'll need to create a generic JSON object. The following script shows a script that logs any table as JSON.
function main(workbook: ExcelScript.Workbook) {
  // Get the table on the current worksheet.
  const table = workbook.getActiveWorksheet().getTables()[0];

  // Use the table header names as JSON properties.
  const tableHeaders = table.getHeaderRowRange().getValues()[0] as string[];

  // Get each data row in the table.
  const dataValues = table.getRangeBetweenHeaderAndTotal().getValues();
  let jsonArray: object[] = [];

  // For each row, create a JSON object and assign each property to it based on the table headers.
  for (let i = 0; i < dataValues.length; i++) {
    // Create a blank generic JSON object.
    let jsonObject: { [key: string]: string } = {};
    for (let j = 0; j < dataValues[i].length; j++) {
      jsonObject[tableHeaders[j]] = dataValues[i][j] as string;
    }

    jsonArray.push(jsonObject);
  }

  // Do something with the objects, such as return them to a Power Automate flow.
  console.log(jsonArray);
}
See also
Collaborate with us on GitHub
The source for this content can be found on GitHub, where you can also create and review issues and pull requests. For more information, see our contributor guide.
Office Scripts