Note
Access to this page requires authorization. You can try signing in or changing directories.
Access to this page requires authorization. You can try changing directories.
The Range.setValues() API puts data in a range. This API has limitations depending on various factors, such as data size and network settings. This means that if you attempt to write a massive amount of information to a workbook as a single operation, you'll need to write the data in smaller batches in order to reliably update a large range.
The first part of the sample shows how to write a large dataset in Excel. The second part expands the example to be part of a Power Automate flow. This is necessary if your script takes longer to run than the Power Automate action timeout.
For performance basics in Office Scripts, please read Improve the performance of your Office Scripts.
Note
Run these samples directly from the Office Scripts Code Editor. To open the Code Editor, go to Automate > New Script > Create in Code Editor. Replace the default code with the sample code you want to run, and then select Run.
Sample 1: Write a large dataset in batches
This script writes rows of a range in smaller parts. It selects 1000 cells to write at a time. Run the script on a blank worksheet to see the update batches in action. The console output gives further insight into what's happening.
Note
You can change the number of total rows being written by changing the value of SAMPLE_ROWS. You can change the number of cells to write as a single action by changing the value of CELLS_IN_BATCH.
function main(workbook: ExcelScript.Workbook) {
  const SAMPLE_ROWS = 100000;
  const CELLS_IN_BATCH = 10000;

  // Get the current worksheet.
  const sheet = workbook.getActiveWorksheet();

  console.log(`Generating data...`)
  let data: (string | number | boolean)[][] = [];
  // Generate six columns of random data per row.
  for (let i = 0; i < SAMPLE_ROWS; i++) {
    data.push([i, ...[getRandomString(5), getRandomString(20), getRandomString(10), Math.random()], "Sample data"]);
  }

  console.log(`Calling update range function...`);
  const updated = updateRangeInBatches(sheet.getRange("B2"), data, CELLS_IN_BATCH);
  if (!updated) {
    console.log(`Update did not take place or complete. Check and run again.`);
  }
}

function updateRangeInBatches(
  startCell: ExcelScript.Range,
  values: (string | boolean | number)[][],
  cellsInBatch: number
): boolean {

  const startTime = new Date().getTime();
  console.log(`Cells per batch setting: ${cellsInBatch}`);

  // Determine the total number of cells to write.
  const totalCells = values.length * values[0].length;
  console.log(`Total cells to update in the target range: ${totalCells}`);
  if (totalCells <= cellsInBatch) {
    console.log(`No need to batch -- updating directly`);
    updateTargetRange(startCell, values);
    return true;
  }

  // Determine how many rows to write at once.
  const rowsPerBatch = Math.floor(cellsInBatch / values[0].length);
  console.log("Rows per batch: " + rowsPerBatch);
  let rowCount = 0;
  let totalRowsUpdated = 0;
  let batchCount = 0;

  // Write each batch of rows.
  for (let i = 0; i < values.length; i++) {
    rowCount++;
    if (rowCount === rowsPerBatch) {
      batchCount++;
      console.log(`Calling update next batch function. Batch#: ${batchCount}`);
      updateNextBatch(startCell, values, rowsPerBatch, totalRowsUpdated);

      // Write a completion percentage to help the user understand the progress.
      rowCount = 0;
      totalRowsUpdated += rowsPerBatch;
      console.log(`${((totalRowsUpdated / values.length) * 100).toFixed(1)}% Done`);
    }
  }

  console.log(`Updating remaining rows -- last batch: ${rowCount}`)
  if (rowCount > 0) {
    updateNextBatch(startCell, values, rowCount, totalRowsUpdated);
  }

  let endTime = new Date().getTime();
  console.log(`Completed ${totalCells} cells update. It took: ${((endTime - startTime) / 1000).toFixed(6)} seconds to complete. ${((((endTime  - startTime) / 1000)) / cellsInBatch).toFixed(8)} seconds per ${cellsInBatch} cells-batch.`);

  return true;
}

/**
 * A helper function that computes the target range and updates.
 */
function updateNextBatch(
  startingCell: ExcelScript.Range,
  data: (string | boolean | number)[][],
  rowsPerBatch: number,
  totalRowsUpdated: number
) {
  const newStartCell = startingCell.getOffsetRange(totalRowsUpdated, 0);
  const targetRange = newStartCell.getResizedRange(rowsPerBatch - 1, data[0].length - 1);
  console.log(`Updating batch at range ${targetRange.getAddress()}`);
  const dataToUpdate = data.slice(totalRowsUpdated, totalRowsUpdated + rowsPerBatch);
  try {
    targetRange.setValues(dataToUpdate);
  } catch (e) {
    throw `Error while updating the batch range: ${JSON.stringify(e)}`;
  }
  return;
}

/**
 * A helper function that computes the target range given the target range's starting cell
 * and selected range and updates the values.
 */
function updateTargetRange(
  targetCell: ExcelScript.Range,
  values: (string | boolean | number)[][]
) {
  const targetRange = targetCell.getResizedRange(values.length - 1, values[0].length - 1);
  console.log(`Updating the range: ${targetRange.getAddress()}`);
  try {
    targetRange.setValues(values);
  } catch (e) {
    throw `Error while updating the whole range: ${JSON.stringify(e)}`;
  }
  return;
}

// Credit: https://www.codegrepper.com/code-examples/javascript/random+text+generator+javascript
function getRandomString(length: number): string {
  var randomChars = 'ABCDEFGHIJKLMNOPQRSTUVWXYZabcdefghijklmnopqrstuvwxyz0123456789';
  var result = '';
  for (var i = 0; i < length; i++) {
    result += randomChars.charAt(Math.floor(Math.random() * randomChars.length));
  }
  return result;
}
Training video: Write a large dataset
Watch Sudhi Ramamurthy walk through this sample on YouTube.
Sample 2: Write data in batches from a Power Automate flow
For this sample, you'll need to complete the following steps.
- Create a workbook in OneDrive named SampleData.xlsx.
- Create a second workbook in OneDrive named TargetWorkbook.xlsx.
- Open SampleData.xlsx with Excel.
- Add sample data. You can use the script from the Write a large dataset in batches section to generate this data.
- Create and save both of the following scripts. Use Automate > New Script > Create in Code Editor to paste the code and save the scripts with the suggested names.
- Follow the steps under Power Automate flow: Read and write data in a loop to create the flow.
Sample code: Read selected rows
function main(
  workbook: ExcelScript.Workbook,
  startRow: number,
  batchSize: number
): string[][] {
  // This script only reads the first worksheet in the workbook.
  const sheet = workbook.getWorksheets()[0];

  // Get the boundaries of the range.
  // Note that we're assuming usedRange is too big to read or write as a single range.
  const usedRange = sheet.getUsedRange();
  const lastColumnIndex = usedRange.getLastColumn().getColumnIndex();
  const lastRowindex = usedRange.getLastRow().getRowIndex();

  // If we're starting past the last row, exit the script.
  if (startRow > lastRowindex) {
      return [[]];
  }

  // Get the next batch or the rest of the rows, whichever is smaller.
  const rowCountToRead = Math.min(batchSize, (lastRowindex - startRow + 1));
  const rangeToRead = sheet.getRangeByIndexes(startRow, 0, rowCountToRead, lastColumnIndex + 1);
  return rangeToRead.getValues() as string[][];
}
Sample code: Write data at row location
function main(
  workbook: ExcelScript.Workbook,
  data: string[][],
  currentRow: number,
  batchSize: number
): boolean {
  // Get the first worksheet.
  const sheet = workbook.getWorksheets()[0];

  // Set the given data.
  if (data && data.length > 0) {
    sheet.getRangeByIndexes(currentRow, 0, data.length, data[0].length).setValues(data);
  }

  // If the script wrote less data than the batch size, signal the end of the flow.
  return batchSize > data.length;
}
Power Automate flow: Read and write data in a loop
Sign into Power Automate and create a new Instant cloud flow.
Choose Manually trigger a flow and select Create.
Create a variable to track the current row being read and written. In the flow builder, select the + button and Add an action. Select the Initialize variable action and give it the following values.
- Name: currentRow
- Type: Integer
- Value: 0

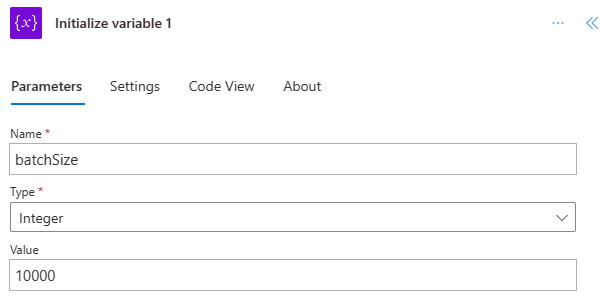
Add an action to set the number of rows to be read in a single batch. Depending on the number of columns, this may need to be smaller to avoid the data transfer limits. Make a new Initialize variable action with the following values.
- Name: batchSize
- Type: Integer
- Value: 10000
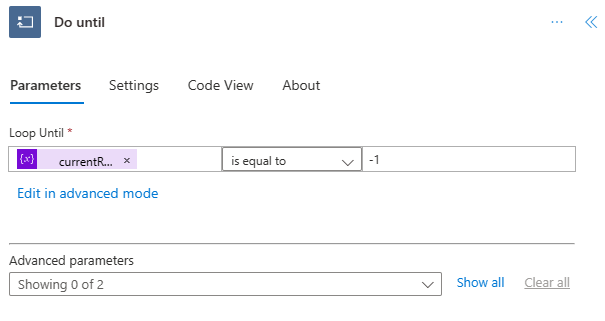
Add a Do until control. The flow will read chunks of the data until it has all been copied. You'll use the value of -1 to indicate the end of the data has been reached. Give the control the following values.
- Choose a value: currentRow (dynamic content)
- is equal to (from the dropdown list)
- Choose a value: -1
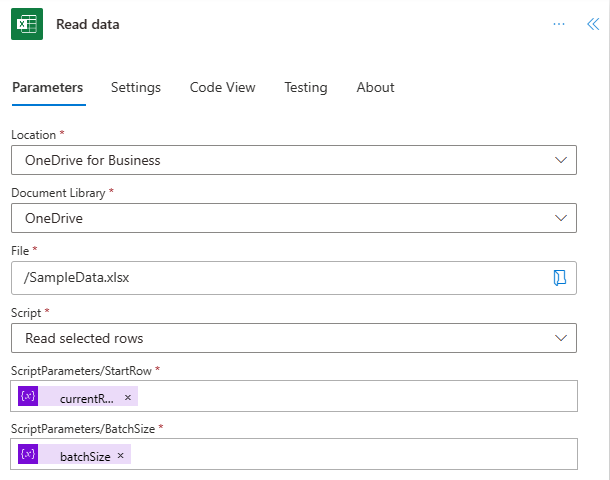
The remaining steps are added inside the Do control. Next, call the script to read the data. Add the Excel Online (Business) connector's Run script action. Rename it to Read data. Use the following values for the action.
- Location: OneDrive for Business
- Document Library: OneDrive
- File: "SampleData.xlsx" (as selected by the file picker)
- Script: Read selected rows
- startRow: currentRow (dynamic content)
- batchSize: batchSize (dynamic content)
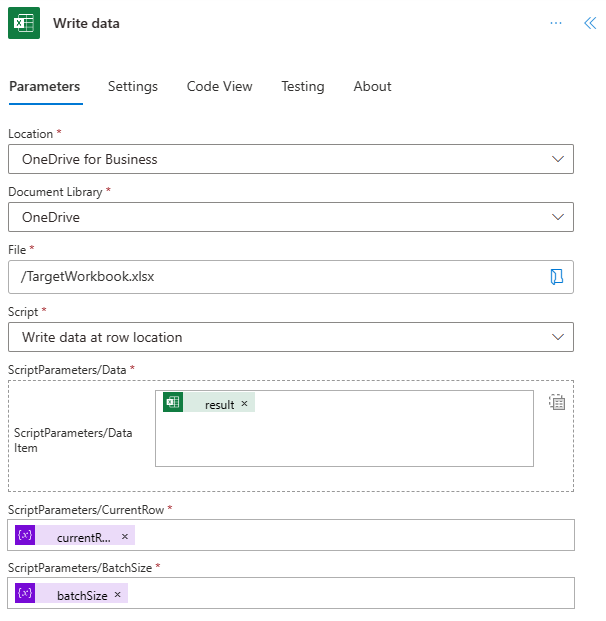
Call the script to write the data. Add a second Run script action. Rename it to Write data. Use the following values for the action.
- Location: OneDrive for Business
- Document Library: OneDrive
- File: "TargetWorkbook.xlsx" (as selected by the file picker)
- Script: Write data at row location
- data: result (dynamic content from Read data)
- Press Switch input to entire array first.
- startRow: currentRow (dynamic content)
- batchSize: batchSize (dynamic content)
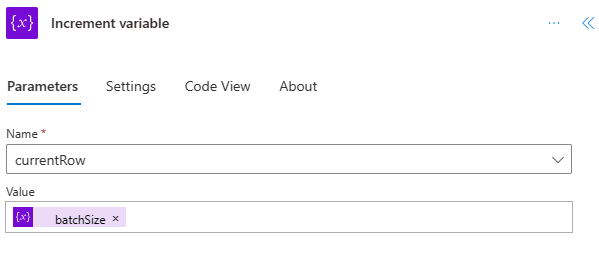
Update the current row to reflect that a batch of data has been read and written. Add an Increment variable action with the following values.
- Name: currentRow
- Value: batchSize (dynamic content)
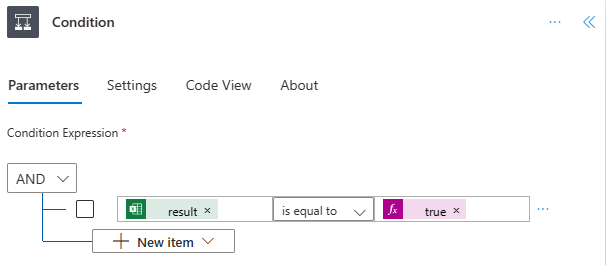
Add a Condition control to check if the scripts have read everything. The "Write data at row location" script returns true when it has written fewer rows than the batch size allows. This means it's at the end of the data set. Create the Condition control action with the following values.
- Choose a value: result (dynamic content from Write data)
- is equal to (from the dropdown list)
- Choose a value: true (expression)
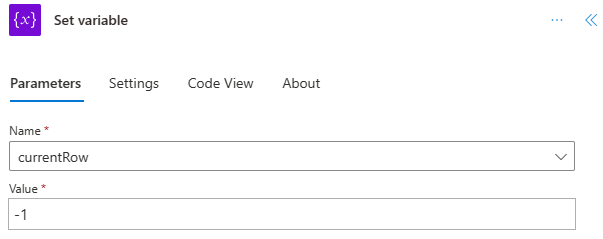
Under the True section of the Condition control, set the currentRow variable to be -1. Add a Set variable action with the following values.
- Name: currentRow
- Value: -1
Save the flow. The flow designer should look like the following image.
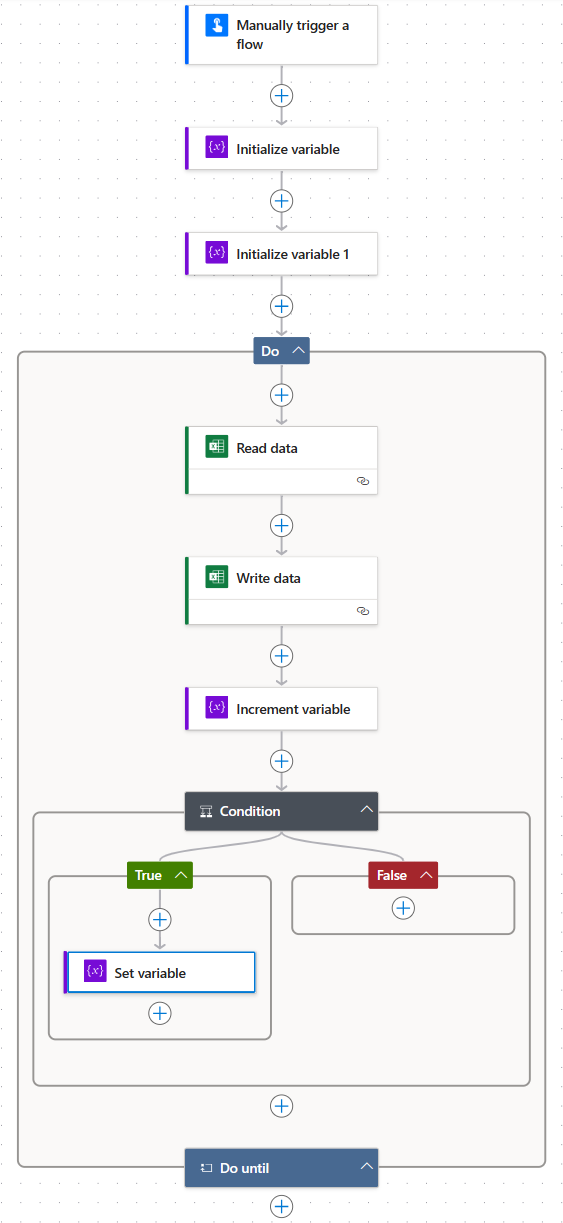
Use the Test button on the flow editor page or run the flow through your My flows tab. Be sure to allow access when prompted.
The "TargetWorkbook.xlsx" file should now have the data from "SampleData.xlsx".
Collaborate with us on GitHub
The source for this content can be found on GitHub, where you can also create and review issues and pull requests. For more information, see our contributor guide.
Office Scripts