Note
Access to this page requires authorization. You can try signing in or changing directories.
Access to this page requires authorization. You can try changing directories.
Original KB number: 981022
Symptoms
When you use Group Policy or the Office Customization Tool (OCT) to customize the Contact Card in Microsoft Outlook 2010, the Contact Card remains unchanged.
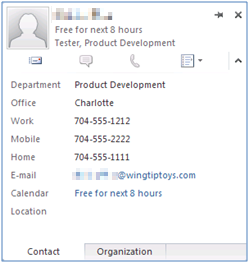
For example, you try to replace the Department field on the contact card with another attribute from the Active Directory Domain Services (AD DS). After you deploy this change, the Contact Card remains unchanged. All default fields remain displayed on the Contact Card. The default Contact Card fields are shown in the following figure.
This problem occurs for all settings that you configure under the Office 2010\Contact Card\Contact Tab node in the settings tree. The following figure shows these settings in the Office Customization Tool.
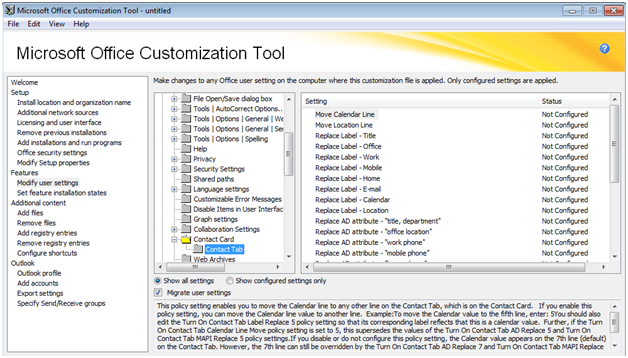
A similar tree structure for these settings is also shown in the Group Policy Management Console.
Cause
This issue occurs because the Group Policy and OCT template files do not contain the correct registry settings to customize the Contact Card settings under the Contact Tab section.
Workaround
Important
This section, method, or task contains steps that tell you how to modify the registry. However, serious problems might occur if you modify the registry incorrectly. Therefore, make sure that you follow these steps carefully. For added protection, back up the registry before you modify it. Then, you can restore the registry if a problem occurs. For more information about how to back up and restore the registry, see How to back up and restore the registry in Windows.
To work around this problem, use the following registry information to customize which fields are displayed on the Contact Card.
Key: HKEY_CURRENT_USER\Software\Policies\Microsoft\Office\14.0\Common\ContactCard
Note
The \Policies hive in the registry must be used.
String: TurnOnContactTabLabelReplace#
Value: Any text that you want to replace the default text that is displayed in the Contact Card.
DWORD: TurnOnContactTabMAPIReplace#
Value: The hexadecimal value that corresponds to the MAPI value of an attribute from AD DS. Please see Table 2 for allowed values.
Note
For these two registry values, use an integer between 1 and 8 for the placeholder #. Table 1 specifies the default item displayed on the Contact Card and the integer value to use in the registry if you want to replace this item with another attribute from AD DS.
Table 1: Contact Card default item line item integer values
| Default Item | Integer value |
|---|---|
| Department | 1 |
| Office | 2 |
| Work | 3 |
| Mobile | 4 |
| Home | 5 |
| 6 | |
| Calendar | 7 |
| Location | 8 |
Table 2: AD DS attributes and their corresponding MAPI values
| AD DS Attribute | MAPI value | Property Name in the Address Book | Comment |
|---|---|---|---|
| legacyExchangeDN | 3003001f | PR_EMAIL_ADDRESS | |
| info | 3004001f | PR_COMMENT | |
| 39fe001f | PR_SMTP_ADDRESS | ||
| displayNamePrintable | 39ff001f | PR_7BIT_DISPLAY_NAME | |
| mailNickname | 3a00001f | PR_ACCOUNT | |
| givenName | 3a06001f | PR_GIVEN_NAME | |
| telephoneNumber | 3a08001f | PR_BUSINESS_TELEPHONE_NUMBER | |
| homePhone | 3a09001f | PR_HOME_TELEPHONE_NUMBER | |
| Initials | 3a0a001f | PR_INITIALS | |
| cn | 3a0f001f | PR_MHS_COMMON_NAME | |
| sn | 3a11001f | PR_SURNAME | |
| company | 3a16001f | PR_COMPANY_NAME | |
| title | 3a17001f | PR_TITLE | |
| department | 3a18001f | PR_DEPARTMENT_NAME | |
| physicalDeliveryOfficeName | 3a19001f | PR_OFFICE_LOCATION | |
| Mobile | 3a1c001f | PR_CELLULAR_TELEPHONE_NUMBER | |
| displayName | 3a20001f | PR_TRANSMITABLE_DISPLAY_NAME | |
| pager | 3a21001f | PR_BEEPER_TELEPHONE_NUMBER | |
| facsimileTelephoneNumber | 3a23001f | PR_PRIMARY_FAX_NUMBER | |
| co | 3a26001f | PR_BUSINESS_ADDRESS_COUNTRY | |
| l | 3a27001f | PR_BUSINESS_ADDRESS_CITY | |
| st | 3a28001f | PR_BUSINESS_ADDRESS_STATE_OR_PROVINCE | |
| streetAddress | 3a29001f | PR_BUSINESS_ADDRESS_STREET | |
| postalCode | 3a2a001f | PR_BUSINESS_ADDRESS_POSTAL_CODE | |
| telephoneAssistant | 3a2e001f | PR_ASSISTANT_TELEPHONE_NUMBER | |
| msExchAssistantName | 3a30001f | PR_ASSISTANT | |
| homePostalAddress | 3a5d001f | PR_HOME_ADDRESS_STREET | |
| homeMTA | 8007001f | PR_EMS_AB_HOME_MTA | |
| C | 8069001f | PR_EMS_AB_COUNTRY_NAME | |
| street | 813a001f | PR_EMS_AB_STREET_ADDRESS | |
| employeeNumber | 8c67001f | PR_EMS_AB_EMPLOYEE_NUMBER | |
| personalPager | 8c68001f | PR_EMS_AB_TELEPHONE_PERSONAL_PAGER | |
| employeeType | 8c69001f | PR_EMS_AB_EMPLOYEE_TYPE | |
| personalTitle | 8c6b001f | PR_EMS_AB_PERSONAL_TITLE |
Important
The AD DS Attributes names are case sensitive.
Note
The following table lists AD DS attributes that cannot be customized in the Contact Card displayed in Outlook.
| AD DS Attribute | MAPI value | Property Name in the Address Book |
|---|---|---|
| displayName | 3001001e | PR_DISPLAY_NAME |
| comment | 3004001e | PR_COMMENT |
| otherTelephone | 3a1b101f | PR_BUSINESS2_TELEPHONE_NUMBER |
| postOfficeBox | 3a2b101f | PR_BUSINESS_ADDRESS_POST_OFFICE_BOX |
| otherHomePhone | 3a2f101f | PR_HOME2_TELEPHONE_NUMBER |
| manager | Does not exist in the Address Book | |
| description | 806f101f | PR_EMS_AB_DESCRIPTION |
| postalAddress | 810c101f | PR_EMS_AB_POSTAL_ADDRESS |
Note
The MAPI values that you can use for the TurnOnContactTabMAPIReplace# value are listed in the Property Tag column of the table shown in the following article:
Not every attribute that is listed in this MSDN article is available for customization in the Contact Card.
How to rearrange the Location and Calendar fields
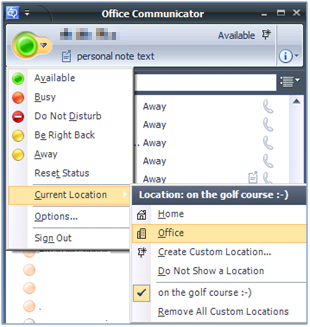
The Location and Calendar fields in the Contact Card differ from the other fields in the Contact Card. These two fields do not pull data from MAPI properties. The data for the Calendar field is retrieved from your current free/busy data, and the data for the Location field is retrieved from the Location setting in Office Communicator, as shown in the following figure:
Note
Microsoft Office Communicator must be running for the data to appear next to the Location field in the Contact Card.
The following registry information is used to move the Calendar and Location fields in the Contact Card from their default locations.
Key: HKEY_CURRENT_USER\Software\Policies\Microsoft\Office\14.0\Common\ContactCard
DWORD: TurnOnContactTabCalendarLineMove
Value: An integer value between 1 and 8
DWORD: TurnOnContactTabLocationLineMove
Value: An integer value between 1 and 8
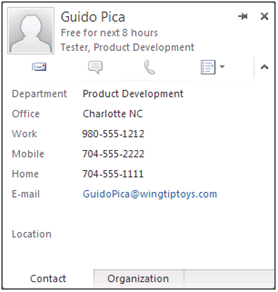
How to leave a blank line in the Contact Card
If you want to leave a blank line in the Contact Card lines, specify the registry settings as follows:
String: TurnOnContactTabLabelReplace#
Value: Leave this field blank
DWORD: TurnOnContactTabMAPIReplace#
Value: 0
Note
For these two registry values, use an integer between 1 and 8 instead of the placeholder #.
This method is demonstrated in the following figure in which the Calendar line in the Contact Card is left blank.
Workaround Example
The following example registry settings make several customizations to the default Contact Card:
Key: HKEY_CURRENT_USER\Software\Policies\Microsoft\Office\14.0\Common\ContactCard
String: TurnOnContactTabLabelReplace4
Value: Alias
DWORD: TurnOnContactTabMAPIReplace4
Value: 3a00001f
String: TurnOnContactTabLabelReplace5
Value: E-mail
DWORD: TurnOnContactTabMAPIReplace5
Value: 39fe001f
String: TurnOnContactTabLabelReplace6
Value: Free/Busy
DWORD: TurnOnContactTabCalendarLineMove
Value: 6
DWORD: TurnOnContactTabLocationLineMove
Value: 7
String: TurnOnContactTabLabelReplace7
Value: IM Location
DWORD: TurnOnContactTabLabelReplace8
Value: Leave this value blank
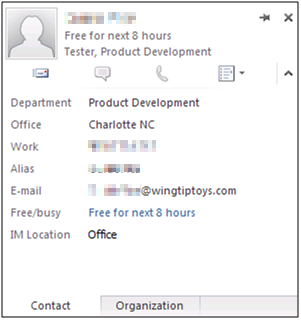
With the changes that were made, the Contact Card shows the following customizations:
- The Mobile label in line 4 is replaced by the Alias label.
- The user's
mailNicknameattribute is displayed in line 4. - The E-mail label is moved to line 5, which replaces the default Home label.
- The user's mail attribute is displayed in line 5.
- The Calendar label is replaced by the Free/busy label and the label is located in line 6.
- The free/busy information is moved to line 6.
- The Location label is replaced by the IM Location label and the label is located in line 7.
- Line 8 is replaced by a blank line.
The following figure shows these customizations:
More information
The Contact Card is also available in other Microsoft Office programs, such as Word, Excel, PowerPoint and SharePoint. To customize the Contact Card entries when you use Office programs other than Outlook, use the following registry value instead of the TurnOnContactTabADReplace# value.
String: TurnOnContactTabADReplace#
Value: An AD DS attribute. Please see the AD DS Attribute column in Table 2 for allowed values. Replace the # with an integer between 1 and 8, based on the values that are listed in Table 1 .
The main differences between Outlook and the other Office programs are as follows:
- Outlook must use a MAPI property and the registry value is a DWORD.
- Other Office programs must use an AD DS attribute and the registry value is a String.
Important
The AD DS Attributes names are case sensitive.
How to display the Contact Card in Office programs other than Outlook
The steps to display the Contact Card in Office programs other than Outlook vary from program to program.
Microsoft Word 2010
To display the Contact Card in Microsoft Word, follow these steps:
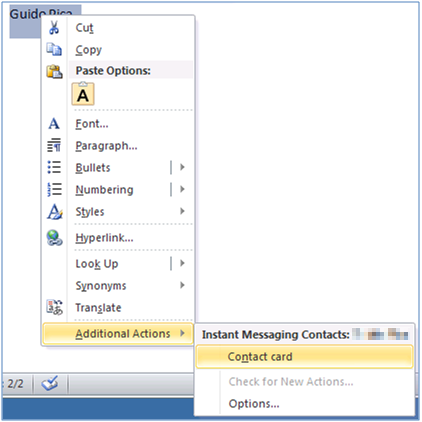
Select the user's name in your Word document.
Right-click the user's name, point to Additional Actions and then select Contact Card (Screenshot for this step is listed below).
The Contact Card can be displayed from the Info section of the Backstage. To display a Contact Card by using Word, follow these steps:
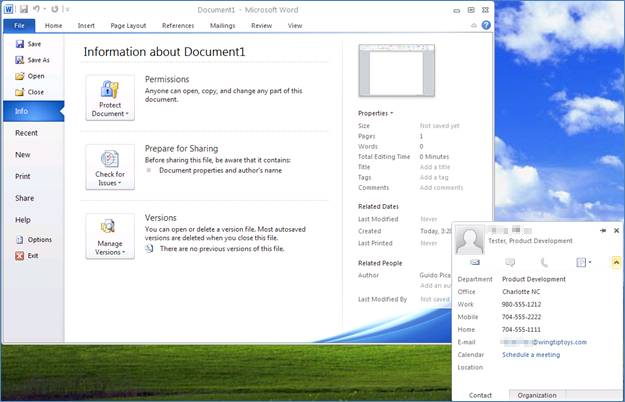
On the File tab, click Info.
In the right-pane, rest the pointer over a name under Related People (Screenshot for this step is listed below).
The Contact Card is displayed after a brief pause.
Microsoft Excel 2010
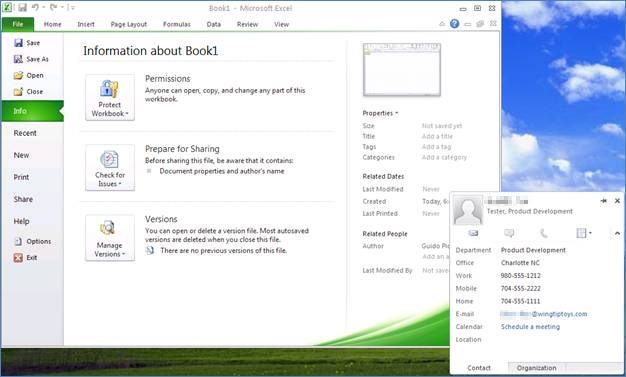
The Contact Card can be displayed from the Info section of the Backstage. To display a Contact Card by using Excel, follow these steps:
On the File tab, select Info.
In the right-pane, rest the pointer over a name under Related People (Screenshot for this step is listed below).
The Contact Card is displayed after a brief pause.
Microsoft PowerPoint 2010
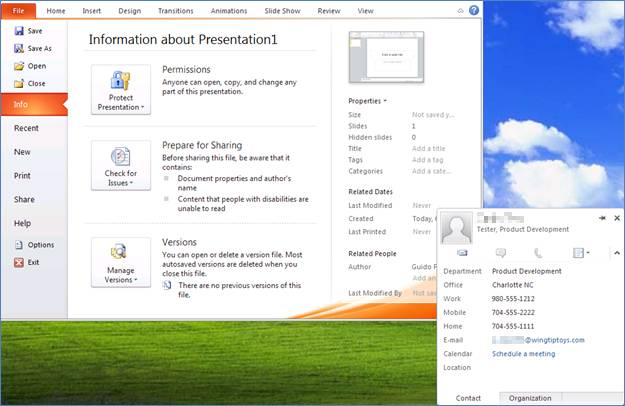
The Contact Card can be displayed from the Info section of the Backstage. To display a Contact Card by using PowerPoint, follow these steps:
On the File tab, select Info.
In the right-pane, rest the pointer over a name under Related People (Screenshot for this step is listed below).
The Contact Card is displayed after a brief pause.
SharePoint Workspace 2010
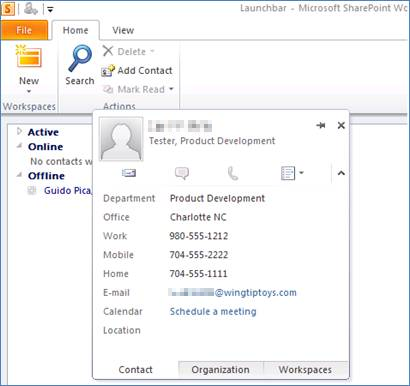
To display a Contact Card by using SharePoint Workspace, follow these steps:
On the Home tab of the Ribbon, select Contacts.
Rest the pointer over a contact (Screenshot for this step is listed below).
The Contact Card is displayed after a brief pause.
SharePoint Server 2010
To display a Contact Card on a SharePoint site, follow these steps:
Select the profile page for the contact.
Rest the pointer over the Presence icon (Screenshots for this step is listed below).
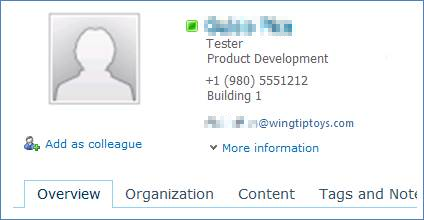
The Contact Card is displayed after a brief pause.
