Respond to security events with the Security Alerts dashboard
Appropriate roles: Admin agent
Applies to: Partner Center Direct Bill and Indirect Providers
The Partner Center Security Alerts dashboard helps partners respond quickly to security, fraud, and other events occurring in their Partner Center or their customer's tenant.
API
For partners that have multiple Partner Center Microsoft Entra tenants, you can use the following APIs to get and update alerts instead of using the Alerts dashboard:
Prerequisites
To use the Partner Center Security Alerts dashboard, your user account must be assigned the Admin agent role.
The importance of timely response to alerts
When an alert is created in your dashboard, it's critical that you triage and mitigate the incident that caused the alert as soon as possible. As a guiding principle, We recommend responding to alerts within one hour. For Fraud type alerts, the longer it takes you to respond to and mitigate the incident that caused the alert, the more financial impact could potentially be accrued.
Navigating to the Alerts Dashboard
To access the Partner Center Security Alerts dashboard:
- Log into Partner Center with a user with the Admin agent role.
- Select the Insights workspace.
- On the left navigational menu, under Security, select Alerts.
Viewing alerts
The Alerts page shows the following:
- New alerts this week – Number of new alerts for the last seven days.
- Resolved – Number of alerts that are resolved with a reason specified (For example, Legitimate or Fraud).
- Active & In progress – Number of unresolved alerts that need attention.

The lower section of the alert page lists alerts that affect the Partner Center tenant that you're logged into.
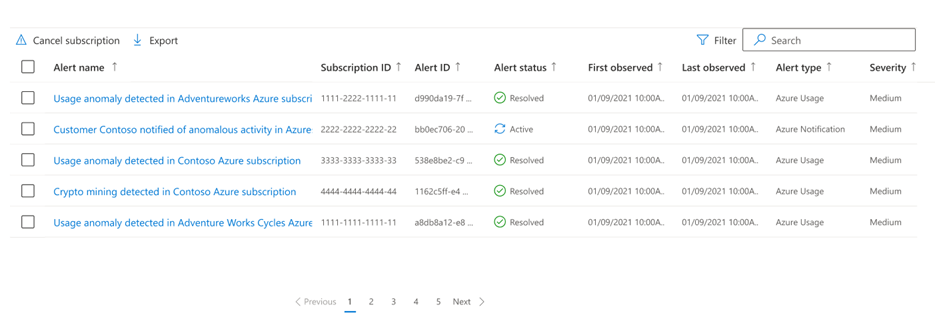
- Alert name – This name shows high level information about what was detected.
- Subscription ID – This identifier is shown when an alert is detected in a specific Azure subscription.
- Alert ID – The unique identifier for the alert.
- Alert status – The status of the alert (Active or Resolved).
- First observed – The first time the alert was displayed.
- Last observed – The most recent time the alert was displayed.
- Alert type – The type of activity that was detected and caused the alert. There are two alert types:
- Azure Notifications – This alert indicates a message was sent to the customer of the affected Azure subscription and displayed as a Service Health notification. A copy of this message is shown in the alert details.
- Azure Usage – This alert indicates either an unusual increase in activity in the Azure subscription or an anomalous activity occurring in the subscription, for example, crypto currency mining.
- Severity – Indicates the level of urgency that should be taken when responding to the alert.
The Filter option allows you to change what alerts are displayed on the Alert page.
Search allows you to search all alerts for the information you enter in the search field, and opens the Alert page. The following fields are searched:
- Subscription ID
- Alert ID
- Customer name
Actions on the Alert detail page
Example of the Alert detail page:
To see more details about an alert, select the alert name. For example, the following example alert shows behavior relating to crypto currency mining occurring in an Azure subscription.

At the top of the Alert detail page, the customer information and reseller (if applicable) is displayed.
The Alert description provides an overview of why the alert occurred along with steps to investigate.
The Impacted resources section shows the following information:
Resource information – Detail about the resources that were involved in the detection that caused the alert. In this example, there's a virtual machine named "badvmtest" in the resource group "testserver". The First connection time and Last connection time indicate when we first detected this resource contacting a known mining pool, and the most recent time it was observed.
Additional information – If details are available about the behavior exhibited by the resource, they're shown here. In this example, the virtual machine "badvmtest" communicated with the IP address of a known mining pool. The Resource information section shows it connected to the IP address four times between the First connection time and Last connection time.
Action bar – When you complete your investigation into the alert, select an action to tell Partner Center what you discovered. Selecting an action marks the alert Resolved. The action you select indicates the Reason you're resolving the alert. The options provided are:
- Mark as legitimate – You investigated the resources and either found no evidence of what the alert indicated or upon checking with the customer, they indicate the behavior is expected.
- Mark as fraud – You investigated the resources and found they were performing the behavior that is indicated by the alert.
Resources – Use the links in this section of the alert to learn more about alerts and what to do when you receive an alert.

Resources – Learn more about alerts and what to do when you receive an alert.

Select an alert to open the Alert detail page.
Actions on the Alert Detail page
Example of the Alert detail page:

The example Alert Detail page shows three actions that you can take.
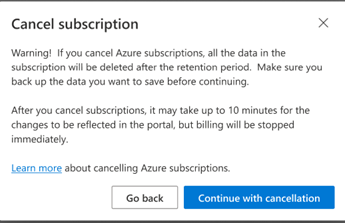
Cancel subscription – You must have both Global Administrator and Admin Agent roles to use this action. If your investigation into the alert indicates that the Azure subscription is overtaken by an unauthorized party, you can select Cancel subscription to deallocate all resources in the Azure subscription and mark all the data in the subscription for deletion after the retention period. Before taking this action, we recommend communicating with your customer about the alert and if possible, get their consent to cancel the subscription. When you select this button, you see the following confirmation page to ensure you understand the impact of this action. Select Continue with cancellation to cancel the Azure subscription. When you select Continue with cancellation, the subscription is canceled and all alerts for that subscription are marked Resolved with the reason Fraud.
For more information, see Cancel an Azure subscription.
Manage subscription – The Manage subscription action takes you into the Azure Management portal using Admin on Behalf of. Based on the level of access granted to you by the customer, you might be able to further investigate the resources indicated in the Alert Detail. For more information, see Manage subscriptions and resources under the Azure plan.
Back to alerts – Returns you to the main Alert Dashboard page with the list of alerts.
Actions on the Alert page
Above the alert list on the Alert page are two actions you can take.
Cancel subscription – You must have both Global Administrator and Admin Agent roles to use this action. If your investigation into the alert indicates that the Azure subscription is overtaken by an unauthorized party, you can select Cancel subscription to deallocate all resources in the Azure subscription and mark all the data in the subscription for deletion after the retention period. Before taking this action, we recommend communicating with your customer about the alert and if possible, get their consent to cancel the subscription. After you select this button, you see the following confirmation page to help ensure you understand the impact of this action. Select Continue with cancellation to cancel the Azure subscription.
Export – If you wish to export all the detailed information about the alerts, you can use the Export action to download a CSV (comma separated value) file containing the alert information. Note: Export produces a CSV file with only the alerts currently being viewed. Adjust the Filter option to display the alert you want to export.
Next steps
Feedback
Coming soon: Throughout 2024 we will be phasing out GitHub Issues as the feedback mechanism for content and replacing it with a new feedback system. For more information see: https://aka.ms/ContentUserFeedback.
Submit and view feedback for