Note
Access to this page requires authorization. You can try signing in or changing directories.
Access to this page requires authorization. You can try changing directories.
You can use many API client tools to authenticate to Microsoft Dataverse environments and compose and send Web API requests. These tools make it easier to learn, test, and perform ad-hoc queries by using the Dataverse Web API.
This article has two goals:
- Demonstrate a strategy to authenticate and connect to Dataverse by using the Insomnia API client with a Microsoft Entra application (client) ID provided by Microsoft that's pre-approved for all Dataverse environments. By using this strategy, you don't need to register an application to get started using the Dataverse Web API.
- Introduce you to some basic data operations you can perform by using the Dataverse Web API in the context of the Insomnia API client. By using this approach, you can use Insomnia to continue to experiment and learn about the Dataverse Web API.
Note
The instructions in this article represent the experience provided by Insomnia when this article was written. The user experience probably changes over time and this article might not represent the current experience. The article updates only when changes occur that fundamentally break the steps described here. Learn more in the Insomnia documentation.
Privacy
Requests you send by using client API tools contain information that could be sensitive. Many developers don't want to upload this information to a cloud service.
The Insomnia local Scratch Pad doesn't require that you create an account and doesn't store information about requests you send. The instructions provided here describe how to use Insomnia local Scratch Pad only. You can choose to create an account and use all the Insomnia features if you wish. If you want a version that has no options to create an account and is focused on privacy, see Insomnium.
Other options
You can also use PowerShell with Visual Studio Code to authenticate with Dataverse Web API as an alternative. Get started using Web API with PowerShell and Visual Studio Code.
PowerShell with Visual Studio Code:
- Uses the Azure AD app registration so you don't need to provide an application (client) ID.
- Doesn't send any information about your requests anywhere.
- Is the starting point for a comprehensive series of Web API samples you can run.
Install Insomnia
See the Insomnia documentation for steps to install Insomnia. The instructions differ for macOS, Windows, and Linux.
For Windows, the installer is an executable file that you download and run. When the installation finishes, you might see different options. These options shouldn't interfere with the instructions in this article, but they might change. When this article was written, the installer presents these options:
For the option to enable features to sync data with the cloud, choose Keep storing locally in Local Vault.
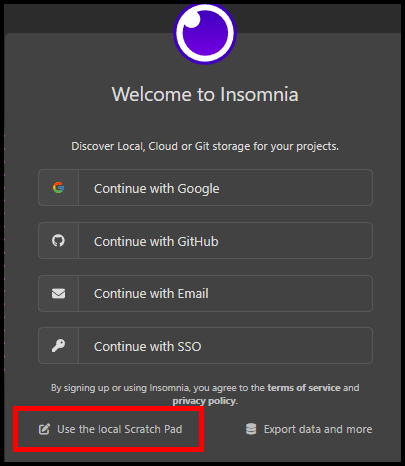
For the option to create an account, choose Use the local Scratch Pad. Learn more about Insomnia Scratch Pad.
Configure the base environment
Use Insomnia environments to store environment variables. Environment variables are a JSON object containing key-value pairs of data that you can reference for many purposes.
You assign the base environment to every workspace. You can access the variables within it throughout the workspace.
After you open Insomnia, select the gear icon
 next to the base environment to open the Manage Environments dialog. Or use the Ctrl + E keyboard shortcut.
Copy the following JSON:
{
   "url": "https://yourorg.api.crm.dynamics.com",
   "version": "9.2",
   "webapiurl": "{{ _.url }}/api/data/v{{ _.version }}/",
   "redirecturl": "https://localhost",
   "authurl": "https://login.microsoftonline.com/common/oauth2/authorize?resource={{ _.url }}",
   "clientid": "51f81489-12ee-4a9e-aaae-a2591f45987d"
}
Paste the JSON into the base environment.
Edit the
urlproperty value and replace thehttps://yourorg.api.crm.dynamics.comvalue to match the URL for your Dataverse environment.You can find the Web API endpoint for your environment by using the instructions in View developer resources. Remove
/api/data/v9.2from the Web API endpoint URL. This URL must end indynamics.com.You might see warnings that the references to the
_.urland_.versionvariables don't resolve immediately, such as the following warning: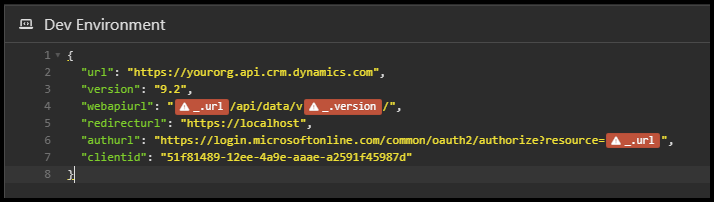
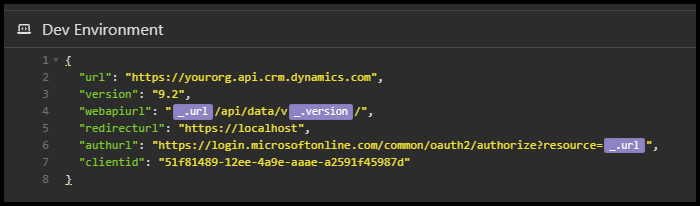
However, after you close the window and reopen it, you can see that the variables are now known and resolved.
Create sub-environments (optional)
If you only ever need to connect to a single Dataverse environment, use the base environment. If you need to connect to multiple environments, create sub-environments for each Dataverse environment. For example, create a sub-environment for your development and test Dataverse environments.
As you did with the base environment, select the gear icon
next to the base environment to open the Manage Environments dialog. Or use the Ctrl + E keyboard shortcut.Select the
 icon to create a new environment. Environments can be shared or private. Choose Private environment.
Double-click the name of the New Environment you created and rename it as you like. You can give it the name of the Dataverse environment you want to connect to, or something like Dev environment.
Copy the following JSON:
{
   "url": "https://yourdevorg.api.crm.dynamics.com"
}
Paste the JSON into the environment you created.
Edit the
urlproperty value to represent the Web API endpoint for your other environment, just as you did for the base environment.Note
You only need to include the
urlproperty in the sub-environment. When you select the sub-environment, this value overrides theurlvalue specified in the base environment. You can also include any of the five other properties if you wish, but theurlproperty value is the only one that is different for each Dataverse environment.
Configure requests
After you configure your base environment and any sub-environments, you're ready to configure a request.
Select the New HTTP Request button, or use the Ctrl+N keyboard shortcut.
After the HTTP method, which is
GETby default, type_.and wait a moment. Insomnia shows a list of available variables to choose from: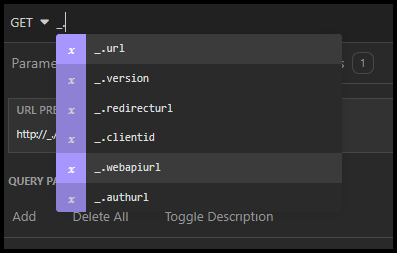
Choose the
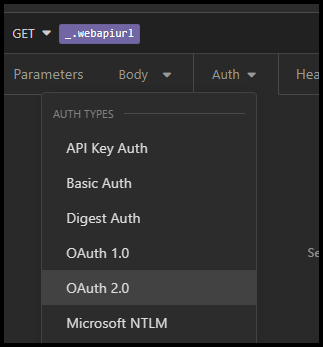
_.webapiurlvariable. The URL PREVIEW field shows the value using theurlproperty value for your selected environment.In the Auth tab, use the drop-down to select OAuth 2.0 AUTH TYPE.
Edit the authentication configuration as shown in the following table, using the environment variables you created:
Field Value GRANT TYPE Implicit AUTHORIZATION URL _.authurlCLIENT ID _.clientidREDIRECT URL _.redirecturlSelect Send.
A dialog opens to enter the credentials for the environment.
After you enter your credentials, you see results in the Preview pane that look something like this:
{
"@odata.context": "https://yourorg.api.crm.dynamics.com/api/data/v9.2/$metadata",
"value": [
   {
      "name": "aadusers",
      "kind": "EntitySet",
      "url": "aadusers"
   },
   {
      "name": "accounts",
      "kind": "EntitySet",
      "url": "accounts"
   },
   {
      "name": "aciviewmappers",
      "kind": "EntitySet",
      "url": "aciviewmappers"
   },
   {
      "name": "actioncards",
      "kind": "EntitySet",
      "url": "actioncards"
   },
   ...
This result is the Web API service document. You view the service document by sending a GET request to the root of the Web API service url. It lists the entity set names for all the tables in your Dataverse environment. When you can see the service document, you successfully authenticated to your Dataverse environment.
Tip
This is a convenient way to find or verify the entity set name for a table you are working with.
View the CSDL $metadata document
The Common Schema Definition Language (CSDL) $metadata document is the source of truth for everything related to Web API. Reference it frequently.
Edit the URL by appending
$metadata?annotations=trueafter the_.webapiurlvariable. The URL should be:GET _.webapiurl$metadata?annotations=trueSelect Send.
In the Preview pane, you see a message saying Response over 5MB hidden for performance reasons, with the options to Save To File and Show Anyway. The file is large, but you can preview it without problems.
Find definitions of types
The CSDL $metadata document is large. The Insomnia preview provides a response filtering tool at the bottom. Use XPath queries to filter the response and find what you need. The following table shows some examples:
| Find | XPath query |
|---|---|
| All entity types | //*[local-name() = 'EntityType'] |
| The account EntityType | //*[local-name() = 'EntityType'][@Name = 'account'] |
| All functions | //*[local-name() = 'Function'] |
| The WhoAmI function | //*[local-name() = 'Function'][@Name = 'WhoAmI'] |
| All actions | //*[local-name() = 'Action'] |
| The CreateMultiple action | //*[local-name() = 'Action'][@Name = 'CreateMultiple'] |
| All complex types | //*[local-name() = 'ComplexType'] |
| The WhoAmIResponse complex type | //*[local-name() = 'ComplexType'][@Name = 'WhoAmIResponse'] |
| All enum types | //*[local-name() = 'EnumType'] |
| The AccessRights enum type | //*[local-name() = 'EnumType'][@Name = 'AccessRights'] |
Learn more about the types defined in the CSDL $metadata document.
Send a WhoAmI request
Now that you're authenticated, modify your request to invoke the WhoAmI function. Because WhoAmI is a function, use a GET method. This function has no parameters, so it's easy to use. Learn more about using Web API Functions.
Edit the URL by appending
WhoAmIafter the_.webapiurlvariable. The URL should be:GET _.webapiurl WhoAmISet request headers.
As described in HTTP headers, each Web API request should have a specific set of request headers. You might need to modify header values for different behaviors.
In the Headers tab, select the Add button to enter each of the following common headers:
Header Value Acceptapplication/jsonOData-MaxVersion4.0OData-Version4.0If-None-MatchnullPreferodata.include-annotations="*"These headers don't change the behavior of the WhoAmI function, but it's good to start adding them at the beginning.
Select Send.
In the Preview pane, you see data corresponding to the WhoAmIResponse complex type.
{
   "@odata.context": "https://yourorg.api.crm.dynamics.com/api/data/v9.2/$metadata#Microsoft.Dynamics.CRM.WhoAmIResponse",
   "BusinessUnitId": "11bb11bb-cc22-dd33-ee44-55ff55ff55ff",
   "UserId": "22cc22cc-dd33-ee44-ff55-66aa66aa66aa",
   "OrganizationId": "00aa00aa-bb11-cc22-dd33-44ee44ee44ee"
}
Retrieve data
To use Insomnia to retrieve records, set the entity set name for the resource.
Change the URL to remove
WhoAmIafter the_.webapiurlvariable. Replace it withaccounts, the entity set name for the account entity type. The URL should be:GET _.webapiurl accountsIn the Parameters tab, set the parameters for your query.
You can add parameters individually by selecting the Add button. But you can also select the Bulk Edit option, which you might find easier.
- Select the Bulk Edit option.
- Copy the following parameters:
$top: 3
$select: name,revenue,address1_city
$expand: primarycontactid($select=fullname)
$filter: address1_city eq 'Redmond'
This query returns selected columns from the top three account records located in the city of Redmond. It also includes information about any related contact specified as the primary contact for the accounts.
Paste the values in the QUERY PARAMETERS field.
Your query should look like this:
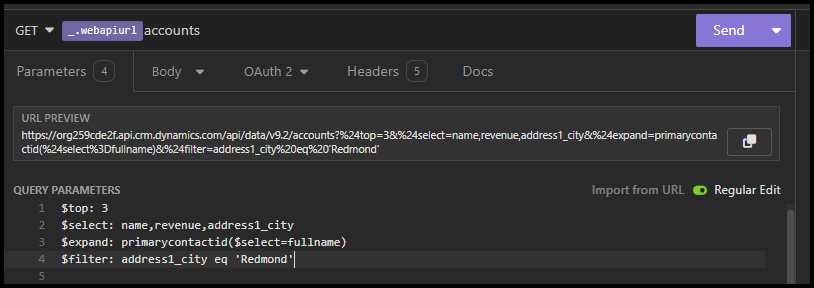
Select Send.
In the Preview pane, you see results like the following:
{
"@odata.context": "https://yourorg.api.crm.dynamics.com/api/data/v9.2/$metadata#accounts(name,revenue,address1_city,primarycontactid(fullname))",
"@Microsoft.Dynamics.CRM.totalrecordcount": -1,
"@Microsoft.Dynamics.CRM.totalrecordcountlimitexceeded": false,
"@Microsoft.Dynamics.CRM.globalmetadataversion": "2341840",
"value": [
   {
      "@odata.etag": "W/\"2343103\"",
      "name": "City Power & Light (sample)",
      "revenue@OData.Community.Display.V1.FormattedValue": "$100,000.00",
      "revenue": 100000.0,
      "address1_city": "Redmond",
      "accountid": "01eaf28f-81e1-ee11-904d-000d3a3517c4",
      "_transactioncurrencyid_value@OData.Community.Display.V1.FormattedValue": "US Dollar",
      "_transactioncurrencyid_value@Microsoft.Dynamics.CRM.associatednavigationproperty": "transactioncurrencyid",
      "_transactioncurrencyid_value@Microsoft.Dynamics.CRM.lookuplogicalname": "transactioncurrency",
      "_transactioncurrencyid_value": "57f82f38-09c8-ee11-907a-00224803d046",
      "address1_composite": "Redmond",
      "primarycontactid": {
      "fullname": "Scott Konersmann (sample)",
      "contactid": "15eaf28f-81e1-ee11-904d-000d3a3517c4"
      }
   },
   {
      "@odata.etag": "W/\"2343104\"",
      "name": "Contoso Pharmaceuticals (sample)",
      "revenue@OData.Community.Display.V1.FormattedValue": "$60,000.00",
      "revenue": 60000.0,
      "address1_city": "Redmond",
      "accountid": "03eaf28f-81e1-ee11-904d-000d3a3517c4",
      "_transactioncurrencyid_value@OData.Community.Display.V1.FormattedValue": "US Dollar",
      "_transactioncurrencyid_value@Microsoft.Dynamics.CRM.associatednavigationproperty": "transactioncurrencyid",
      "_transactioncurrencyid_value@Microsoft.Dynamics.CRM.lookuplogicalname": "transactioncurrency",
      "_transactioncurrencyid_value": "57f82f38-09c8-ee11-907a-00224803d046",
      "address1_composite": "Redmond",
      "primarycontactid": {
      "fullname": "Robert Lyon (sample)",
      "contactid": "17eaf28f-81e1-ee11-904d-000d3a3517c4"
      }
   },
   {
      "@odata.etag": "W/\"2343106\"",
      "name": "A. Datum Corporation (sample)",
      "revenue@OData.Community.Display.V1.FormattedValue": "$10,000.00",
      "revenue": 10000.0,
      "address1_city": "Redmond",
      "accountid": "07eaf28f-81e1-ee11-904d-000d3a3517c4",
      "_transactioncurrencyid_value@OData.Community.Display.V1.FormattedValue": "US Dollar",
      "_transactioncurrencyid_value@Microsoft.Dynamics.CRM.associatednavigationproperty": "transactioncurrencyid",
      "_transactioncurrencyid_value@Microsoft.Dynamics.CRM.lookuplogicalname": "transactioncurrency",
      "_transactioncurrencyid_value": "57f82f38-09c8-ee11-907a-00224803d046",
      "address1_composite": "Redmond",
      "primarycontactid": {
      "fullname": "Rene Valdes (sample)",
      "contactid": "1beaf28f-81e1-ee11-904d-000d3a3517c4"
      }
   }
]
}
Note
These results include many annotation values such as
@OData.Community.Display.V1.FormattedValuebecause thePrefer: odata.include-annotations="*"request header set in Send a WhoAmI request is set to return all annotations. Learn how to request specific annotations.
Learn more about how to query data.
Create a record
By using Insomnia, you can define multiple requests that you can reuse. An easy way to create a new request that keeps any configurations you have is to duplicate an existing request. In this step, duplicate the request defined in the Retrieve data section and create a new request to create a record.
The request you created in Retrieve data has the default name New Request, unless you changed it. Rename the request Retrieve Accounts.
When you hover over the Retrieve Accounts request, select the drop-down menu and select Duplicate.
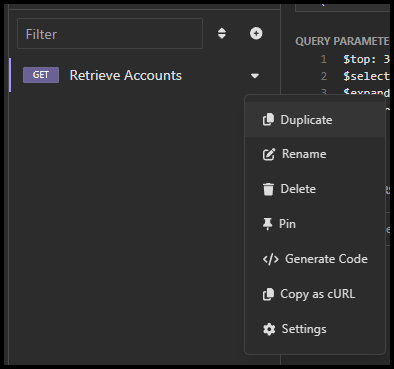
In the Duplicate Request dialog, set the New Name to Create Account.
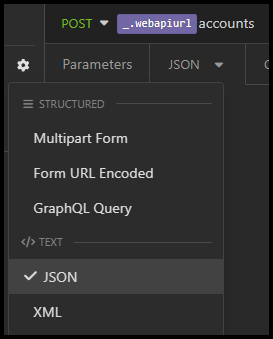
In the new Create Account request, change the HTTP method from
GETtoPOST. The URL is already set to use theaccountsentity set name, so you don't need to change anything else here. The URL should be:POST _.webapiurl accountsIn the Parameters tab, delete all the parameters because they aren't used for the create operation.
In the Body tab, use the drop-down to select JSON from the TEXT group:
Copy the following JSON:
{
   "name": "An Example Account record (sample)",
   "revenue": 10000.0,
   "address1_city": "Redmond"
}
Paste the JSON in the Body field.
Note
Before you select Send to create the record, look at the data in the Auth and Headers tabs. Because you created this request by duplicating the Retrieve Accounts request, you re-use all the information you previously configured.
Select Send to create the record.
You see that the service returned 204 No Content, so there's no content to see in the Preview pane.
The URL to the created record is visible in the Headers list. Look for the
odata-entityidresponse header. The value should look something like this:https://yourorg.api.crm.dynamics.com/api/data/v9.2/accounts(5b4ced1c-88e1-ee11-904c-6045bd05e9d4)This URL contains the primary key field value for the created record, in this case the
accountidproperty value.
Learn more about creating records
Retrieve a record
After you create an account record and get the primary key field value, use that value to retrieve the record. Start by duplicating the Retrieve Accounts request.
Duplicate the Retrieve Accounts request.
Name it Retrieve account.
Edit the URL to append the
accountidvalue in parentheses after the entity set name. If theaccountidof the account you created in Create a record was5b4ced1c-88e1-ee11-904c-6045bd05e9d4, edit the URL to be:GET _.webapiurl accounts(5b4ced1c-88e1-ee11-904c-6045bd05e9d4)In the Parameters tab, remove the
$top,$expand, and$filterparameters, leaving only the$selectparameter to limit the number of columns returned.In the Headers tab, select the checkbox next to the
Preferheader to disable it so that no annotations are returned.Select Send.
The response returns 200 OK, and the Preview pane contains data like the following:
{
   "@odata.context": "https://yourorg.api.crm.dynamics.com/api/data/v9.2/$metadata#accounts(name,revenue,address1_city)/$entity",
   "@odata.etag": "W/\"2343128\"",
   "name": "An Example Account record (sample)",
   "revenue": 10000.0000000000,
   "address1_city": "Redmond",
   "accountid": "5b4ced1c-88e1-ee11-904c-6045bd05e9d4",
   "_transactioncurrencyid_value": "57f82f38-09c8-ee11-907a-00224803d046",
   "address1_composite": "Redmond"
}
Learn more about retrieving records
Delete a record
After you create and retrieve a record by using the primary key value, you can delete it.
Duplicate the Retrieve account request. Name the new request Delete account.
Change the HTTP method from
GETtoDELETE.The URL should still contain the data with the
accountidof the record you created and retrieved before:DELETE _.webapiurl accounts(5b4ced1c-88e1-ee11-904c-6045bd05e9d4)In the Parameters tab, remove the
$selectparameter because it's meaningless for a delete operation.Select Send.
You see that the service returned 204 No Content, so there's no content to see in the Preview pane.
Try sending the Retrieve account request now. It returns 404 Not Found and the Preview pane shows this error:
{
   "error": {
      "code": "0x80040217",
      "message": "Entity 'account' With Id = 5b4ced1c-88e1-ee11-904c-6045bd05e9d4 Does Not Exist"
   }
}
Re-enable the
Preferheader for the Retrieve account request so that all annotations are returned.Send the request again. You can now see many annotations are returned with the 404 Not Found response:
{
   "error": {
      "code": "0x80040217",
      "message": "Entity 'account' With Id = 5b4ced1c-88e1-ee11-904c-6045bd05e9d4 Does Not Exist",
      "@Microsoft.PowerApps.CDS.ErrorDetails.ApiExceptionSourceKey": "Plugin/Microsoft.Crm.Common.ObjectModel.AccountService",
      "@Microsoft.PowerApps.CDS.ErrorDetails.ApiStepKey": "81cbbb1b-ea3e-db11-86a7-000a3a5473e8",
      "@Microsoft.PowerApps.CDS.ErrorDetails.ApiDepthKey": "1",
      "@Microsoft.PowerApps.CDS.ErrorDetails.ApiActivityIdKey": "ef7da2d8-c3bc-40f3-b67f-9d2981341086",
      "@Microsoft.PowerApps.CDS.ErrorDetails.ApiPluginSolutionNameKey": "System",
      "@Microsoft.PowerApps.CDS.ErrorDetails.ApiStepSolutionNameKey": "System",
      "@Microsoft.PowerApps.CDS.ErrorDetails.ApiExceptionCategory": "ClientError",
      "@Microsoft.PowerApps.CDS.ErrorDetails.ApiExceptionMessageName": "ObjectDoesNotExist",
      "@Microsoft.PowerApps.CDS.ErrorDetails.ApiExceptionHttpStatusCode": "404",
      "@Microsoft.PowerApps.CDS.HelpLink": "http://go.microsoft.com/fwlink/?LinkID=398563&error=Microsoft.Crm.CrmException%3a80040217&client=platform",
      "@Microsoft.PowerApps.CDS.InnerError.Message": "Entity 'account' With Id = 5b4ced1c-88e1-ee11-904c-6045bd05e9d4 Does Not Exist"
   }
}
These details aren't useful in this context, because the issue is obvious. But these details might be useful in other scenarios. Learn more about including more details with errors.
Learn more about deleting records.
Next steps
To learn more about what you can do with the Dataverse Web API, see the following articles: