Note
Access to this page requires authorization. You can try signing in or changing directories.
Access to this page requires authorization. You can try changing directories.
There are different ways to connect to data in SQL Server in your app, using Power Fx formulas. You can access data directly or use a view or stored procedures to create, update, or delete data in your app.
Prerequisites
To access data directly, you can create a Start with data app for your SQL Server data. This method lets you get a basic, working app that you can modify with views and stored procedures.
Sign in to Power Apps and go to the Apps page.
Select New app > Start with data.
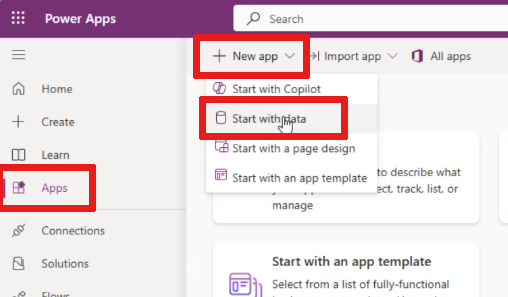
From the Start with data page, choose Connect external data.
Under Choose a data set to start select From SQL.
If you have an existing SQL Server connection, it loads.
Note
If you don't already have a SQL Server connection, you're prompted to create one.
Select your SQL connection.
Enter your Server name and Database name, then choose Connect. Choose a table from the list of tables that appear.

Note
Only one connection is shown at a time. To use a different connection, select the ... overflow menu on your SQL connection, then find a new one or create a new SQL connection.
Select Create app.
Access data
Once your app is connected to SQL Server, you can access data: Access data in SQL Server.
View results
To view the results of your SQL queries, see: View results in SQL Server.
Power Apps data type mappings
| SQL Server | Power Apps |
|---|---|
bigint, decimal, int, money, numeric, smallint, smallmoney, tinyint, float, real |
Number |
char, nchar, varchar, nvarchar, text, ntext |
Text |
bit |
Boolean |
date, datetime, datetime2, smalldatetime, datetimeoffset, time |
DateTime |
uniqueidentifier |
Guid |
Note
If a SQL Server data type doesn't appear in the previous table, that data type isn't supported.
Unsupported data types include the following examples: binary(), varbinary(), image, cursor,
rowversion, hierarchyid, sql_variant xml, Spatial Geometry Types, Spatial Geography Types, and table. Also, 'tinyint' and 'smallint' are not supported as primary keys.
Power Apps functions and operations delegable to SQL Server
Power Apps can delegate Power Fx query operations (for example, Filter) to the back-end data source for processing. Delegation allows the back-end data service (for example, SQL Server) to do the filtering work so that only a few records must be transferred to your device.
This table shows which operations are delegable to SQL Server by data type. Expressions joined with And, Or, and Not are delegable.
| Operation or function | Number | Text | Boolean | DateTime | Guid |
|---|---|---|---|---|---|
*, +, -, / |
Yes | - | - | No | - |
<, <=, >, >= |
Yes | No | No | Yes | - |
=, <> |
Yes | Yes | Yes | Yes | Yes |
Average |
Yes | - | - | - | - |
EndsWith |
- | Yes [1] | - | - | - |
Filter |
Yes | Yes | Yes | Yes [2] | Yes |
In (substring) |
- | Yes [3] | - | - | - |
IsBlank [4] |
No | No | No | No | No |
Len (length) |
- | Yes [5] | - | - | - |
Lookup |
Yes | Yes | Yes | Yes | Yes |
Max |
Yes | - | - | No | - |
Min |
Yes | - | - | No | - |
Search |
No | Yes | No | No | - |
Sort |
Yes | Yes | Yes | Yes | - |
SortByColumns |
Yes | Yes | Yes | Yes | - |
StartsWith |
- | Yes [6] | - | - | - |
Sum |
Yes | - | - | - | - |
UpdateIf, RemoveIf [7] |
Yes | Yes | Yes | Yes | Yes |
Notes
Supported for
(EndsWith(\<column>, "string value"))but not for(EndsWith("string value", \<column>)). If a char(10) column has a value of "hello",EndsWith(\<column>, "llo")returns false, by design. A char(10) column has 10 characters.Direct date filters don't work for SQL Server with an on premise Data Gateway. However, you can create a calculated column that works. For example, you can create:
ALTER TABLE myTable ADD DateAsInt AS (YEAR([date]) * 10000 + MONTH([date]) * 100 + DAY([date]))
And then filter on the calculated number column.Supported for
("string value" in \<column>), but not for(\<column> in "string value").An expression such as
Filter('[dbo].[MyOrders]', !IsBlank(CustomerId))won't delegate to the server. However, you can use an expression such asFilter('[dbo].[MyOrders]', CustomerId <> Blank()), which does delegate to the server and is semantically close. The difference is that the second expression won't treat the empty string ("") as empty. Although the expressions aren't equivalent, the latter might work for your purposes. You can't use this method for the Guid data type.Power Apps delegates the
Lenfunction, but the behavior might not work as you expect. In SQL Server, a char(10) column with value "hello" always has a length of 10. However, Power Apps treats that string as having a length of 5, which may cause discrepancies and confusion. Don't usechar/ncharon SQL server, but usevarchar/nvarcharinstead.Supported for
(StartsWith(\<column>, "string value")), but not for(StartsWith("string value", \<column>))UpdateIf and RemoveIf work locally but simulate delegation to a limit of 500/2000 records. They successively bring down records beyond the non-delegation 500/2000 record limit. Records that meet the If condition are collected. Generally, a maximum of 500/2000 records are collected separately and then changed per execution. However, more records may be updated if the existing local data cache is large as the function may have access to more records for evaluation.