Note
Access to this page requires authorization. You can try signing in or changing directories.
Access to this page requires authorization. You can try changing directories.
Updating or creating records in bulk allows you to act on many records at once. Here are some scenarios where you would want to bulk update records:
- You have many photos and want to upload them all at once.
- You want to submit a time sheet with a week’s data at once.
You might also want to create new records in bulk. For example, when your app has to select many images, you might want to upload them all at once.
This article explains how to update or create bulk records depending on your scenario.
Formulas to bulk update records
The formulas in this section can be used to bulk update records in canvas apps.
Patch() function—Use this function when the collection matches the data source.
Patch( DataSource, Collection )ForAll() function + nested Patch + disambiguation operator—Use this function when the data sources have different columns that you need to join.
ForAll( Collection,
    Patch( DataSource,
        LookUp( DataSource, Id = Collection[@Id] ),
        { Column: Value }
    )
)
AddColumns() function—This function can be used to provide a lookup reference in the Collection that contains the updates to the DataSource if it doesn't have fields that easily reference the table.
Example of a checklist
This example uses a checklist of tasks. When you're done with a few tasks, you can mark them as complete. You could extend this scenario to a product launch checklist, home inspection checklist, or other lists.
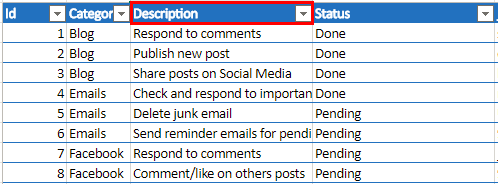
The following screenshot shows the checklist items in Microsoft Excel file. You can check off the tasks related to your blogging or posting on social media in this example. The table in Excel is called ChecklistItems.
The example uses collections to demo this behavior. The approach works for any tabular backend of your choice.
The Excel data is imported as static data into the app. On the App.OnStart property, Collect() the Excel ChecklistItems data into the ChecklistItemsSource collection. The ChecklistItemsSource collection will be used as the source data throughout the app.
This example uses a two screen app:
- Screen 1—Used to review the checklist items and mark them as complete.
- Screen 2—Used to create a new checklist item. The new item will be added to
ChecklistItemsSourcecollection.
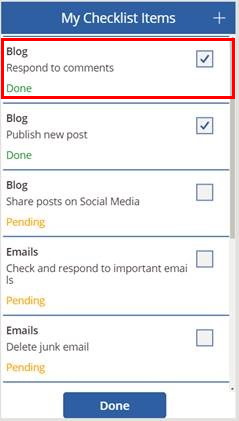
Every time a checklist item is checked, it's added into a collection called CheckedItems. It uses the formula below on the OnCheck event property of the checkbox control. If the item is already checked and is part of the collection, it's removed. If not, the checked item is added.
You can toggle the status between Done and Pending, or you can use the Oncheck and OnUncheck events:
If( !IsBlank(
        LookUp( CheckedItems, Id = ThisItem.Id )
    ),
    Remove( CheckedItems, ThisItem ),
    Collect( CheckedItems, ThisItem )
)
Create multiple records at once
There are different ways of bulk updating records depending on the scenario. This section explains how to create multiple records at once in canvas apps.
When the user selects Done in the above example, you need to update ChecklistItemsSource with changes from the CheckedItems collection.
For columns with the same name
If your source and destination have the same column names, you can use a Patch statement. For example, ChecklistItemsSource and the CheckedItems collections have the same column names. You can use the formula below to update the source at once with all the changes.
Patch( ChecklistItemsSource, CheckedItems )
For columns with different names
If the columns in source and destination tables vary, use ForAll with Patch instead.
With ForAll(), you must loop through each record using a condition. The condition is a comparison between similar columns (for example, Id column) of the different tables. This comparison becomes complicated when the source table and the destination table have the same column names (for example, if ProjectId was a column found in both Project and PurchaseOrder tables).
Here are the alternatives:
Use with disambiguation operator
To update the Status of CheckedItems to "Done", when the source and destination table column names are the same, use this formula:
ForAll( CheckedItems,
    Patch( ChecklistItemsSource,
        LookUp( ChecklistItemsSource, Id = CheckedItems[@Id] ),
        { Status: "Done" }
    )
)
For each item in the CheckedItems collection, the Id (represented by the disambiguation operator CheckedItems[@Id]) is compared against the Id column of the ChecklistItemsSource collection. Then, each matched record is updated with the status as "Done". The disambiguation operator is used when two columns belonging to different tables have the same name. If you don't use this disambiguation operator, you'll see that only the first record gets updated.
Use an extra label within the gallery
If you don't want to use an extra collection to store the checked items, you can try the following steps:
Create an extra label within the gallery template.
- Bind it to the Id column.
- Rename the label to IdText.
Remove the code on the OnCheck of the checkbox control mentioned above.
Write the following formula on the OnSelect event of the Done Button:
ForAll(
    Filter( ChecklistGallery.AllItems,
      StatusCheckbox.Value = true
    ),
    Patch( ChecklistItemsSource,
      LookUp( ChecklistItemsSource, Id = IdText.Text ),
      { Status: "Done" }
    )
)
Here, you're directly applying the filter on the Gallery's items to find the checked items. For each record in the filtered items, a match is found on the ChecklistItemsSource table by comparing the Id with value stored in IdText label.
The status is updated to "Done".
The disambiguation operator can't be used on the Gallery's items. Instead, you can store a label within the gallery and reference it for comparison.
Use an alternative to create a new column with a different label
This method is an alternative to using the disambiguation operator or a label inside gallery.
While creating a local copy of your data source, you can use the AddColumns() formula to create a new column with a different label (NewId) for the Id column in your source collection. When using ForAll with Patch, you compare the NewId column against the Id column in your source data.
Bulk create records
You may want to create new records in bulk if, for example, you want to upload many images all at once.
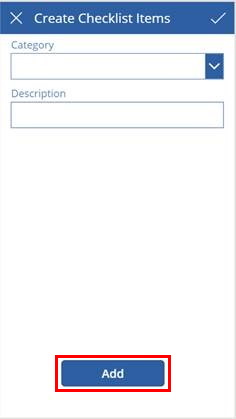
Here's an example using Example of a checklist.
On the Create Checklist Items screen, each time you select Add, the information is stored in the NewChecklistItems collection. When you select Submit, ForAll() with Patch() are used to update the source collection.
ForAll( NewChecklistItems,
    Patch( ChecklistItemsSource,
        Defaults( ChecklistItemsSource ),{
            Id: Id,
            Category: Category,
            Description: Description,
            Status:Status
        }
    )
)
For each item in the NewChecklistItems, a new record is created (indicated by Defaults(ChecklistItemsSource)) in the ChecklistItemsSource collection. The Id is set to the Id from the NewChecklistItems collection. Similarly, Category, Description, and Status values are set.