Building AI plugins for discovery by Copilot (preview)
[This article is prerelease documentation and is subject to change.]
Microsoft Dataverse supports three types of AI plugins – Dataverse custom APIs, Dataverse Table Search, and Dataverse File Search. Before you start building AI plugins for discoverability by Copilots across Microsoft 365, you need to decide which one of the supported AI plugin types to create.
While other AI plugin types might be added as supported by Dataverse, the steps to define plugin are the same.
All components within AI plugins are solution-aware, and follow the standard application lifecycle management (ALM) principles.
In general, there's two main steps in defining AI plugins.
- Define the core functionality that you want to expose as an AI plugin.
This is a prerequisite and an existing step in Dataverse about defining a custom API or a custom connector. This means that you can define an AI plugin for your existing custom APIs or custom connectors without any major changes. - Define the metadata of the AI plugin that can be discovered by a Copilot.
This is a new step that lets you define the metadata for your AI plugin that is used by the Copilots to discover and invoke this plugin. The process includes the following three main components:
- AI plugin definition: The metadata of your plugin. For example, SalesAIPlugin/.
- AI plugin operation: A list of operations supported by your plugin. For example, GetOpportunities, CreateOpportunity/.
- AI plugin instance: Controls the state of your plugin, which is Enable or Disable.
Let's get started and define our first AI plugin. In this example, we're going to define an AI plugin of type custom API.
Note
A basic understanding and knowledge of application lifecycle management (ALM) in Dataverse is required to follow this example. See Solution concepts in Power Platform ALM to learn more.
Defining a Dataverse custom API as an AI plugin
Step 1 – Define custom API
You can create a custom API using the Power Apps. More information: Create a custom API in Power Apps
The plugin infrastructure currently supports only custom APIs with 'IsFunction=False' and 'IsPrivate=False'. Hence, ensure that your custom API isn't a function or private API. At this point, you can test your custom API using an API client like Insomnia
Step 2 – Define AI plugin
Once you define the custom API, you can define the AI plugin using Power Apps. First, Create a solution. Once you create a solution, follow these steps to create an AI plugin:
- In your solution, select New > More > Other > AI plugin from the drop-down.
- Enter the values for the required fields.
- Name: Enter a name that starts with a prefix. For example, new_myAIPlugin
- PluginType: Dataverse
- HumanName, HumanDescription, ModelName, Model Description fields control how your plugin is discovered by the large language model (LLM). So, provide meaningful values for those for your plugins. The remaining fields you can leave blank for now.
- Select Save.
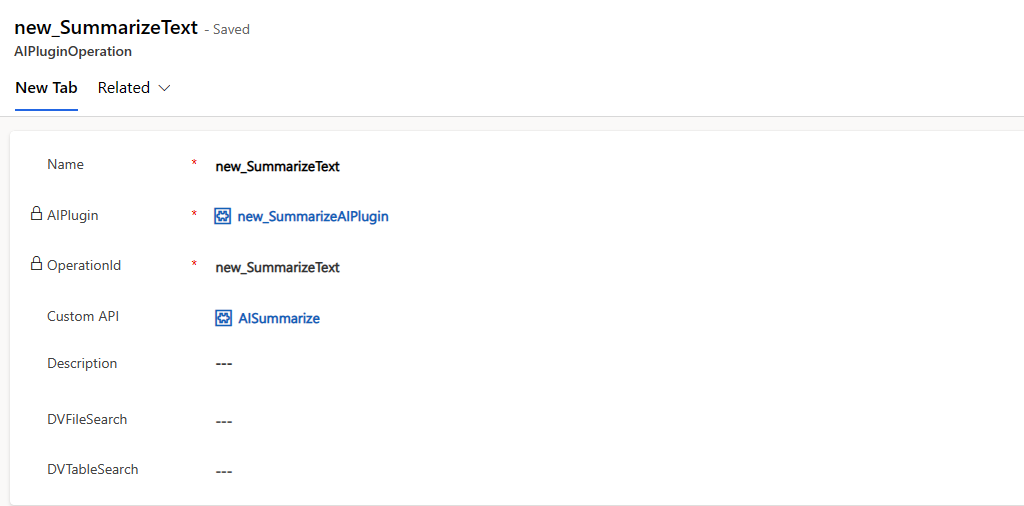
Step 3 – Define AI operations
Once you have defined an AI plugin, the next step is to add the operations you want the plugin to expose. This can be done by selecting + New AIPluginOperation from the top menu bar.
Enter the following fields in this form:
- Name: Provide a name for your operation
- OperationID: this needs to be a value with a prefix like shown below
- Custom API: This will be a look up to the custom API you created in Step 1.
- Description: This field is currently used by BizChat for plugin matching, so don't leave it blank
Select Save and close. If you have additional operations, you can add those following the same steps.
Step 4 – Package as a solution
Once you add all the required plugin metadata to your solution, make sure that you add your custom API to the same solution as well. This can be done in your solution, select Add Existing > More > Other > CustomAPI from the drop-down and select the custom API you created in Step 1.
Go to Solutions section in Power apps and select your solution. Then, select Export from the menu > select Managed. You can download the exported zip file and import into another test environment and test your changes.
Feedback
Coming soon: Throughout 2024 we will be phasing out GitHub Issues as the feedback mechanism for content and replacing it with a new feedback system. For more information see: https://aka.ms/ContentUserFeedback.
Submit and view feedback for