Note
Access to this page requires authorization. You can try signing in or changing directories.
Access to this page requires authorization. You can try changing directories.
A quick view control on a model-driven app form displays data from a row that is selected in a lookup on the form. The data displayed in the control is defined using a quick view form. The data displayed is not editable, but when the primary column is included in the quick view form, it becomes a link to open the related row. More information: Create and edit quick view forms

Add a quick view form
Sign in to Power Apps.
Select Solution from the left navigation pane. If the item isn’t in the side panel pane, select …More and then select the item you want.
Open the solution you want, open the table you want, and then select the Forms area.
Select a form, which Type is Main.
In the form designer, select + Component, and then in the left navigation pane, select Quick view.
In the Select quick view forms dialog box, select a Lookup column included in the form, and then select a quick view form for the related tables. The related tables shown depend on the Lookup column chosen.

Select Done to close the Select quick view forms dialog box. The quick view form appears on the form, and the properties of the quick view appear in the properties pane.
Quick view form properties
| Property | Description |
|---|---|
| Label | Required: A label to display for the quick view form. |
| Name | Required: The unique name for the quick view form that is used when referencing it in scripts. |
| Hide label | Displays the label on the form. |
| Quick view forms | Lists the quick view forms selected for the related tables. |
| Select forms | Select or change the selected quick view forms for the related tables. The related tables shown depend on the Lookup column chosen. |
| Components | Properties to configure for the component. A quick view control component has no properties to configure, and by default is shown whether someone is using a web browser, Dynamics 365 for phones, or Dynamics 365 for tablets. |
Quick view control properties in classic form designer
Sign in to Power Apps.
Expand Data, select Tables, select the table you want, and then select the Forms area.
In the list of forms, open the form of type Main.
On the command menu, select Switch to classic.
Then on the Insert tab, select Quick View Form to view quick view control properties.
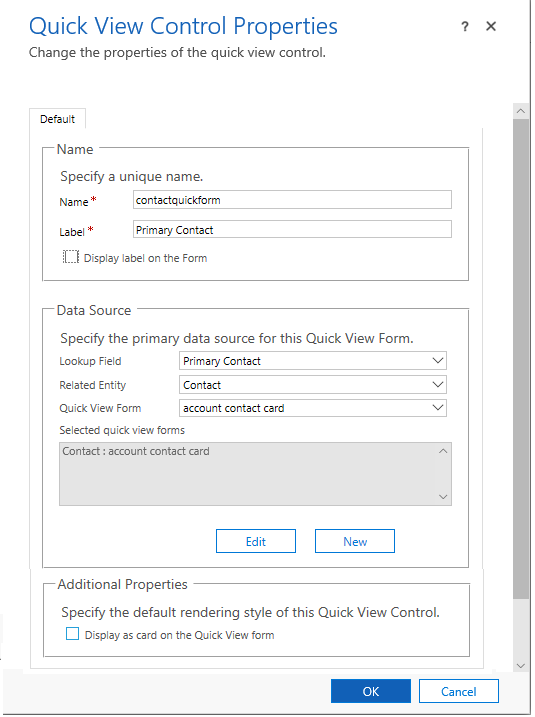
| Property | Description |
|---|---|
| Name | Required: The unique name for the quick view form that is used when referencing it in scripts. |
| Label | Required: A label to display for the quick view form. |
| Display label on the Form | Displays the label on the form. |
| Lookup Column | Choose one of the lookup columns included in the form. |
| Related table | This value depends on the Lookup Column chosen. It is usually the primary table for the 1:N table relationship for the lookup. If the table includes a Potential Customer lookup that can accept either an account or contact, in the Quick View Form column you can choose a quick view form for both account and contact by changing this value and then choosing another quick view form. |
| Quick View Form | If the Related table has any quick view forms these can be selected here. Otherwise, select New to create one. Select Edit to change the selected quick view form. |
| Additional Properties | The default rendering style can be specified by selecting the check box. |
Note
When adding a multi-line text column to a quick view form, the form will have a height of one regardless of how the column control height is set. This ensures proper rendering of the form while maintaining density. Notice that multi-line text columns on other form types, such as main forms, work differently as the form automatically expands based on the amount of text.