Note
Access to this page requires authorization. You can try signing in or changing directories.
Access to this page requires authorization. You can try changing directories.
In this guide, you'll set up a webpage and custom web template that will use the Web API to read, write, update, and delete records from the contact table.
Note
You can change the column names, or use a different table, while following the steps in this example.
Step 1. Create site settings
Before you can use the portals Web API, you have to enable the required site settings with the Portal Management app. The site settings depend on the table that you want to use when interacting with the Web API.
Start the Portal Management app.
On the left pane of the Portal Management app, select Site Settings.
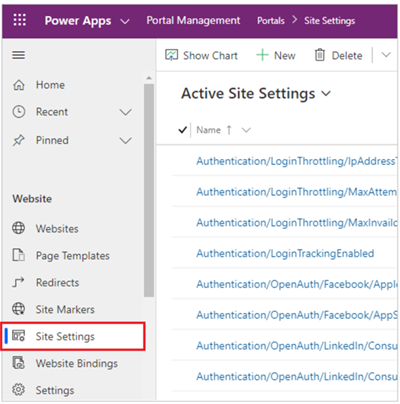
Select New.
In the Name box, enter Webapi/contact/enabled.
In the Website list, select your website record.
In the Value box, enter true.
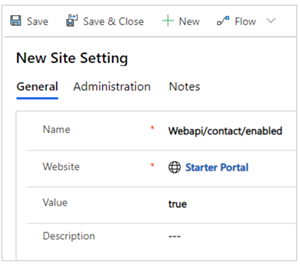
Select Save & Close.
Select New.
In the Name box, enter Webapi/contact/fields.
In the Website list, select your website record.
In the Value box, enter
firstname,lastname,fullname,emailaddress1,telephone1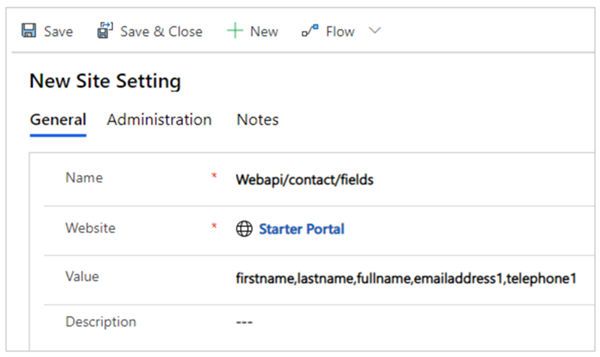
Select Save & Close.
Select New.
In the Name box, enter Webapi/error/innererror.
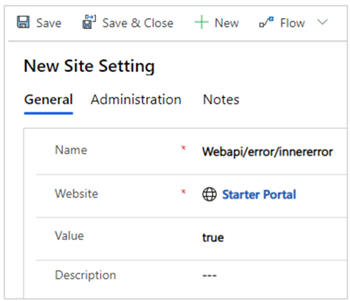
In the Website list, select your website record.
In the Value box, enter true.
Select Save & Close.
Verify the site settings for Web API.
Step 2. Configure permissions
You'll have to configure permissions so that users are able to use the Web API feature. In this example, you'll need to setup or create a new web role that will use the Web API, next you'll add the table permissions for the Contact table and associate the table permission to the web role, and finally assign the web role to users in order to allow them to use the Web API.
Note
The Web API follows table permissions coming from the web role context of the authenticated user or the anonymous web role. Consider if your users already have a web role that has access to the specific tables in your website needed by the Web API. You don't need to create additional web roles just to use the Web API.
Create a web role
If you currently do not have a web role with permissions to the table you are accessing through the Web API or require different context of accessing the data, the following steps so you how to create a new web role and assign table permissions.
Start the Portal Management app.
On the left pane, in the Security section, select Web Roles .
Select New.
In the Name box, enter Web API User (or any name that best reflects the role of the user accessing this functionality).
In the Website list, select your website record.
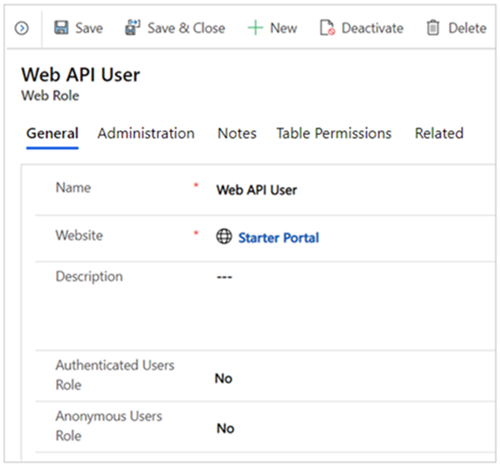
Select Save.
Create table permissions
Launch the Power Pages design studio.
Select the Security workspace.
Under the Protect section, select Table permissions.
Select New permission.
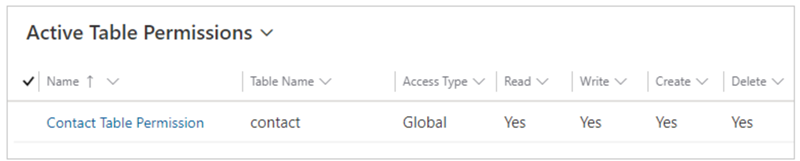
In the Name box, enter Contact Table Permission.
In the Table Name list, select Contact (contact).
In the Access Type list, select Global.
Select Read, Write, Create, and Delete privileges.
Select + Add roles and select the web role you select or created earlier.
Select Save & Close.
Add contacts to the web role
Start the Portal Management app.
On the left pane, in the Security section, select Contacts.
Select a contact that you want to use in this example for the Web API.
Note
This contact is the user account used in this example for testing the Web API. Be sure to select the correct contact in your portal.
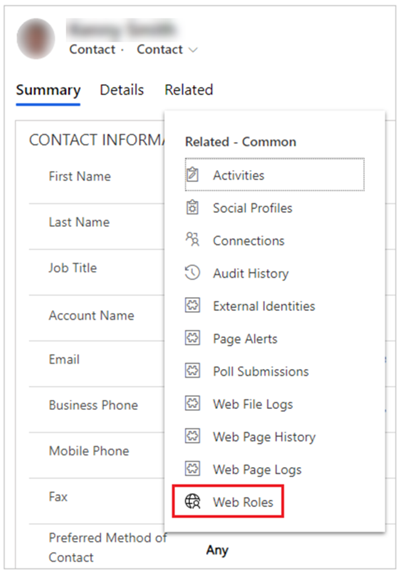
Select Related > Web Roles.
Select Add Existing Web Role.
Select the Web API User role, created earlier.
Select Add.
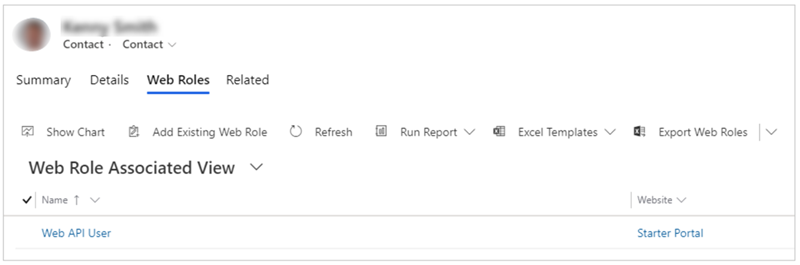
Select Save & Close.
Step 3. Create a webpage
Now that you've enabled the Web API and configured user permissions, create a webpage with sample code to view, edit, create, and delete records.
Launch the Power Pages design studio.
In the Pages workspace, select + Page.
In the Add a page dialog,
In the Name box, enter WebAPI and select Start from blank layout.
Select Add.
Select the Edit Code option in the upper right hand corner.
Select Open Visual Studio Code.
Copy the following sample code snippet and paste it in between the
<div></div>tags of the page section.<!-- Sample code for Web API demonstration --> <style> #processingMsg { width: 150px; text-align: center; padding: 6px 10px; z-index: 9999; top: 0; left: 40%; position: fixed; -webkit-border-radius: 0 0 2px 2px; border-radius: 0 0 2px 2px; -webkit-box-shadow: 0 2px 4px rgba(0, 0, 0, 0.2); box-shadow: 0 2px 4px rgba(0, 0, 0, 0.2); display: none; } table td[data-attribute] .glyphicon-pencil { margin-left: 5px; opacity: 0; } table td[data-attribute]:hover .glyphicon-pencil { opacity: 0.7; } </style> <script> $(function() { //Web API ajax wrapper (function(webapi, $) { function safeAjax(ajaxOptions) { var deferredAjax = $.Deferred(); shell.getTokenDeferred().done(function(token) { // Add headers for ajax if (!ajaxOptions.headers) { $.extend(ajaxOptions, { headers: { "__RequestVerificationToken": token } }); } else { ajaxOptions.headers["__RequestVerificationToken"] = token; } $.ajax(ajaxOptions) .done(function(data, textStatus, jqXHR) { validateLoginSession(data, textStatus, jqXHR, deferredAjax.resolve); }).fail(deferredAjax.reject); //ajax }).fail(function() { deferredAjax.rejectWith(this, arguments); // On token failure pass the token ajax and args }); return deferredAjax.promise(); } webapi.safeAjax = safeAjax; })(window.webapi = window.webapi || {}, jQuery) // Notification component var notificationMsg = (function() { var $processingMsgEl = $('#processingMsg'), _msg = 'Processing...', _stack = 0, _endTimeout; return { show: function(msg) { $processingMsgEl.text(msg || _msg); if (_stack === 0) { clearTimeout(_endTimeout); $processingMsgEl.show(); } _stack++; }, hide: function() { _stack--; if (_stack <= 0) { _stack = 0; clearTimeout(_endTimeout); _endTimeout = setTimeout(function() { $processingMsgEl.hide(); }, 500); } } } })(); // Inline editable table component var webAPIExampleTable = (function() { var trTpl = '<% _.forEach(data, function(data){ %>' + '<tr data-id="<%=data.id%>" data-name="<%=data.fullname%>">' + '<% _.forEach(columns, function(col){ %>' + '<td data-attribute="<%=col.name%>" data-label="<%=col.label%>" data-value="<%=data[col.name]%>">' + '<%-data[col.name]%><i class="glyphicon glyphicon-pencil"></i>' + '</td>' + '<% }) %>' + '<td>' + '<button class="btn btn-default delete" type="submit"><i class="glyphicon glyphicon-trash" aria-hidden="true"></i></button>' + '</td>' + '</tr>' + '<% }) %>'; var tableTpl = '<table class="table table-hover">' + '<thead>' + '<tr>' + '<% _.forEach(columns, function(col){ %>' + '<th><%=col.label%></th>' + '<% }) %>' + '<th>' + '<button class="btn btn-default add" type="submit">' + '<i class="glyphicon glyphicon-plus" aria-hidden="true"></i> Add Sample Record' + '</button>' + '</th>' + '</tr>' + '</thead>' + '<tbody>' + trTpl + '</tbody>' + '</table>'; function getDataObject(rowEl) { var $rowEl = $(rowEl), attrObj = { id: $rowEl.attr('data-id'), name: $rowEl.attr('data-name') }; $rowEl.find('td').each(function(i, el) { var $el = $(el), key = $el.attr('data-attribute'); if (key) { attrObj[key] = $el.attr('data-value'); } }) return attrObj; } function bindRowEvents(tr, config) { var $row = $(tr), $deleteButton = $row.find('button.delete'), dataObj = getDataObject($row); $.each(config.columns, function(i, col) { var $el = $row.find('td[data-attribute="' + col.name + '"]'); $el.on('click', $.proxy(col.handler, $el, col, dataObj)); }); //User can delete record using this button $deleteButton.on('click', $.proxy(config.deleteHandler, $row, dataObj)); } function bindTableEvents($table, config) { $table.find('tbody tr').each(function(i, tr) { bindRowEvents(tr, config); }); $table.find('thead button.add').on('click', $.proxy(config.addHandler, $table)); } return function(config) { var me = this, columns = config.columns, addHandler = config.addHandler, deleteHandler = config.deleteHandler, $table; me.render = function(el) { $table = $(el).html(_.template(tableTpl)({ columns: columns, data: me.data })).find('table'); bindTableEvents($table, { columns: columns, addHandler: addHandler, deleteHandler: deleteHandler }); } me.addRecord = function(record) { $table.find('tbody tr:first').before(_.template(trTpl)({ columns: columns, data: [record] })); bindRowEvents($table.find('tbody tr:first'), config); } me.updateRecord = function(attributeName, newValue, record) { $table.find('tr[data-id="' + record.id + '"] td[data-attribute="' + attributeName + '"]').text(newValue); } me.removeRecord = function(record) { $table.find('tr[data-id="' + record.id + '"]').fadeTo("slow", 0.7, function() { $(this).remove(); }); } }; })(); //Applicaton ajax wrapper function appAjax(processingMsg, ajaxOptions) { notificationMsg.show(processingMsg); return webapi.safeAjax(ajaxOptions) .fail(function(response) { if (response.responseJSON) { alert("Error: " + response.responseJSON.error.message) } else { alert("Error: Web API is not available... ") } }).always(notificationMsg.hide); } function loadRecords() { return appAjax('Loading...', { type: "GET", url: "/_api/contacts?$select=fullname,firstname,lastname,emailaddress1,telephone1", contentType: "application/json" }); } function addSampleRecord() { //Sample data to create a record - change as appropriate var recordObj = { firstname: "Willie", lastname: "Huff" + _.random(100, 999), emailaddress1: "Willie.Huff@contoso.com", telephone1: "555-123-4567" }; appAjax('Adding...', { type: "POST", url: "/_api/contacts", contentType: "application/json", data: JSON.stringify(recordObj), success: function(res, status, xhr) { recordObj.id = xhr.getResponseHeader("entityid"); recordObj.fullname = recordObj.firstname + " " + recordObj.lastname; table.addRecord(recordObj); } }); return false; } function deleteRecord(recordObj) { var response = confirm("Are you sure, you want to delete \"" + recordObj.name + "\" ?"); if (response == true) { appAjax('Deleting...', { type: "DELETE", url: "/_api/contacts(" + recordObj.id + ")", contentType: "application/json", success: function(res) { table.removeRecord(recordObj); } }); } return false; } function updateRecordAttribute(col, recordObj) { var attributeName = col.name, value = recordObj[attributeName], newValue = prompt("Please enter \"" + col.label + "\"", value); if (newValue != null && newValue !== value) { appAjax('Updating...', { type: "PUT", url: "/_api/contacts(" + recordObj.id + ")/" + attributeName, contentType: "application/json", data: JSON.stringify({ "value": newValue }), success: function(res) { table.updateRecord(attributeName, newValue, recordObj); } }); } return false; } var table = new webAPIExampleTable({ columns: [{ name: 'firstname', label: 'First Name', handler: updateRecordAttribute }, { name: 'lastname', label: 'Last Name', handler: updateRecordAttribute }, { name: 'emailaddress1', label: 'Email', handler: updateRecordAttribute }, { name: 'telephone1', label: 'Telephone', handler: updateRecordAttribute }], data: [], addHandler: addSampleRecord, deleteHandler: deleteRecord }); loadRecords().done(function(data) { table.data = _.map(data.value, function(record){ record.id = record.contactid; return record; }); table.render($('#dataTable')); }); }); </script> <div id="processingMsg" class="alert alert-warning" role="alert"></div> <div id="dataTable"></div>
Select CTRL-S to save the code.
In the design studio, select Sync to update the site with the code edits.
Step 4. Use the Web API to read, view, edit, create, and delete
To test the Web API functionality:
Select Preview, and then choose Desktop.
Sign in to your site with the user account that has been assigned the Web API User role you created earlier.
Go to the WebApi webpage created earlier.

Select Add Sample Record to add the sample record from the script.
Select a field. In this example, we've selected Email to change the email address of a contact.

Select the Delete icon to delete a record.
Now that you've created a webpage with a sample to read, edit, create, and delete records, you can customize the forms and layout.
Next step
Compose HTTP requests and handle errors