Note
Access to this page requires authorization. You can try signing in or changing directories.
Access to this page requires authorization. You can try changing directories.
When building Power Apps, one important consideration is data security. Your apps drive important business processes, and if users can see sensitive data or delete records that they shouldn't have access to, it can disrupt your business.
For example, if you've an app with sensitive customer data, unauthorized access to the data could put your company at risk of compliance with privacy laws.
You may think "I'll just obscure access to sensitive data in my app!" However, if the underlying data source is shared with users, they can still get to the data, or build new apps on the data source, giving them access to the restricted records.
One of the advantages of building Power Apps in Teams with Dataverse for Teams is that it provides the ability to set the table permissions to your specific business needs that map the security roles in Teams—such as Owners, Members, Guests, and App Users.
For example, if there's a table that the users should only be able to modify for the records that they own, Dataverse for Teams offers a table permission called Collaborate that gives users the ability to only edit records that they own. In this article, we'll review the table permissions in Dataverse for Teams, and learn about how you can use them to secure your important business applications.
Note
Only team owners have the ability to edit table permissions currently.
Watch this video to learn how to configure table permissions:
Understanding team roles
Permission to apps and the data that they use in Teams are based on the following roles in Teams team.
- Owner - A team member with the owner role. This includes the creator of the team, and anyone who has been given the owner role by another users. Owners get full access to the data used in apps in the team.
- Member - A team member who isn't an owner. By default, team members get full access like owners, but you can also change the permission for team members. You might want to restrict members from being able to edit certain tables.
- Guest - A guest is someone outside of your organization who is added to the team. By default, guests can create records, but not view records created by others.
- Colleagues with access: With Power Apps for Teams, you can share an app with Azure AD security group whose members need not be part of the Teams team where the app was built. This enables you to add users to the application without having to add them to the specific team, and opens up “Broad Distribution” scenarios. For example, you may want to build an app that is enabled for every accountant in the organization, or even every employee in that organization.
Understanding table permissions
When assigning security to a table, the following are the permissions that you can assign:
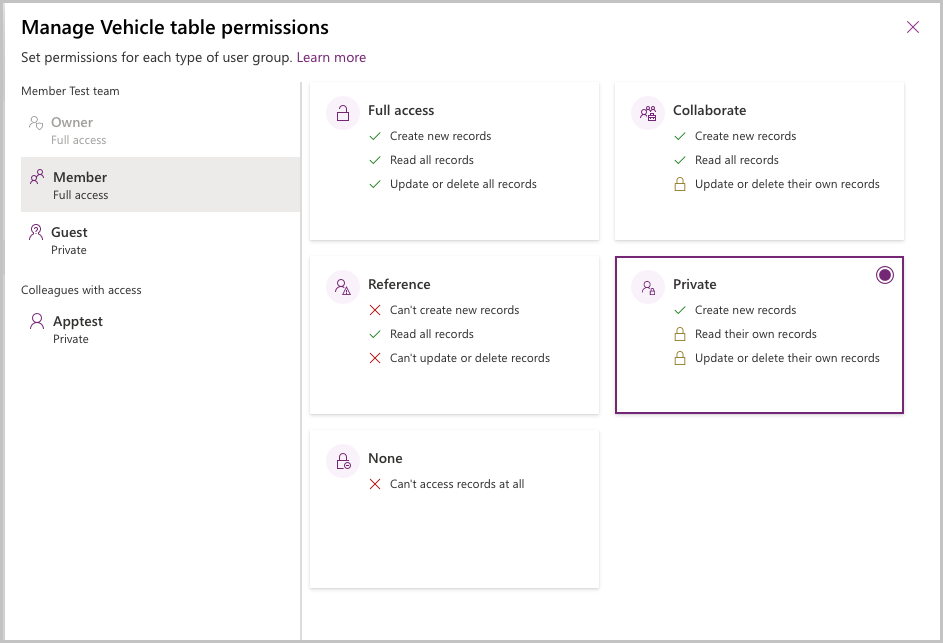
- Full Access – Allows end users to see and edit all records in the table.
- Collaborate – Allows end users to see all records and create new records. But they can only edit or delete their own records. An example for when you want to use collaborate is "up votes" in the Ideas the Perspectives app. You want each user of the app to view the up-votes of other users. But they shouldn't be able to change the votes for any users other than their own.
- Reference – Provides a read-only view of data. Users can't create, edit, or delete any records. An example is in Bulletins app—if you want users to read bulletin records but not edit them, you'd give them Reference permission on the Bulletin table.
- Private – Users can create new records. Additionally, they can view, edit, or delete their own records only. An example is in the Issue reporting app—if you want users to only be able to create and see their own issue records in Dataverse, you'd give them Private permission on the Issue Report table.
Table permissions in real-world scenario
Let’s take a look at how table permissions work in practice. We'll create a table, and then show what two different users see.
Note
To complete this part of the lesson, you'll need an environment with two user logins. One of them having the team owner role and another with team member (a member of the team but not granted owner role)
Sign in to Teams as the Team owner.
Create an app and the table in team with a Dataverse for Teams database.
Right-click on the Power Apps icon and pop out the app.
Create a new app.
- App name: "Vehicle Manager"
- Select Create new table and name it "Vehicle".
- Add columns: "Make", "Model", "Year Manufactured".
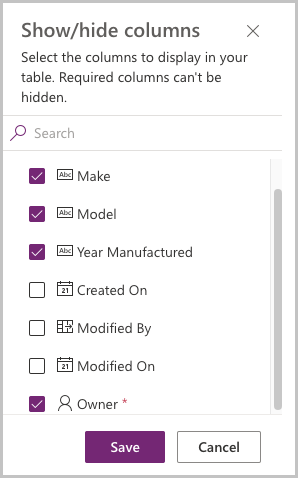
- Select Show/hide columns.
- From Show/hide column dialog, select the Owner field and select Save.

Your table should now look like this:

Add a record to the table:
- Select Add row.
- Enter record details.
- The owner field of the created record will reflect your logged-in user account.
Select the area outside of the table definition screen to return to the app.
Save and Publish the app. You'll need to select a channel in which the app will be displayed—select + next to the desired channel name to select the channel.
Configure and verify table permissions
We're going to set the permissions for the vehicles table for Team members:
In Teams, open the Power Apps app. Right-click on the Power Apps icon in Teams, and select Pop out app. This will pop out the app in a new window, so if you move somewhere else in Teams, you won’t lose your changes.
Select the Build tab.
Select the team that contains the Vehicle Manager app.
In the Items created for… area, select See all.
Select Tables from the solution components bar.
Select the Vehicle table and then select Manage permissions.
Select the Member node. The initial permission will show Full access. Select the permission Private and select Save.

Next, we'll log in to Teams as a user who is a non-owner Team member to observe their experience.
- Log into Teams using a user who is a member of the team in which the app is installed.
- Select the channel where the app is installed.
- Select the tab for the Vehicle Manager app.
- The app should open for the user, but no records will show in the gallery, as the user only has visibility to their own records.
- Select New record to create a new vehicle record, select the check mark to save the record.
- You should now see one record in the gallery.
Log out of Teams and log back in as the Team owner. We'll now go to the table and see the created data.
Log in to Teams using the Team owner personal.
Right-click on the Power Apps icon and pop out the app.
Select the Build tab.
Select the team in which the Vehicle Manager app is installed
Select the Vehicle table
Select Edit.
You'll now see two records in the Vehicle table, each with a different owner.

So how would this apply to one of the sample app templates for Teams?
For example, with Bulletins we might set the following permissions for the tables in the app:
| Table | Permission | Reason |
|---|---|---|
| Bulletin | Reference | Users should read all bulletins, but not edit or create bulletins. |
| Bulletin Bookmark | Private | Users should create their own bulletins, but not view or edit other users’ bookmarks. |
| Bulletin Category | Reference | Users should read all categories but not edit or create categories. |
| Bulletin Category Preference | Private | Users should create their own category preferences but shouldn't be able to read or edit other users category preferences. |
| Bulletin Contact | Reference | Users should read all contact records but not create or edit contacts. |
| Bulletin FAQ | Reference | Users should read all FAQ records but not create or edit existing FAQ records. |
| Bulletin FAQ Category | Reference | Users should read all FAQ categories but not create or edit existing FAQ records |
| Bulletin Link | Reference | Users should read all links but not create or edit existing link records. |
| Bulletin Link Category | Reference | Users should read all link categories but not create or edit existing link categories. |
| Bulletin Read Receipts | Private | Users should be able to create new read receipts when they view a bulletin, but not read or edit other users read receipts. |
| Bulletin User Settings | Private | Users should be able to create new user setting records but not read or edit other users setting records. |
What permissions should I share?
Before assigning permissions, you should plan your security based on the personas of users of your app. Who will administer the app? Who will use the app? How will they use it?
For example, the Inspection sample app template for Teams is designed to address the following personas:
- Inspection manager - Creates Inspection forms and manages the list of locations or assets.
- Inspection reviewer - Reviews inspection data and approves inspections.
- Inspection User - Completes the inspections.
Once we have the personas defined, relate these personas to the team role to which they should be assigned:
- Inspection manager - Since inspection managers will need full access to create inspection forms and other system table records, we'll make them owners in the team.
- Inspection reviewer - Since inspection reviewers should be able to edit all inspections, but they won't create inspection forms, we'll make them team members. This will enable us to give them reference access to the Area Inspection Checklist table (where inspection form data is stored), but full access to Area Inspection table (where inspection records are stored).
- Inspection user - Inspection users should only be able to submit new inspections, but not create new inspection forms or see other user’s inspections. So we won't make them members of the team in which the app is installed—we'll share the app with them as colleagues, and give them Reference permission to Area Inspection Checklist and Private permission to Area Inspection. This will allow users to view inspection forms and create their own inspection records.
For more details about the recommended table permissions for the sample app templates for Teams, see articles about deploying sample app templates broadly, such as Deploy Profile + as broad distribution app.