Note
Access to this page requires authorization. You can try signing in or changing directories.
Access to this page requires authorization. You can try changing directories.
In this article, we'll be changing the notifications that come from the Employee Ideas app from HTML-based messages in Teams to adaptive cards in Teams. Currently, Teams notifications are started from within the app and are sent as a message posted to the Teams channel. We'll replace this Teams channel notification with an adaptive card notification that will be initiated using a Power Automate flow.
Watch this video to learn how to replace notifications with adaptive card:
Prerequisites
To complete this lesson, we would need the ability to sign in into Microsoft Teams that will be available as part of select Microsoft 365 subscriptions, and will also need to have the Employee Ideas sample app.
Create the Power Automate flow to generate the adaptive card
To get started, let’s create a flow to replace the current notification with an adaptive card.
Open the Power Apps for Teams personal app and locate the Employee Ideas app. For ease of use, you can right-click on the Power Apps logo in Teams and select Pop out app to work with the Power Apps studio in its own window.
Select the Ideas app to open the Power Apps studio in Teams and begin editing the app.
In the top menu, select the vertical ellipsis to the right of the Settings option. You'll see three options - Power Automate, Collections, and Variables.
Choose Power Automate to open the Data sidebar menu on the right. You'll see all available flows.
Choose Create a new flow. You'll see Power Automate Studio in a separate browser window. Check to ensure that you are in the correct environment for the Team containing the app you're trying to change before continuing.
In the upper left-hand area, you'll see that the flow has a name of Untitled. Select that text to change the name to Employee Ideas Adaptive Card To Teams.
Add the Power Apps trigger to allow us to trigger the flow from Power Apps and to add values to pass from Power Apps to Power Automate.
Select +New step to add a new step > select the action Get a row by ID and for Row ID > select the Value field area to reveal the Dynamic content menu > select Ask in Power Apps. This action will create a variable in the Power Apps trigger to allow passing data from the app to Power Automate.

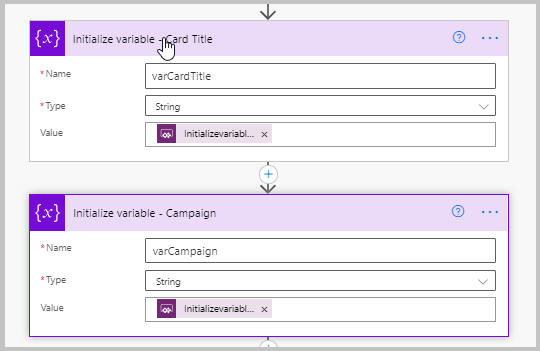
Next, add two Initialize Variable actions. These actions will be used to store information from Power Apps and to store a link to the Ideas app that will be used in the adaptive card to link straight to the record. Rename each of the actions as follows:
Initialize variable - Card Title
Name = varCardTitle
Type = String
Initialize variable – Campaign
Name = varCampaign
Type = String
Set each of the Type values to String and add a Name for each: varCardTitle, varCampaign, and varReviewIdeasLink, respectively.
For the Card Title and Campaign actions, select the Value field area to reveal the Dynamic content menu, and then select Ask in Power Apps. This configuration will create a variable in the Power Apps trigger to allow passing data from the app to Power Automate.
For the Review Ideas Link action, we'll use the link to the app. To find this link, go to the Team where the Ideas app is and copy the link for tab in which the app is installed. You can copy the link to the tab by opening the tab, then selecting the ellipses (…) in the upper right corner.

Your URL will look something like the following example:
https://teams.microsoft.com/l/entity/GUID/_djb2_msteams_prefix_1434832750?context=%7B%22subEntityId%22%3Anull%2C%22channelIdGUIDthread.tacv2%22%7D&groupId=GUID&tenantId=GUIDTo continue, copy the part of the URL that comes after context= use a URL decoder such as https://www.urldecoder.org/ to decode the text.

Copy the decoded text, and go back to the Power Automate flow.
Add a new step to the flow to initialize a variable.
Rename the step to Initialize variable – Review Ideas Link
Set Name = varReviewIdeasLink
Select Type = String
Enter Value = {paste the text copied from the url above}

Add a new step with the action Compose and in the Inputs field paste the following code:
replace(replace(replace(variables('varReviewIdeasLink'),'{','%7B'),'"','%22'),'}','%7D')
Add a Post adaptive card in a chat or channel action. Set the Post as value to User and the Post in value to Channel. In the Team and Channel fields, select the Team and Channel that you would like to post the adaptive card to.
The following sample code is only an example, though you can design your own cards.
Tip
You can learn more about adaptive cards at https://adaptivecards.io/ and design their own cards in a visual editor at https://adaptivecards.io/designer/.
In the Adaptive Card field, copy and paste the following:
{

"type": "AdaptiveCard",

"body": [

{

"type": "TextBlock",

"size": "large",

"weight": "Bolder",

"text": "@{variables('varCardTitle')}",

"wrap": true

},

{

"type": "TextBlock",

"text": "A new idea has been submitted!",

"wrap": true

},

{

"type": "TextBlock",

"text": "For the campaign: @{variables('varCampaign')}",

"wrap": true

}

],

"actions": [

{

"type": "Action.OpenUrl",

"title": "View @{variables('varCardTitle')}",

"url":
"https://teams.microsoft.com/l/entity/b7fad6ce-2e23-4aba-b209-859a59ca230e/_djb2_msteams_prefix_1434832750?context=@{outputs('Compose')}"

}

],

"\$schema": "http://adaptivecards.io/schemas/adaptive-card.json",

"version": "1.2"

}
In the Subject field, copy, and paste the following code:
New idea submitted for @{variables('varCampaign')} Campaign
This action will set the adaptive card’s characteristics and use the variables from Power Apps in the adaptive card.
Save and test the flow to ensure it works properly. Selecting manually from the Test flow sidebar will allow you to enter the Card Title, Campaign, and Review Ideas Link variables.
Add the flow to the Ideas app
Once you've verified that the flow is working properly, you can add it to the Ideas app.
Go back to the Power Apps studio where the Ideas app was being edited.
In the Tree View on the left-hand side, select the Campaign Detail Screen.
Next, select the Submit idea button (named btnCampaignIdeaControls_Submit in the Tree View). We'll add the Power Automate flow we created to this button.

First, we'll copy the code currently in the OnSelect property of the button. One issue with adding Power Automate flows to controls in Power Apps is that any existing code on the control will be removed. To work around this problem, paste the copied code into a text editor, such as Notepad, and edit it to paste back in the OnSelect property when done. After pasting the code, ensure that all the code was added.
With the button still selected, select the vertical ellipsis to the right of the Settings in the upper menu bar. Select Power Automate, which will reveal the Data sidebar. You should now see the Employee Ideas Adaptive Card To Teams flow in the Available flows section. Select it to add it to the button.
You'll now need to edit the pasted code. Find and remove the following text:
Notify(

If(tglIdeaDetailControls_PostToTeams.Value,

If(

IsError(

MicrosoftTeams.PostMessageToChannelV3(

gblSettingTeamId,

gblSettingNotificationChannelId,

{

content: Concatenate(

"A new employee idea has been created!",

"\<br\>\<br\>",

"\<b\>Description\</b\>",

"\<br\>",

locFormRecordIdea.Description

),

contentType: "html"

},

{subject: locFormRecordIdea.Title}

)

),

"Message was not posted. You may not have access to the Team and/or Channel.
Contact the app administrator.",

NotificationType.Warning

)

)

);
Where the removed text was, paste the following code:
If(tglIdeaDetailControls_PostToTeams.Value,
EmployeeIdeasAdaptiveCardToTeams.Run(locFormRecordIdea.Title,gblSelectedRecordCampaign.Title,locFormRecordIdea.'Employee
Idea',locFormRecordIdea.'Employee Idea'));
This code contains the reference to the flow we just added and the variables to pass to Power Automate.
Copy the entirety of the text that was edited and paste it back into the OnSelect property of the Submit inspection button. Verify that there are no errors on the button.
Update app to open the actual record using the Adaptive Card link
Now we'll update the app to accept the hyperlink parameter and support deep linking to records.
The adaptive card has a link that should take us back to the Idea record that was created. We need to make some changes to the Loading page of the app to load the appropriate data.
From the tree view, select the Loading screen. Then select the container conLoading_HiddenHelper and under that select tmrLoadingDelay.
Select the OnTimerEnd property of the timer control and notice that there's an IF condition named If(gblAppLoaded,----------).
Replace that whole IF condition with the following IF condition (added a few more checks along with the original checks).
Note
This code is edited to include deep linking to the specific idea record in case the app is opened from the adaptive card. There are a few collections/values that need to be defined before the screen loads if we want it to deep link to the specific idea record directly
If(

gblAppLoaded,

If(

!IsBlank(Param("subEntityId")), //check if the parameter is blank or not, if
not, populate the relevant variables and collections to make deep linking work

Set(

gblRecordCampaignIdea,

LookUp(

'Employee Ideas',

'Employee Idea' = GUID(Param("subEntityId"))

)

);

ClearCollect(

colResponses,

Filter(

'Employee Idea Responses',

Idea.msft_employeeideaid = gblRecordCampaignIdea.msft_employeeideaid

)

);

ClearCollect(

colFiles,

Filter(

'Employee Idea Files',

'Employee Idea Files'[@Idea].'Employee Idea' = gblRecordCampaignIdea.'Employee
Idea'

)

);

Set(

gblSelectedRecordCampaign,

LookUp(

'Employee Idea Campaigns',

'Employee Idea Campaign' = gblRecordCampaignIdea.Campaign.'Employee Idea
Campaign'

)

);

ClearCollect(

colIdeas,

Filter(

'Employee Ideas',

'Employee Ideas'[@Campaign].'Employee Idea Campaign' =
gblSelectedRecordCampaign.'Employee Idea Campaign'

)

);

If( //check if the user is on a mobile device or desktop/web and redirect the
user accordingly to deep link into the specific idea

Or(

Param("hostClientType") = "android",

(Param("hostClientType") = "ios" And Parent.Width \< 800)

),

Navigate(

'Campaign Detail Screen',

ScreenTransition.None,

{

locVisibleCampaignIdea: true,

locVisibleCampaignView: false,

locCreateNewIdea: false

}

),

Navigate(

'Mobile Idea Screen',

ScreenTransition.None,

{

locVisibleCampaignIdea: true,

locVisibleCampaignView: false,

locCreateNewIdea: false

}

)

),

If( //if the parameter is blank, check if the user is on a mobile device or
desktop/web and redirect the user accordingly

Or(

Param("hostClientType") = "android",

(Param("hostClientType") = "ios" And Parent.Width \< 800),

tglAdmin_Mobile.Value// Studio Testing

),

Navigate(

'Mobile Landing Screen',

ScreenTransition.None,

{locShowSetup: false}

),

Navigate(

'Campaign Summary Screen',

ScreenTransition.None,

{

locShowModal: (gblRecordUserSettings.'Display Splash (Power Apps)?' = 'Display
Splash (Power Apps)? (Employee Ideas User Settings)'.Yes),

locShowPowerAppsPrompt: gblRecordUserSettings.'Display Splash (Power Apps)?' =
'Display Splash (Power Apps)? (Employee Ideas User Settings)'.Yes

}

)

)

)

)
This action should load all the required data appropriately after the app opens. User selecting the record in the adaptive card will be taken to the appropriate idea.
Publish the Ideas App
All the changes to the Ideas app are completed.
The app can now be published by selecting the Publish to Teams button on the top right.
Test the app
Sign in into Teams and navigate to Team where the Ideas app is installed.
Select the Ideas tab on the top.
The Ideas app opens.
Select one of the Campaigns – for example, Workplace Safety.

Select the Submit an idea button.

Enter Title and Description.
Select ratings for the listed questions.
Add any other information needed.
Hit the Submit idea button once all details are populated.
The idea gets submitted.
A notification is sent to the Team in which the app is installed.
Select the link in the notification and verify that the idea record opens.
