Note
Access to this page requires authorization. You can try signing in or changing directories.
Access to this page requires authorization. You can try changing directories.
Timeline is a modernized and optimized control that helps provide you with at-a-glance understandability when working with your customers. You can use the timeline to view information that is connected to a row in a table and occurs over time in a single stream. Some information that can be logged into the timeline includes notes and posts, in addition to displaying activities such as emails, appointments, phone calls, and tasks.
Timeline allows you to:
- Access the command bar to perform common actions quickly
- Filter and view important notes, posts, and activities using multiple filter options, and keep the filtered settings across activities
- Quickly view and manage email conversation threads with ease
- Keep detailed customer records by attaching important files and images to posts

Timeline functionality
The timeline section on the table form is intended to centralize access to information and streamline effort to accomplish actions. The following section is an overview of how the timeline functionality works in each section on the table form.
When enabled by your system administrator, you can use the icons that are displayed on the top-right navigation in the timeline for quick access to do the following actions:
- Create a timeline row
- Work with Filters
- Work with row
- Explore more commands
- Search row
- Add attachments
The timeline dashboard displays only the entities that are configured for the signed-in user. So, what you see on the timeline may differ from what another user sees. The signed-in user sees any rows they followed if those rows are configured to display on the dashboard. For example, if only email and appointments are configured to display, then the signed-in user only sees email that relates to them, which can be email they sent, email sent to them, and email they follow. The same would be true for appointments in this scenario. For more information on setting up timeline, see Set up the timeline control.
Note
The Notes feature isn't available from the timeline.
Create a timeline row
When enabled by your system administrator, you can use the Create a timeline record feature to quickly create appointments, tasks, send emails, and make notes and posts and associate them with other rows.
Select Create a timeline record icon.

Select the type of row you want to create from the display options available.

For information on timeline row configuration, Set up the timeline control.
Work with filters
When enabled by your system administrator, the timeline Filter further streamlines your productivity by allowing you to customize your experience and view data that's relevant to you.

Legend:
- The timeline Filter
 icon is located in the top-right navigation on the timeline.
 - The filter pane displays when the filter icon is selected.
- Use the carats to expand or minimize selections.
- When enabled by your system administrator, row and activity types are displayed in the filter pane. Row and activity types can be filtered by selecting the corresponding box next to the item.
- The
 icon removes and clears all filter selections from the filter pane.
Filter rows on timeline
Filters are valuable for sorting data. You can easily filter through rows and activity types using multiple options to quickly see what matters to you. The filter is available for the activities, notes, posts, and custom entities that are present in timeline.
Filter icon display
- When the Filter icon displays as a transparent , it means the filter pane is empty and nothing has been applied.
- When the Filter icon displays as dark
 , it means filters are applied.
Filter options
The following category and subcategory options are available on the filer menu:
| Category | Subcategory |
|---|---|
| Row type | |
| Activity type | |
| Activity status | |
| Activity due date (active) | |
| Posts by | |
| Modified date |
Save filter settings
You can choose to save your filter settings so that you don't have to set them again each time you work with activities in the timeline.
To save your filter settings, after configuring the filters you want, select the ellipses, and then select Remember my filters.
Note
If you have a system administrator or basic user role, Remember my filters works by default. If you don't have either of these roles, you must have Create/Read/Write privileges to be added to the msdyn_customcontrolextendedsettings table for the setting to work.

Work with rows
When working with rows, you can view key information at a glance or expand rows to view more details. When you hover over a row, actions display that you can use.
Expand all rows
When enabled by your system administrator, you can view timeline rows quickly in a collapsed format or expand a row to see more details for ease of use.

Legend
- The Expand all records
 icon is used to expand all rows listed on the timeline.
 - The Modified on timestamp displays the time the record was last updated.
- Each row has a list of commands relevant to their row type that displays in the top right corner for ease of use.
- Row backgrounds change to grey when you hover over it, and it becomes transparent again when you move the mouse away.
- The carats in the bottom-right corner of each row allow you to expand (^) or minimize (v) the display views.
More commands
The More commands option contains refresh, sort, and email functionalities.

Legend
- The More commands
 icon, when expanded, provides more functionality options.
 - The Refresh timeline command updates row details in the timeline.
- The Sort newer to older or Sort older to newer command is used to sort rows.
- The Show email as command is used to enable or disable threaded email views.
- The Display layout command allows you to choose from two different views: Roomy or Cozy. Roomy (set by default) shows you more information, such as profile details, and adds space between the rows. Cozy hides some of the details, such as icons, and compacts the space between rows.
- The Remember my filters command allows your filters to persist when you close the record so that they continue to be applied across sessions.
- The Reset to default command reverts all of the command settings you changed back to the default settings.
View email inline in timeline
If preferred, you can view email messages inline on the timeline rather than open them as separate pages.
To view an email directly in the timeline, on the row, select View more. The email is displayed on the same form. When you’re finished viewing the email, you can collapse the screen and return to the previous view of the form.

Threaded email views in timeline
Use the threaded email view option to save valuable space when you have emails with multiple replies. This view consolidates email threads when collapsed.
Collapsed threaded email view

Legend
- When enabled using the Always show email as conversations option under More commands , emails with multiple responses are grouped together into threaded emails.
- The Show more link appears in the bottom-left corner of the last visible email in the thread to view the complete string of email responses.
Expanded threaded email view

Legend
- When expanded, the most recent 10 email responses in the thread display. To display more, select Show more to expand the view again.
- Emails in the same thread are displayed as being linked together.
Enable threaded email views in timeline
Enabling the threaded email view is done via the timeline configuration in Power Apps. Threaded email views must be done in this setting for the specific table, in the specific form, for each specific timeline.
Threaded email views can be enabled in timeline via two options:
Option 1:
You can enable the threaded email view using the More Commands ![]() feature, located on the right-hand side of the timeline.
feature, located on the right-hand side of the timeline.
Enable threaded email through the More Commands option
Steps:
- Use the More commands icon on timeline that displays a flyout menu.
- Select Always show email as conversations to thread and group all emails in that specific timeline.

Option 2:
Enable threaded email through Personal Options setting
To enable threaded email via this option, go to the command bar and select Settings, then Personalization Settings. The Set Personal Options dialog box is displayed so you can use the following steps to enable the threaded email view on timeline.
Steps:
- Select the Email tab.
- Select the Show emails as conversation on Timeline check box.
- Select OK.

Note
The emails as conversation view is based on the user's preference. Personal settings are tied to the user, not the form, which means when you enable the threaded email view, the setting is applied to all of your timeline views.
Search rows on timeline
When enabled by your system administrator, you can easily search for rows in the timeline. When you search for a phrase in the timeline, it searches in the title, subject of the row, body, or description fields of the row and displays the row for you.

Legend
- The Search bar allows you to quickly find rows using keywords or phrases that the search feature retrieves and displays below the search bar.
- Keywords that are used are highlighted.
Work with notes and posts
Notes allow you to record richly formatted information and images for reference, summary, or investigation. You can easily add a mention to another user or a reference to a timeline row. The mention capability is available in timeline only when rich text notes and rich text posts are enabled.
When you type the @ symbol, the results you see are matches with the first name, last name, or email address of system users starting with your search string. When you mouse over the profile image, you can view the user's detailed profile card and online presence status. More information: View the profile card for a contact or user.
When you type the # symbol, the results you see are matches with the account and contact name table rows starting with your search string.
Add a note or post to a row on timeline
When enabled by your system administrator, you can either add a note or a post to a row on timeline. Each note and post has a maximum size limit of 100,000 characters.
You can also enter a note and add it to a row, but you can only add one attachment per note. You can only add an attachment if notes are enabled.
Note display view
When enabled by your system administrator, the Note field is displayed under the Search feature on timeline.

Post display view
When enabled by your system administrator, the Post field is also displayed under the Search feature on timeline.

Add an attachment to a post
You can add an attachment to a post, such an image or a document. The supported file formats are as follows: .JPG, .PNG, and .PDF.
To add an attachment to a post:
In the Create a post section in the timeline, select the Attach icon in the lower-left corner.

Browse to the file you want to attach to the post, and then select it.
Finish the edits you want to make to your post, and then in the timeline, select Add post.
Preview an attachment in the timeline
You can view previews of attachments in the timeline if they're in the supported file format (.JPG, .PNG., or .PDF). Any attachment that's viewable inline on the timeline can be downloaded, whether or not a preview is available.

To preview an attachment in the timeline, do either of the following steps:
In edit mode:
- Right-click the attachment, and then select Preview. The Attachment preview dialog opens with the attachment displayed. You can view and download the attachment from the dialog.
- When you're finished viewing the attachment, select Close to return to the note or post.
OR
In read mode:
- Select the attachment. The Attachment preview dialog opens with the attachment displayed. You can view and download the attachment from the dialog.
- When you're finished viewing or downloading the attachment, select Close to return to the note or post.
Note
The use of the Attachment preview dialog to view the file can be skipped in the browser by using Ctrl + Left click (of mouse). By doing so, the attachment is directly downloaded without previewing it.
Access the command bar to perform actions
When you hover your cursor on or expand an activity, post, or note, the command bar appears in the top-right corner of the row with the specific options that support that activity, such as assigning it to others, adding it to a queue, converting it to a case, liking or replying to a post, editing a note, or deleting an activity. However, not all rows can perform the same actions.
Command actions by row

Legend
- Only the actions associated with that row are displayed in the top-right command bar displayed in the row.
- Each row displays a different set of associated actions. Not all actions work on all rows.
The following table is an overview of the command bar icons and the actions they support:
| Icon | Name | Description |
|---|---|---|
| Assign | Lets you assign a task. | |
| Close Activity | Lets you close the activity row. | |
| Add to Queue | Lets you add a task to a queue. | |
| Open Row | Lets you open a row. | |
| Delete | Lets you delete the row. | |
| Reply | Lets you reply to an email. Note: This command is only available for Email. | |
| Reply All | Lets you reply to all for an email. Note: This command is only available on Email. | |
| Forward | Lets you forward an email. Note: This command is only available on Email. | |
| Like this post | Lets you like a post. Note: This command is only available on Posts. | |
| Edit this note | Lets you edit a note. Note: This command is only available on Notes. |
The following table is an overview of the default command bars for frequently used activities, notes, and posts:
| Activity | Command bar icons | Notes |
|---|---|---|
| Email (draft) | Open Row, Delete | |
| Reply, Reply All, Forward, Open Row | ||
| Appointment | Assign, Close Activity, Add to Queue, Open Row, Delete | |
| Appointment (closed) | Assign, Add to Queue, Open Row, Delete | |
| Task | Assign, Close Activity, Add to Queue, Open Row, Delete | |
| Task (closed) | Assign, Add to Queue, Open Row, Delete | |
| Phone Call | Assign, Add to Queue, Open Row, Delete | |
| Note | Edit, Delete | |
| Post (user) | Like, Reply, Delete | Only the author of the post has the ability to delete it. The author always has the ability to delete regardless of user privilege. |
| Autopost | Like, Reply, Delete |
Work with notes
The Note message box has a rich text editor that enables you to use rich text and create well-formatted content.

Legend
- Note title field for adding headings and subjects.
- Notes have a rich text editor so you can format and structure your messages.
- The rich text editing tool expands to a full menu for quick access to formatting features.
- The paperclip is used to attach files to your note.
- Attached files are displayed at the bottom of the note.
Note
- Only Notes have rich text capability, and they're only available in the timeline.
- You can only format the message body of a note; not the title.
- The rich text editor is available only for Unified Interface.
- If you create a rich text editor note in Unified Interface and then view the note in the web client, it displays in HTML syntax.
View whether a note has attachments and inline files in the timeline
If you attach a file to a note or include an inline image in the note, the timeline shows that the note has an attachment or inline files. If you attach a file or include multiple files inline, the note shows the number of files using the first two file names and a number to represent the remaining count of and the file type.

Add a mention or reference a team member in a note

Legend
- Typing the @ sign in the Note field displays a flyout menu with a list of users that have been recently used.
- If the user row isn't displayed, typing the name after the @ sign refreshes the rows in the flyout menu using the Quick Find search engine that's operating in the background.
- Switch views using Advanced to display the Lookup Records pane. In the Lookup Records pane, you can switch between the Recent records and All records view to search rows.
When you mouse over the profile image, you can view the user's detailed profile card and online presence status.

Note
You can mention only a system user in a note. For example, a team member within your organization.
Add an attachment to a note in timeline
When enabled by your system administrator, you can add an attachment, such as a file, to a note in timeline to share with users. Any attachment that is viewable inline on the timeline can be downloaded, whether or not a preview is available.
Note
- The list of allowed attachments is configured by your system administrator.
- On iOS and Android you can only select and attach a picture or video.
Select the paperclip ![]() icon to attach a file to a note.
icon to attach a file to a note.
Edit Note
When you attach a file to your note, the Edit note screen displays, and attachments show at the bottom of the Edit note screen.
Important
You can only add one file attachment per note.

Quickly save notes
The Quick save feature allows you to save your notes faster by selecting Ctrl+S on your keyboard at any point when you're typing a note. When you use Quick save, you don't have to navigate to Save or Save and Close on the command bar.
When you use Ctrl+S, a Save successful confirmation message is displayed in the note to let you know your note saved on the timeline.

Work with posts
When enabled by your system administrator, you can either add a post to a row or mention to another user or timeline.
Add a mention or reference a team member in a post

Legend
- Typing the @ sign in the Post field displays a flyout menu with a list of users that have been recently used.
- If the user row isn't displayed, typing the name after the @ sign refreshes the rows in the flyout menu using the Quick Find search engine that's operating in the background.
- Switch views using Advanced to display the Lookup Records pane. In the Lookup Records pane, you can switch between the Recent records and All records view to search rows.
When you mouse over the profile image, you can view the user's detailed profile card and online presence status.
Note
You can mention only a system user, i.e. a team member within your organization, in a post.
Add references in a post in timeline rows
To add a reference such as links in a post to a timeline row, select the ![]() icon, select Post, and then complete these steps:
icon, select Post, and then complete these steps:

Legend
- Links can be added to a row by typing # which displays a flyout menu with a list of rows recently accessed. Type a keyword after the # tag and the display refreshes in the flyout menu via the Quick Find search engine that's operating in the background.
- Rows displayed can be of any row type, such as accounts, contacts, or leads.
- The icons beside the row names in the flyout menu indicate the row types, which help you determine which row to select.
- Advanced provides more options when a row can't be located by allowing the user to switch to a different view or create a new row.
Look up rows in posts in timeline

Legend
- The Lookup Records pane provides users with options to switch between the Recent records and All records view to find a row.
- Change View to see rows from a different view.
- New Record allows you to create a new row if you can't find the row you need.
For more information on notes and post functionality and configuration, see: Set up the timeline control
Use the rich text editor toolbar
The rich text editor toolbar provides features and functionality that allows you to work with rich text format in notes.
Formatting options
The following table describes the different formatting features and functionality options that are available in the rich text editor that you can use in notes.
Note
You can access your browser's context menu by selecting Ctrl + right-click. This setting is useful if you need to use your browser's built-in spellchecker. Otherwise, you can right-click to provide contextual formatting for any element you are using.
| Icon | Name | Shortcut key | Description |
|---|---|---|---|
 |
Format Painter | Ctrl+Shift+C, Ctrl+Shift+V | Apply the look of a particular section to another section. |
 |
Font | Ctrl+Shift+F | Select a font of your choice. The default font is Segoe UI. Note: When you select any formatted content, the font name for that content displays. If your selection contains multiple fonts, the topmost font name of your selection is displayed. |
 |
Font size | Ctrl+Shift+P | Change the size of your text. The default size is 9 pt. Note: When you select any formatted content, the font size for that content displays. If your selection contains multiple font sizes, the topmost font name of your selection is displayed. |
 |
Bold | Ctrl+B | Make your text bold. |
 |
Italic | Ctrl+I | Italicize your text. |
 |
Underline | Ctrl+U | Underline your text. |
 |
Text Highlight Color | Make your text stand out by highlighting it in a bright color. | |
 |
Font Color | Change the color of your text. | |
 |
Bullets | Create a bulleted list. | |
 |
Numbering | Create a numbered list. | |
 |
Decrease Indent | Move your paragraph closer to the margin. | |
 |
Increase Indent | Move your paragraph farther away from the margin. | |
 |
Block Quote | Apply a block-level quotation format in your content. | |
 |
Align Left | Ctrl+L | Align your content with the left margin. (Commonly used for body text to make it easier to read.) |
 |
Align Center | Ctrl+E | Center your content on the page. (Commonly used for a formal appearance.) |
 |
Align Right | Ctrl+R | Align content to the right on the page. (Commonly used for a formal appearance.) |
 |
Link | Create a link in your document for quick access to web pages and files. Pasted or typed URL text is converted into a link. For example, "http://myexample.com" becomes "http://myexample.com". In the Link dialog box, choose the type of link you'd like to insert. The Link Info tab allows you to choose the link type and set the link protocol and URL. The Target tab is only available for the URL link type. It specifies the location where the link opens after you select it. |
|
 |
Unlink | Delete a link in your email or document. When you place the cursor on a link, the Unlink button on the toolbar becomes active. Select the button to remove the link and make it plain text. |
|
 |
Superscript | Type small letters just above the line of text. | |
 |
Subscript | Type small letters just below the line of text. | |
 |
Strikethrough | Cross out text by drawing a line through it. | |
 |
Insert Image | You can insert an image by directly copying and pasting it inline in the editor, dragging and dropping it from your desktop or local folder directly into the editor, or by typing a URL. The following formats are supported: .PNG, .JPG., or .GIF. To insert an image inline in your article: 1. Drag and drop the image or copy and paste it directly into the article. 2. Drag any corner of the image to resize it. To insert an image using a URL or navigating to the local image: 1. Choose Insert Image. 2. In the Image property dialog, choose from the following options:
Note: |
|
 |
Left to Right | Change the text to left-to-right for content such as a paragraph, header, table, or list. Commonly used for bi-directional language content. This setting is the default setting. | |
 |
Right to Left | Change the text to right-to-left for content such as a paragraph, header, table, or list. Commonly used for bi-directional language content. The default setting is left-to-right. | |
 |
Undo Typing | Undo changes you made to the content. | |
 |
Redo Typing | Redo changes you made to the content. | |
 |
Clear All Formatting | Remove all formatting from a selection of text, leaving only the normal, unformatted text. | |
 |
Add a Table | Add a table to your content. After adding a table, you can do any of the following:
|
|
 |
Expand Toolbar | Appears when the toolbar is collapsed. Select to expand the toolbar and make all options visible. | |
 |
Copy to Clipboard | Copies entire text in a note to the clipboard so that you can paste the contents in another location. |
The rich text editor is enabled by default. Your system administrator can enable or disable the editor for you.
Use timeline highlights powered by generative AI
To learn about AI-generated timeline highlights, see Use AI-generated timeline highlights.
View a conversation transcript
In the timeline, you can view the transcripts of completed chats you had in conversation channels. To view these transcripts, you must have prvReadmsdyn_transcript permission. More information: Roles and permissions
To view a conversation transcript, select the View more link in the row for which you want to view the transcript. The row expands and the entire transcript is displayed inline.

View what you missed in timeline
When you access the timeline after being away, activities that you missed display at the top of the timeline, denoted with a blue vertical line next to them. You can quickly open the activities or scroll past them.

Pin or unpin records in timeline
If your administrator has enabled the pin setting and you have write/delete access, you can quickly access records, such as activities, by keeping them at the top of the timeline. Pinning a record eliminates the need to scroll through every record to find the one you need.
Note
If you have a system administrator or basic user role, the pin and unpin settings work by default. If you don't have either of these roles, you must have Create/Read/Write privileges to be added to the msdyn_customcontrolextendedsettings table for these settings to work.
By default, you can pin notes. The activities that you can pin depend on how your administrator has set up the feature. More information: Let users pin and unpin activities to the top of timeline.
Pin a record by selecting the pin icon next to it. This setting moves it to the top of the timeline in the Pinned section, where it can be quickly accessed. The Pinned section also lists the number of records that are pinned. You can pin a maximum of 15 records. Records that are pinned will stay at the top of the timeline for a year unless you unpin them.

To unpin a record, select the pin icon next to it. Unpinning it moves it out of the Pinned section and back to where it originally appeared in the list of records in the timeline.
Bookmarks
Bookmarks are a quick way for the user to set, and switch between, different sets of filters. Bookmarks are enabled by default. If necessary, you can disable them from the Advanced section.
Note
Bookmarks feature replaces Remember my filters button. Use the steps in the following section to set up your user filters.
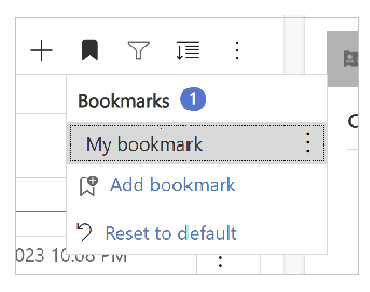
Create a bookmark
Open the filter pane, and select the filters that will be associated with the new bookmark. You may have no filters selected.
Select the bookmark icon
 in timeline's action bar.
Select Add bookmark.
Enter a bookmark name. Optionally, set it as a default bookmark.
Select Save.
Selecting the bookmark icon again will now display a flyout of your created bookmarks. You can apply a bookmark by selecting it from this list, or edit it using the More options button on the right side of the bookmark.
If a bookmark is selected, its filters are applied to the timeline, and is indicated by a filled bookmark icon ![]() in the action bar. Hover over the icon to see the name of the bookmark, or select the icon. The selected bookmark has a grey background color.
in the action bar. Hover over the icon to see the name of the bookmark, or select the icon. The selected bookmark has a grey background color.
Note
You can have a maximum of 15 bookmarks.
Edit a bookmark
Any bookmark can be renamed, updated, or deleted from the More options menu.
Note
Selecting Delete directly deletes the bookmark.
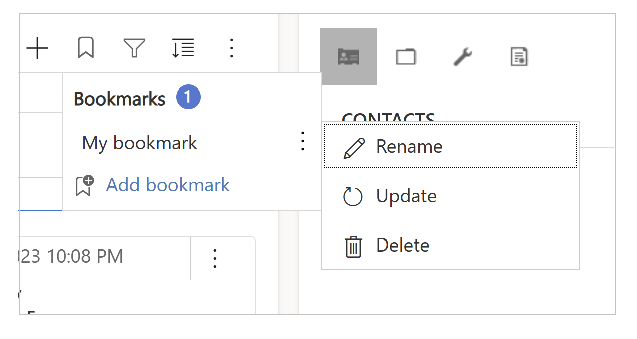
Updating a bookmark will change its filters to the currently selected filters.
You may also set this bookmark as a default for the current form or all forms.
Set a default bookmark
When creating or updating a bookmark, you may select the Set as default bookmark checkbox, with the option to apply this change for the current form or globally.
A default bookmark has a star icon ![]() next to its name, and is selected automatically when the timeline loads, overriding any admin filters set for timeline.
next to its name, and is selected automatically when the timeline loads, overriding any admin filters set for timeline.
Note
You may set a bookmark as a form default for multiple forms; however, it can't be both a form default and a global default. A form-default bookmark will override a global one.
Reset to the default view
If a nondefault bookmark is selected, or if other filters are applied, a reset to default button appears in the bookmark flyout. This applies the default bookmark to timeline, if one exists, otherwise clearing all filters.
Bookmark filters can't be applied
If a bookmark's filters can't be applied (for example, a bookmark that filters for notes while timeline has notes disabled), then an exclamation mark icon is displayed next to its name.