Note
Access to this page requires authorization. You can try signing in or changing directories.
Access to this page requires authorization. You can try changing directories.
You can run an instant flow to automate repetitive tasks, generate documents, track approvals, and more, from inside a stage in a business process.
Add an instant flow as a step in a business process
Let's assume you sell printers and you use the Lead to Opportunity Sales Process to close deals. As part of this process, you’d like to have the team lead review and approve proposals that the sales team puts together in an earlier stage of the business process flow before sharing it with the customer.
To do this, you'll need to do two things:
- Build an instant flow that requests review and approval of the proposal from the team.
- Add the instant flow as a step in the Lead to Opportunity Sales Process.
Tip
Only solution-aware flows can be added as a step in a business process.
Build an instant flow
In Power Automate, select Solutions in the navigation menu.
Select Default Solution from the list of solutions that appears.
Select the + New menu, and then select Flow from the list that appears.
Search for, and then select the Microsoft Dataverse connector.
Search for, and then select the When a row is selected trigger from the list of Microsoft Dataverse triggers.
Set Environment to Default, and then set Table Name to Lead to Opportunity Sales Process.
Add a text input column for the user to enter the link to the proposal.

We'll need information from the business process flow instance to help provide context for the approval request so follow these steps to do this.
Add the Parse JSON action.
Set Content to table by selecting it from the list of dynamic values for the When a row is selected trigger.
Paste the following content into the Schema column.
{
    "type": "object",
    "properties": {
    "entity": {
        "type": "object",
        "properties": {
            "FlowsWorkflowLogId": {
                "type": "string"
            },
            "BPFInstanceId": {
                "type": "string"
            },
            "BPFInstanceEntityName": {
                "type": "string"
            },
            "BPFDefinitionId": {
                "type": "string"
            },
            "BPFDefinitionEntityName": {
                "type": "string"
            },
            "StepId": {
                "type": "string"
            },
            "BPFDefinitionName": {
                "type": "string"
            },
            "BPFInstanceName": {
                "type": "string"
            },
            "BPFFlowStageLocalizedName": {
                "type": "string"
            },
            "BPFFlowStageEntityName": {
                "type": "string"
            },
            "BPFFlowStageEntityCollectionName": {
                "type": "string"
            },
            "BPFFlowStageTableRowID": {
                "type": "string"
            },
            "BPFActiveStageId": {
                "type": "string"
            },
            "BPFActiveStageEntityName": {
                "type": "string"
            },
            "BPFActiveStageLocalizedName": {
                "type": "string"
            }
        }
      }
    }
}
Things should look like this now:

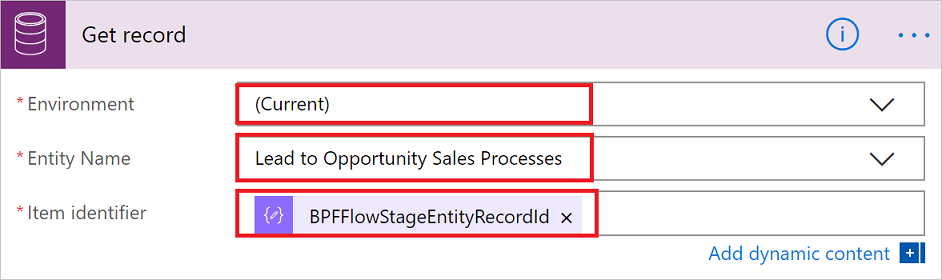
Add the Get row by ID action from the Microsoft Dataverse connector.
Set Table Name to Lead to Opportunity Sales Process, and Row ID to BPFFlowStageTableRowID.
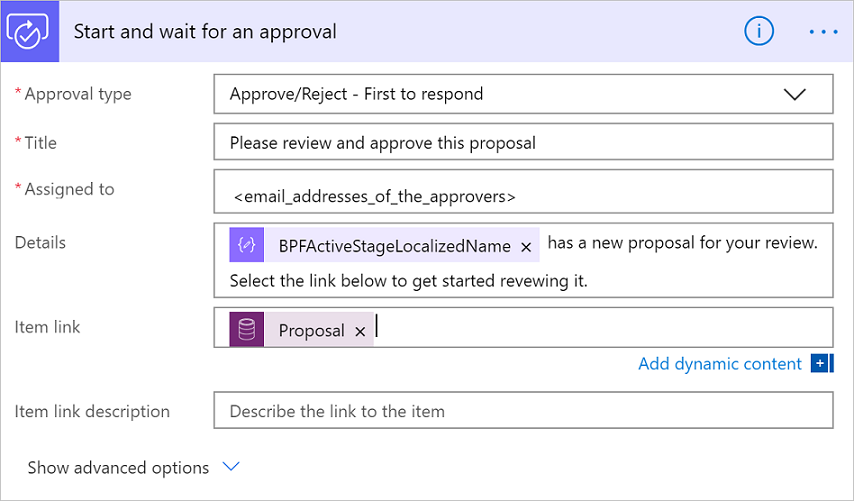
Now that we have the data, define the approval process by adding the Start and wait for an approval (V2) action, and then filling in the relevant information. Learn more about approvals if you are not familiar.
Tip
- Use the dynamic content picker to add columns from the Get row by ID action to add relevant information to the approval request so that approvers can easily know what the request is about.
- To provide further context regarding the active stage that the business process is in, add the BPFActiveStageLocalizedName column from the list of dynamic values.
Your Start and wait for an approval (V2) card might look similar to this one:
Finally, save the flow and then turn it on.
Add this flow as a step in the Lead to Opportunity Sales Process.
Now that you've created the instant flow, all that's needed is for you to add it to your business process flow.
- Open the Lead to Opportunity Sales Process in the business process flow designer.
- Drag and drop the Flow Step (Preview) from the list of Components onto the Propose stage.
- Next, select the search icon in the Select a Flow column to list all flows that you can added to a business process flow.
- Select a cloud flow from the list, and then save your changes by selecting the Apply button at the bottom of the properties pane.
- Finally, select the Update button to make this business process flow with its new instant flow step available to your users.
Flow step considerations
The status of your flow step might be Processing even after your flow successfully ran to completion, if you are not writing to the process log. In order to mark a cloud flow step as completed, add the Update a row action of the Microsoft Dataverse connector under the If yes path. Set the Table to Process Logs. Then set Row ID to FlowsWorkflowLogId by picking it from the list of dynamic values. Finally, set Status Value to Succeeded by selecting it from the dropdown.
Note
The user requires read access to the System Jobs table in Dataverse for the status to change from Processing to Completed.