Create orders on Dynamics 365 Supply Chain Management
Dynamics 365 empowers your organization to deliver operational excellence and delight every customer. To make your use of Dynamics 365 even more productive and save users time and errors, we're releasing free automation solutions that let Dynamics 365 customers automate common tasks.
This article outlines the steps administrators need to allow users to automate quality order creation for Dynamics 365 Supply Chain Management and focus on higher-priority activities that require their unique creativity.
Prerequisites
Before starting, you must prepare your environment with adequate licenses and software setup. This section provides step-by-step instructions about how to get the grounds ready.
Software
You'll need to:
- Install Power Automate. Power Automate will carry out the steps in Dynamics 365 as if a human were doing it in front of their computer.
- Sign out of the Dynamics 365 app you wish to automate.
- Get the appropriate security role for the automation to run.
Sign out of the Dynamics 365 app you wish to automate
To accomplish the full automation, sign out of the application before running the automation for the first time. You need to do this step if you switch between automation and your account.
Get the appropriate security role set up for the account running the automation
You need to decide which work account will run the automation. It can be a dedicated account created by your admin in Microsoft Entra ID or the account of an existing employee. Check that the chosen account has the appropriate security roles to access the surfaces you're automating.
We recommend the following security roles:
| Application | Security role | Link to documentation |
|---|---|---|
| Power Platform | Environment admin or environment maker (if the environment already has Dataverse and unattended license needed) | |
| Dynamic 365 Supply Chain Management |
Licenses
If you already use Power Automate, PowerApps and Dynamics 365 applications on a day-to-day basis, you can skip this section and go to Install the Dynamics 365 RPA solutions.
Otherwise, you need at least a trial license for these three products. This section shows you how to acquire these trial licenses.
Get a trial license for Power Automate
Power Automate can automate processes by doing what a human would do on a keyboard and screen.
There are two ways to automate processes:
- Attended mode: someone is sitting in front of their computer and watching the process run as if they were doing it manually.
- Unattended mode: the process runs in the background on remote machines that users don’t see.
To run attended, users need to acquire the Power Automate per-user license with RPA. To run unattended, users need to have acquired two licenses: Power Automate per-user license with RPA and the Power Automate unattended add-on.
To get a trial license for Power Automate per-user license with RPA:
- Go to the Power Automate portal, navigate to My Flows > Desktop flows.
- Select Start free trial now
Alternatively, launch Power Automate for desktop and select Start trial on the console on the Premium features dialog.
To add a trial license for Power Automate unattended add-on:
- As an admin, you can get an RPA unattended add-on and assign it to your environment. To find more information about the RPA unattended add-on, go to Power Automate sign-up Q&A in your organization
Get a trial license for Power Apps
Follow the instructions in Explore Power Apps for free for 30 days to get a trial license for Power Apps.
Get a trial license for the Dynamics 365 applications you wish to automate
To get started with Dynamics 365 Supply Chain Management and automate the quality order creation process, see Discover how Dynamics 365 Supply Chain Management can transform the way you do business.
Setup steps
Now that prerequisites are set, you are on your way to get the free solutions that automate your processes.
Install Power Automate for desktop
Download and install Power Automate on the machine that will run the automation. You can find more information about Power Automate installation in Install Power Automate.
Switch the Power Automate machine settings to the environment in which you'll install the solution.

Sign in to the Power Automate portal to create a cloud flow with manual trigger.
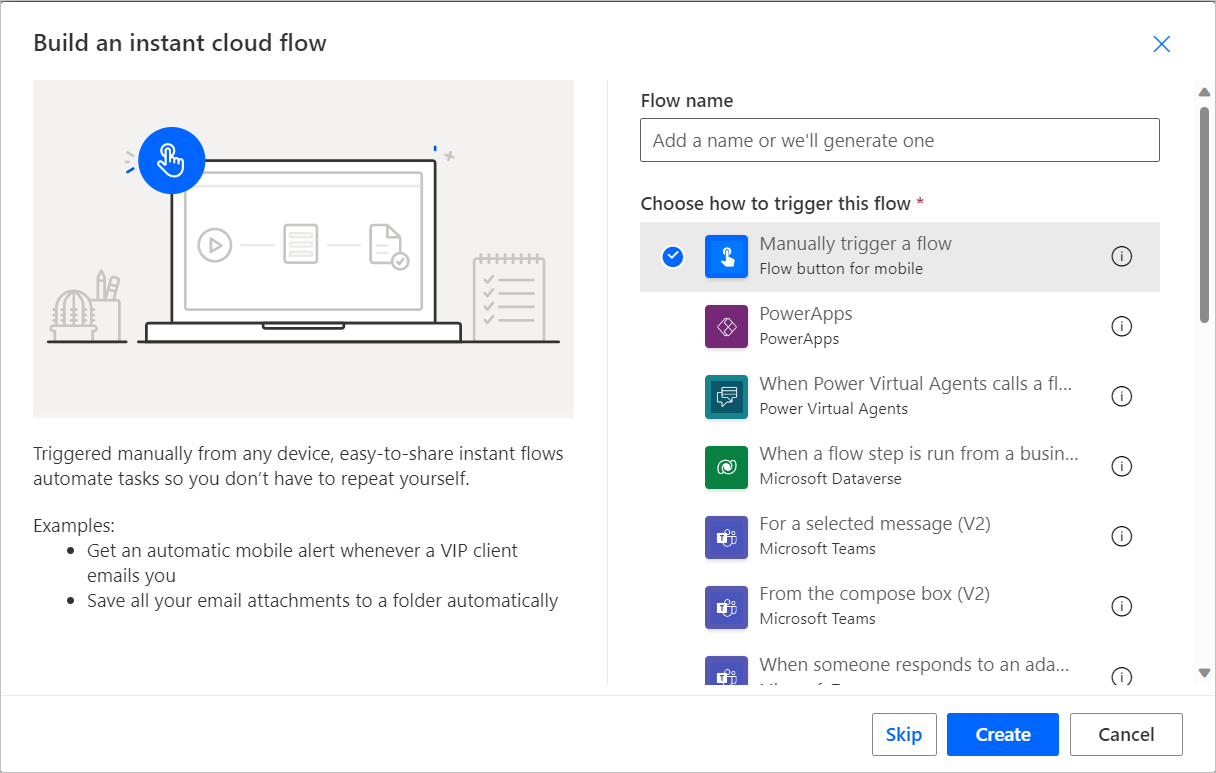
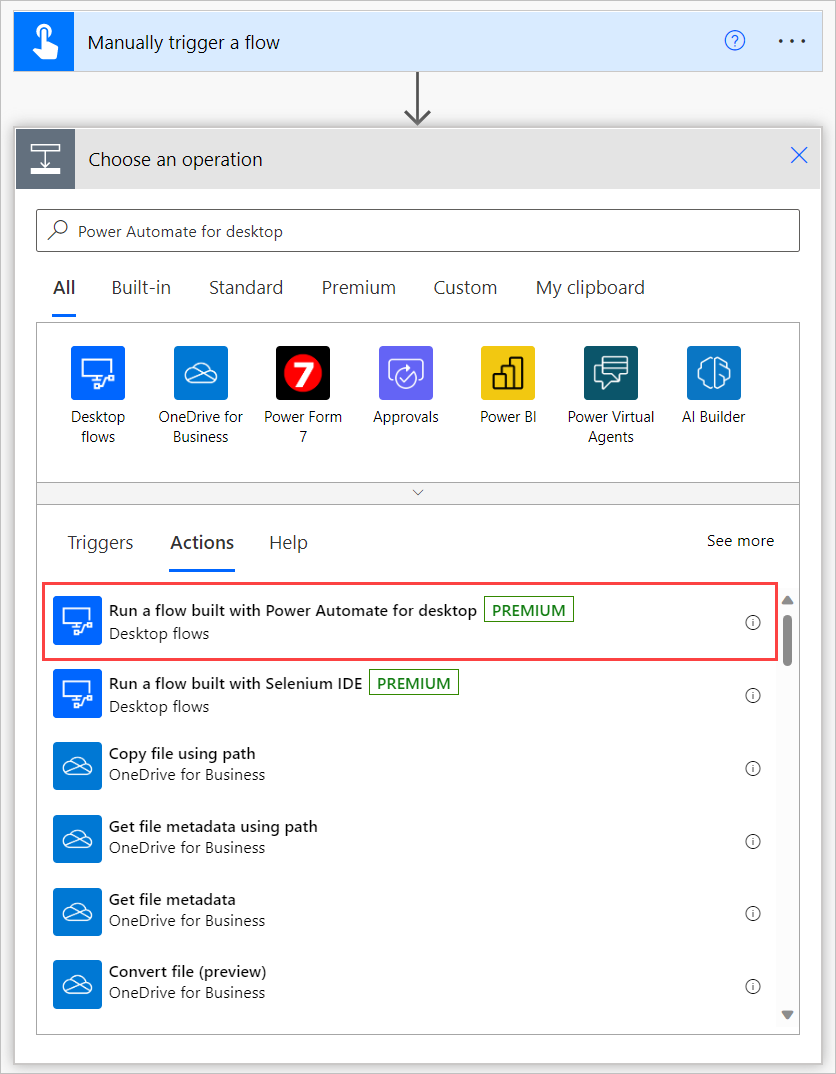
Add the appropriate action to run desktop flows.
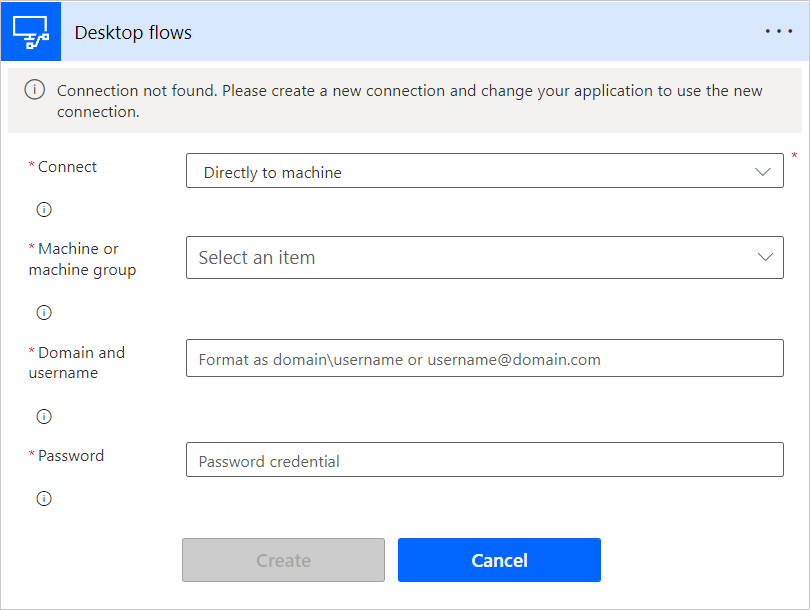
Select Directly to machine in the Connect field. Then, select the machine name on which you've installed Power Automate, and enter the machine credential (the username and password you use to sign in to the machine. To find more information about direct connectivity, see Manage machines.
Install the Dynamics 365 RPA solution
Download the Dynamics 365 automation solution and save it on your machine.
Import the Dynamics 365 automation solution in the environment of your choice:
- Go to https://powerautomate.microsoft.com and sign in using your work account.
- Select the environment in which you wish to work.
- In the vertical menu on the left of your screen, select Solutions.
- In the main bar, select Import then Browse.
- Navigate to the solution file you previously downloaded and double-click on it.
- Select Next.
Configure the connections needed to be used by the solution in the environment:
For each connector the solution uses, either select an existing connection or create a new one using your Microsoft account and credentials of your choice.
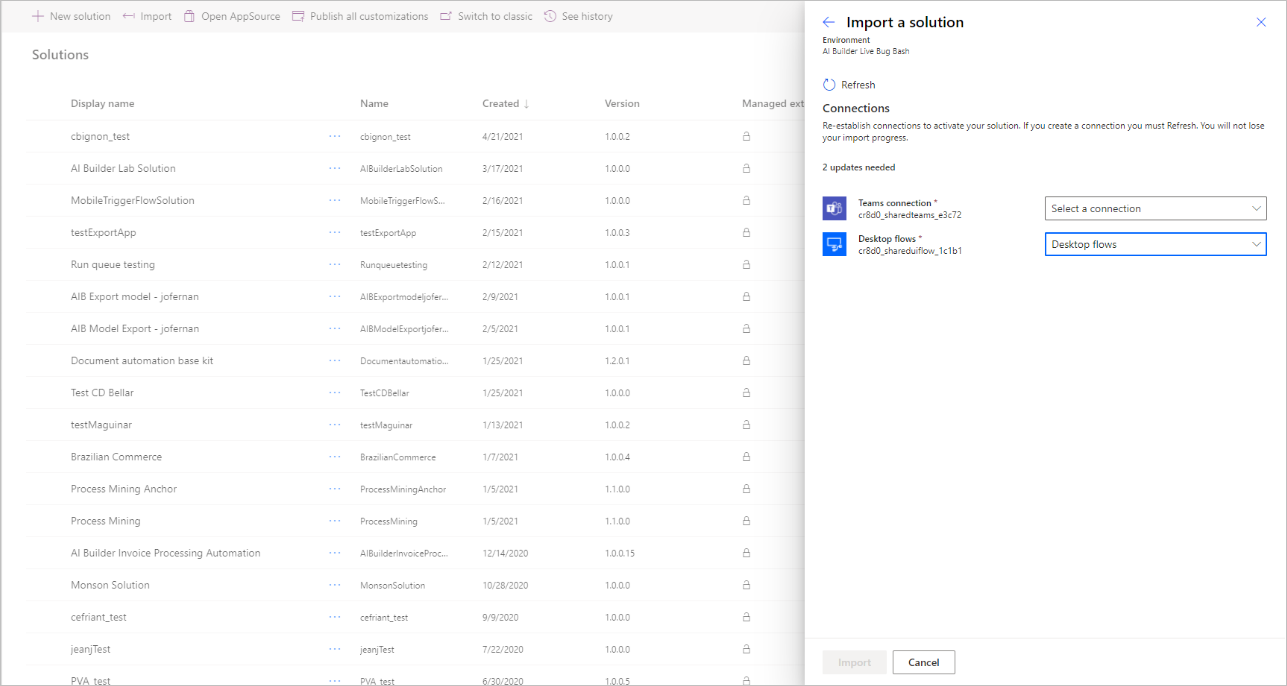
Go back to the tab in which you initiate the above step and select Refresh.
Select Import. The solution explorer shows you a message informing you that the solution is being imported. This step may take a few minutes.
Enter the parameters that the solution should use to run the process:
From the solutions explorer, select the appropriate solution to open it.
In this step, you'll see some rows with the value Environment Variable in the Type column. Add values for each of these.
Select each environment variable, and under Current Value, select Add New Value to put in your parameter.
Environment variable name Description QOrder Parameter - SCM Portal URL URL for the SCM environment including parameters for company and form for the InventQualityOrderTable. For example: https://hxoshmyfoodus9o1mf.sandbox.operations.int.dynamics.com/?cmp=USMF&mi=InventQualityOrderTableSCM SignIn User The user account to sign in to Dynamics 365 SCM. For example: helloworld@contoso.com QOrder Parameter – Site The name of the site to use for filling in the quality order creation form. QOrder Parameter – Test Group Configure the Test group for the quality order creation QOrder Parameter - Warehouse Configure the Warehouse for the quality order creation 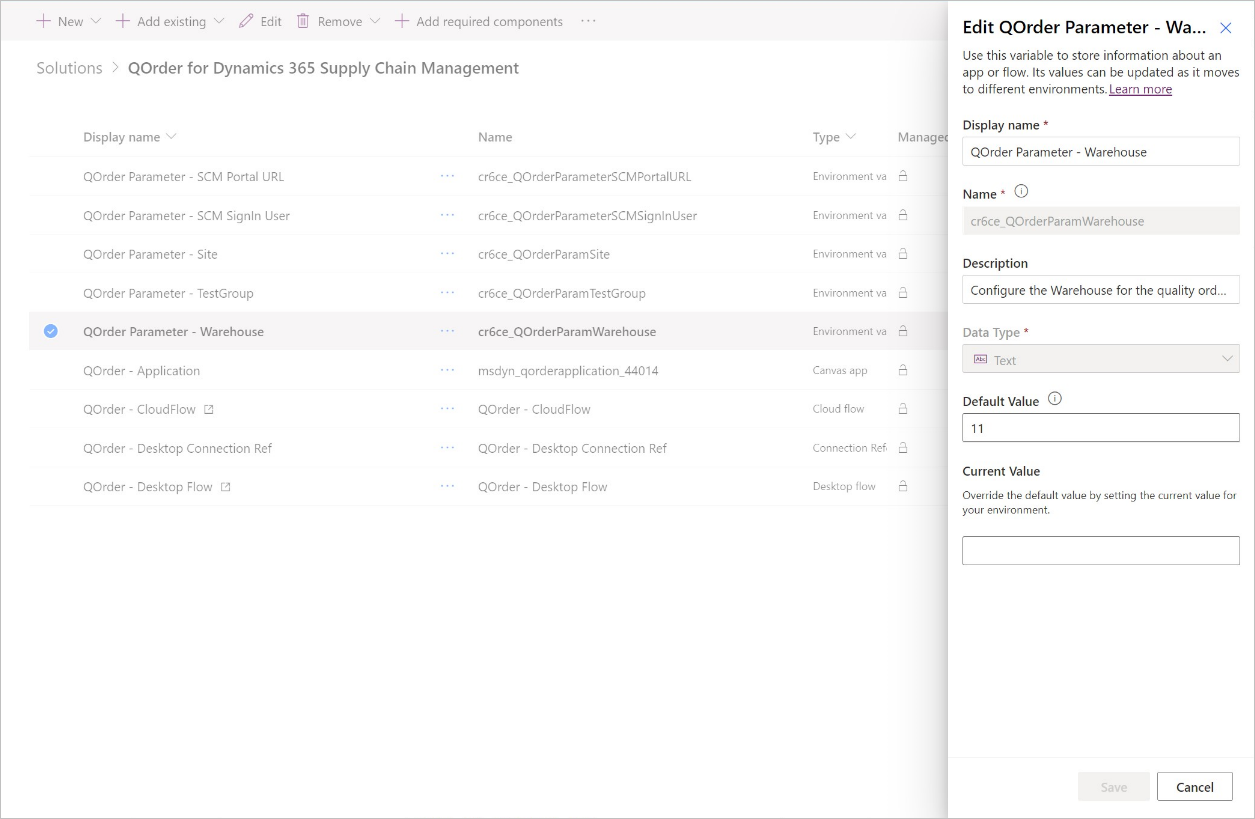
Turn on the cloud flow in the solution:
- In the solution, select the … menu for the QOrder - CloudFlow cloud flow.
- Select Turn On
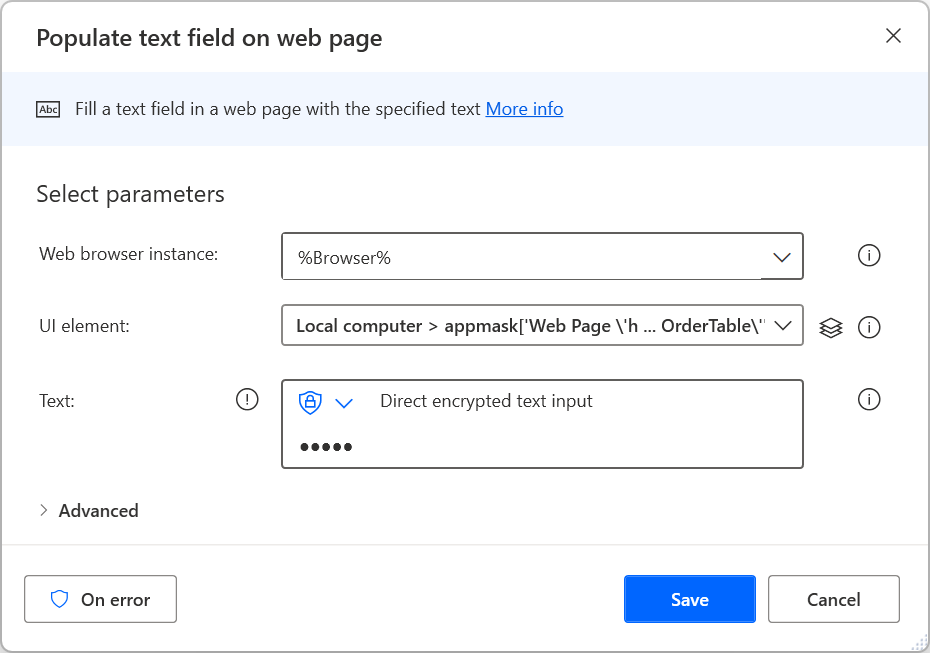
Put in the encrypted credentials to be used by the solution to sign in to Dynamics 365:
From the solution explorer, select the line item called QOrder – Desktop Flow
Select Edit, then Launch App. This step will launch Power Automate for desktop.
Under the Subflows dropdown, select LoginSCM.
In the LoginSCM subflow, open the properties of the action 8.
Fill in the Text field with the password of the account to use during automation.
Share each component of the solution (app, connection, flow, desktop flow) to other users in your company as run only user.
Have the user launch the QOrder-Application Power App from their phone and start using it.
Known issues
| Known issue | Workaround |
|---|---|
| If you acquire the adequate licenses for Power Automate and Power Apps after you install the solution, the flow or app will be turned off. | After you acquire the licenses, go back to the solution explorer, select the … menu for the app or flow, and then select Turn On. |
Feedback
Coming soon: Throughout 2024 we will be phasing out GitHub Issues as the feedback mechanism for content and replacing it with a new feedback system. For more information see: https://aka.ms/ContentUserFeedback.
Submit and view feedback for