Note
Access to this page requires authorization. You can try signing in or changing directories.
Access to this page requires authorization. You can try changing directories.
Integrate Power Automate with Excel for the web and desktop to automate repetitive tasks, reduce errors, and improve productivity. For example, you can track customer feedback, manage projects, or analyze data. By connecting Excel to apps and services such as SharePoint, Teams, and Planner, Power Automate can make collaboration and data sharing across different platforms seem effortless.
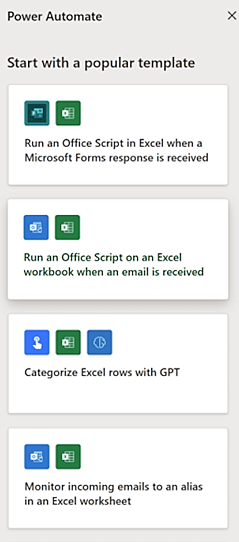
With this feature, you can easily create Power Automate workflows in Excel. To get started, select a Power Automate prebuilt template that closely meets your needs. Then, customize it to fit your Excel workbook.
Here are some of the prebuilt templates that you can use in Excel:
- Monitor incoming emails to an alias in an Excel worksheet
- Track Planner tasks in Excel
- Categorize Excel rows with GPT
Build a flow in Excel
To get started using Power Automate in Excel, follow these steps.
Open your Excel workbook in Excel.
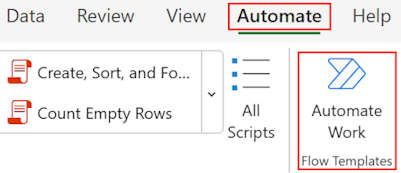
On the ribbon, on the Automate tab, select Automate Work.
Browse the prebuilt templates, and select one.
Follow the prompts to connect to the app or service that you want to integrate with Excel.
Select Create flow.
Important
All flows are created in the default environment.
Manage your flow
After you create a flow, you can manage it from Excel. Management includes the ability to delete your flow, turn it off, edit it, and view details about it.
To manage your flow, select the ellipsis (…) for it in the Power Automate pane, and then select an option on the menu.

Limitations
Here are some limitations to be aware of when using Power Automate in Excel:
- The Power Automate pane is currently available only in Excel for the web and desktop, but not on Mac.
- If your flow uses the Excel Online (Business) connector, you might experience issues. Learn about the issues and limitations in Excel Online (Business).
- Only flows created in the default environment are listed and available to be run in Excel.
Authentication requirements for Excel and Power Automate
When users run Power Automate flows from within Excel, the Excel client performs a token exchange with the Power Automate service. If your organization uses Conditional Access policies (MFA, Terms of Use, or device compliance), the requirements must be consistent between Excel and Power Automate.
If you target individual applications in your CA policy and the requirements differ, users see an authentication error when they try to run flows from Excel. Additionally, if your policy includes Terms of Use, existing flow connections can break because the silent token refresh can't present the acceptance page.
Tip
Target the Office 365 app or All cloud apps in your Conditional Access policy for consistent enforcement. If you must target individual apps, ensure Microsoft Flow Service (Application ID: 7df0a125-d3be-4c96-aa54-591f83ff541c) is included alongside Excel with matching requirements. Learn more in Conditional Access and multifactor authentication in Power Automate.