Set up the automation kit main component
This section includes the manual install process for the main solution of the automation kit. There's an automated command line installer that will also guide you through this process.
Once you've completed the main solution setup, you can setup the following optional components:
Satellite: Allows you to meter deployed Automation Project solutions.
Scheduler - Provides a calendar view of recurring cloud flows that include Power Automate Desktop flows.
Important
Perform all steps using the Automation CoE Admin account mentioned in the Prerequisites article.
Import the main solution into the main environment
Create an environment in which to set up the automation kit.
Sign in to the Power Platform admin center.
Select Environments > + New, and then enter a name, type, and purpose.
Select Yes to create the database, and then select Next.
Keep sample apps and data set to No.
Select Save.
Enable the Power Apps component framework
Once the environment is created, enable the Power Apps component framework.
Sign in to the Power Platform admin center.
Select an environment where you want to enable this feature.
You need to do this for main and all satellite environments.
On the top pane, select Settings.
Select Product > Features.
Turn on Allow publishing of canvas apps with code components.
Select Save.
Import the Creator Kit
Next, import the Power Platform Creator Kit.
Download the Power Platform Creator Kit.
Sign in to Power Automate.
Go to the environment you just created in which the main solution will be imported. For this example, we're importing to the environment named Contoso_Main.
On the left pane, select Solutions.
Select Import > Browse.
Select the Creator Kit solution named CreatorKitCore_x_x_x_x_managed.zip.
Select Import.
Wait for the Creator Kit to finish importing before continuing to the next step.
Import the automation kit main solution
Download the most recent release of the automation kit main managed solution from the Assets section of the automation kit file.
On the left pane, select Solutions.
Select Import > Browse.
Select the Automation CoE main solution (AutomationCoEMain_x_x_x_x_managed.zip).
After the compressed (.zip) file loads, select Next.
Review the information, and then select Next.
Establish connections to activate your solution.
If you create a new connection, you must select Refresh. You won't lose your import progress.
Select Import. The import process can take 10 to 20 minutes to complete.
After importation completes, verify that all the flows are turned on, and share the apps with the appropriate users.
(Optional) Provision the approvals solution
This step is optional.
In new environments, Power Automate approvals functionality isn't configured by default. After Power Automate initiates an approval, the approvals solution gets created.
This process usually takes 5 to 10 minutes. You can do this step while the main solution is being imported.
Sign in to Power Automate. This is where the main solution is being imported.
On the menu to the left, select My flows > New flow > Instant cloud flow.
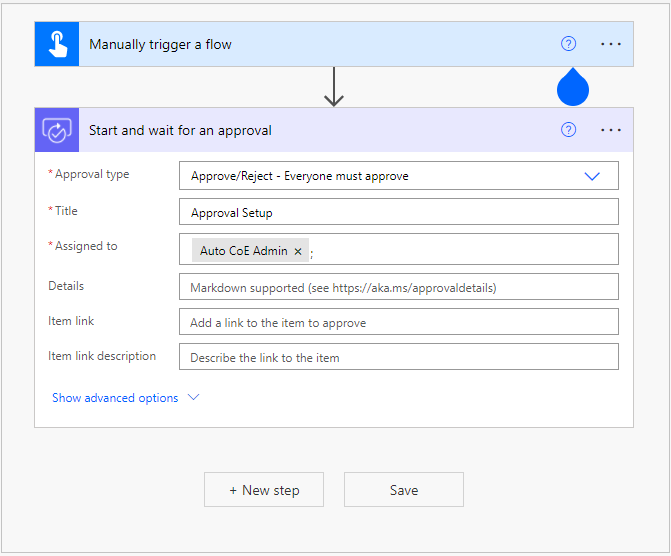
Under the button trigger, add the Start and wait for approval action to the flow.
Fill in your details to trigger the flow.
Here's is an example of how you can configure the Start and wait for approval action.
To learn more about approvals provisioning, go to Power Automate Approvals Provisioning Overview and Troubleshooting.
Assign security roles
Once the importation completes, assign security roles to members of the organization. The main solution comes with three security roles.
Review roles and assign roles based on responsibility.
Automation Project Admin: Maintains the configuration data in the automation kit and maps automation projects to environments.
Automation Project Contributor: Generates or requests new automation projects.
Automation Project Viewer: The business process owner who approves or rejects automation project requests.
To assign roles:
Sign in to the Power Platform admin center.
Select your main environment.
Under Security roles on the Access card, select See all.
Select the security role, and then add members to the security role.
Sync environments
Follow these steps to sync environments. The main solution has a cloud flow called Sync Environments.
Select the Sync Environments flow.
Trigger it if it hasn’t run.
Wait for the run to complete.
Import the desktop flow actions csv
Import all the desktop flow actions from the csv file into the Desktop Flow Action table.
This must be done for all environments in which the automation kit is installed, such as main and all satellites.
Sign in to Power Automate.
Go to your environment where the solution is installed.
Select the Solutions tab.
Find and then select the Automation COE Main solution.
Select the Desktop Flow Action table.
Expand the Import list near the top.
Select Import data from Excel.
After the popup opens, select Upload, and then upload the included Excel file named autocoe_desktopflowactions.csv.
Wait for the mapping status to show as successful.
Select Import.
After the import completes, verify that the data was imported.
Feedback
Coming soon: Throughout 2024 we will be phasing out GitHub Issues as the feedback mechanism for content and replacing it with a new feedback system. For more information see: https://aka.ms/ContentUserFeedback.
Submit and view feedback for