Note
Access to this page requires authorization. You can try signing in or changing directories.
Access to this page requires authorization. You can try changing directories.
A trigger is an event that initiates a cloud flow in Power Automate. For example, to get a notification in Microsoft Teams whenever you receive an email, you might set up a trigger that starts a flow when an email arrives in your inbox. Triggers are essential for automating tasks and workflows. They define the conditions under which a flow should start. This article helps you understand how triggers work and how to optimize them to significantly improve the performance and reliability of your flows.
Types of triggers
Triggers are either polling triggers or webhook triggers. A polling trigger checks for events at regular intervals. A webhook trigger listens for events in real time. When the event occurs, the trigger activates the flow.
The two types of triggers behave differently when the flow is turned off and then back on. Understanding these differences is crucial for ensuring that your flows behave as expected. Learn more in My trigger is firing for old events.
Polling triggers
After it's registered, a polling trigger checks the connected service periodically. When the flow is turned off, the trigger stops polling the service but isn't deregistered. When the flow is turned back on, the trigger picks up where it left off, polling the service for new events since the last poll. This behavior ensures that no data is missed, even if the flow was stopped due to errors or throttling.
However, if a large number of events occurred while the flow was off, they're all processed when the flow is turned on again, possibly leading to delays and performance issues. If you don't want to process pending items when you turn your flow back on, create a copy of the flow and then delete the original. This action re-registers and resets the trigger.
Webhook triggers
Instead of periodically checking a service, webhook triggers register with the service to receive notifications when specific events occur. When the flow is turned off, the trigger doesn't receive notifications of new events. When the flow is turned back on, it processes only new events that occur from that point forward. If any events occurred while the flow was off, they're not processed when the flow is turned on again. This behavior can help avoid delays and performance issues, but it also means that you might miss some events if the flow is turned off for an extended period of time.
Set trigger conditions
If you don't want your flows to run every time they're triggered, set them to execute only when a specific condition is met. By setting up the right conditions for your triggers, you ensure that your flows run only when necessary, improving efficiency and reducing unnecessary executions.
Let's say that in your organization, an expense that's more than $100 needs manager approval. Your approval flow executes every time a record is added to the Expenses table. A condition starts the approval process only if the amount is greater than 100, but the flow runs for every expense that's submitted.

Now let's add a trigger condition on the When a row is added, modified, or deleted action that checks the amount before activating the flow. In this case, the flow runs only when the amount is greater than 100.

Tip
Use the OData filter property to define precise conditions for when a flow should be triggered based on changes in Dataverse data. You can specify a condition and the names of the columns on which the flow can trigger, optimizing flow performance and ensuring that flows run only when necessary.
Learn more:
Use trigger concurrency control
By default, a cloud flow trigger executes as many runs as possible simultaneously when its conditions are met. This behavior is useful for most scenarios, but it can lead to performance issues in some cases. For example, if your flow is triggered by a new email in your inbox, and you have a large number of emails to process, the trigger might create multiple instances of the flow to handle the load. This can lead to poor performance or even cause the service to become unresponsive.
Similarly, if your flow reads a record and then updates it but the update fails, the flow might have already acted on the old data, leading to inconsistencies. This situation is known as a dirty read and can lead to unexpected results.
Trigger concurrency control can help you avoid both situations. Concurrency control is turned off by default. Select your flow's trigger and turn on the Concurrency control option in the trigger settings. You can then specify the maximum number of concurrent runs, or the degree of parallelism, for the trigger.
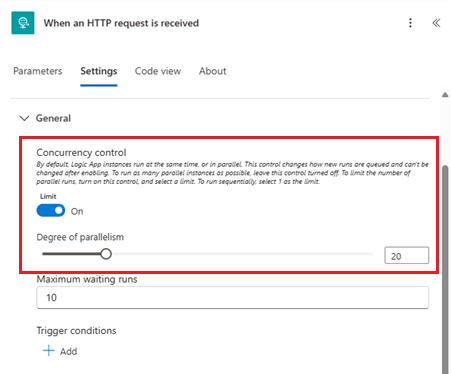
By default, the degree of parallelism is set to 1, meaning that only one instance of the flow can run at a time. This setting is useful when you're working with a single record or when you need to ensure that actions are performed in a specific order.
Select a number greater than 1 to allow that many instances of the flow to run simultaneously. This setting is useful when you're working with large datasets or performing multiple actions that don't depend on each other.
Important considerations
Be cautious when using concurrency control. A high number of concurrent runs can lead to performance issues, especially if the actions in the flow are resource-intensive or if the connected services have limits on the number of concurrent requests they can handle.
Concurrency control is irreversible. Once applied, concurrency control settings can't be undone. To remove concurrency control, you need to create a new flow. Therefore, proceed with caution.
As a best practice, leave the concurrency control at its default setting. If you need to apply concurrency control, consider doing so on a flow with the least number of actions. For example, you might organize actions that require concurrency control into a dedicated child flow and apply the control only to the child flow.