Note
Access to this page requires authorization. You can try signing in or changing directories.
Access to this page requires authorization. You can try changing directories.
Automate template app installation to streamline the Power BI deployment process for your customers. Template apps provide prebuilt reports that connect to customer data, but manual configuration can be challenging for users unfamiliar with connection details.
This tutorial shows data services providers how to automate template app parameter configuration using Azure Functions. When customers click a preconfigured link, the automation gathers necessary information, sets parameters, and redirects them to install the app—requiring only authentication to complete setup.
When the customer signs in to your portal, they select a special link you've prepared. This link:
- Launches the automation, which gathers the information it needs.
- Preconfigures the template app parameters.
- Redirects the customer to their Power BI account where they can install the app.
All they have to do is select Install and authenticate against their data source, and they're good to go!
The customer experience is illustrated here.

In this tutorial, you'll use an automated installation Azure Functions sample that we've created to preconfigure and install your template app. This sample has deliberately been kept simple for demonstration purposes. It encapsulates the setup of an Azure function to use Power BI APIs for installing a template app and automatically configuring it for your users.
For more information about the general automation flow and the APIs that the app uses, see Automate configuration of a template app installation.
Our simple application uses an Azure function. For more information about Azure Functions, see the Azure Functions documentation.
Basic flow
The following basic flow lists what the application does when the customer launches it by selecting the link in your portal.
- The user signs in to the ISV's portal and selects the supplied link. This action initiates the flow. The ISV's portal prepares the user-specific configuration at this stage.
- The ISV acquires an app-only token based on a service principal (app-only token) that's registered in the ISV's tenant.
- Using Power BI REST APIs, the ISV creates an install ticket, which contains the user-specific parameter configuration as prepared by the ISV.
- The ISV redirects the user to Power BI by using a
POSTredirection method, which contains the install ticket. - The user is redirected to their Power BI account with the install ticket and is prompted to install the template app. When the user selects Install, the template app is installed for them.
Note
While parameter values are configured by the ISV in the process of creating the install ticket, data source-related credentials are only supplied by the user in the final stages of the installation. This arrangement prevents them from being exposed to a third party and ensures a secure connection between the user and the template app data sources.
Prerequisites
- Your own Microsoft Entra tenant setup. For instructions on how to set one up, see Create a Microsoft Entra tenant.
- A service principal (app-only token) registered in the preceding tenant.
- A parameterized template app that's ready for installation. The template app must be created in the same tenant in which you register your application in Microsoft Entra ID. For more information, see Tips for authoring template apps or Create a template app in Power BI.
- To be able to test your automation work flow, add the service principal to the template app workspace as an Admin.
- A Power BI Pro license. If you're not signed up for Power BI Pro, sign up for a free trial before you begin.
Set up your automation development environment
Before you continue setting up your application, follow the instructions in Quickstart: Create an Azure Functions app with Azure App Configuration to develop an Azure function along with an Azure app configuration. Create your app configuration as described in the article.
Register an application in Microsoft Entra ID
Create a service principal as described in Embed Power BI content with service principal and an application secret.
Make sure to register the application as a server-side web application. You register a server-side web application to create an application secret.
Save the application ID (ClientID) and application secret (ClientSecret) for later steps.
Add the service principal to the template app workspace as an Admin so that you'll be able to test your automation work flow.
Template app preparation
After you've created your template app and it's ready for installation, save the following information for the next steps:
App ID, Package Key, and Owner ID as they appear in the installation URL at the end of the Define the properties of the template app process when the app was created.
You can also get the same link by selecting Get link in the template app's Release Management pane.
Parameter names as they're defined in the template app's semantic model. Parameter names are case-sensitive strings. They can also be retrieved from the Parameter Settings tab when you define the properties of the template app or from the semantic model settings in Power BI.
Note
You can test your preconfigured installation application on your template app if the template app is ready for installation, even if it isn't publicly available on AppSource yet. For users outside your tenant to be able to use the automated installation application to install your template app, the template app must be publicly available in AppSource. Before you distribute your template app by using the automated installation application you're creating, be sure to publish it to Partner Center.
Install and configure your template app
In this section, you'll use an automated installation Azure Functions sample that we created to preconfigure and install your template app. This sample has deliberately been kept simple for demonstration purposes. It allows you to use an Azure function and Azure App Configuration to easily deploy and use the automated installation API for your template apps.
Download Visual Studio
Download Visual Studio (version 2017 or later). Make sure to download the latest NuGet package.
Download the automated installation Azure Functions sample
Download the automated installation Azure Functions sample from GitHub to get started.

Set up your Azure app configuration
To run this sample, you need to set up your Azure app configuration with the values and keys as described here. The keys are the application ID, the application secret, and your template app's appId, packageKey, and ownerId values. See the following sections for information about how to get these values.
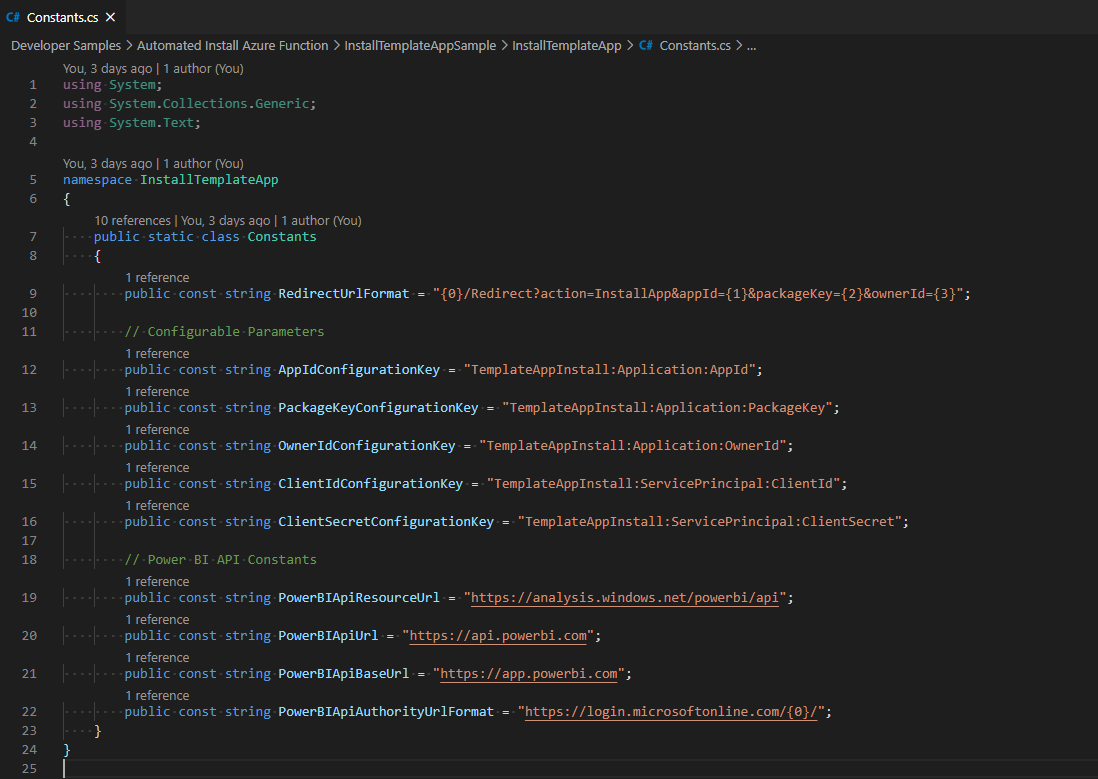
The keys are also defined in the Constants.cs file.
| Configuration key | Meaning |
|---|---|
| TemplateAppInstall:Application:AppId | appId from the installation URL |
| TemplateAppInstall:Application:PackageKey | packageKey from the installation URL |
| TemplateAppInstall:Application:OwnerId | ownerId from the installation URL |
| TemplateAppInstall:ServicePrincipal:ClientId | Service principal application ID |
| TemplateAppInstall:ServicePrincipal:ClientSecret | Service principal application secret |
The Constants.cs file is shown here.
Get the template app properties
Fill in all relevant template app properties as they're defined when the app is created. These properties are the template app's appId, packageKey, and ownerId values.
To get the preceding values, follow these steps:
Sign in to Power BI.
Go to the application's original workspace.
Open the Release Management pane.

Select the app version, and get its installation link.

Copy the link to the clipboard.

This installation URL holds the three URL parameters whose values you need. Use the appId, packageKey, and ownerId values for the application. A sample URL will be similar to what is shown here.
https://app.powerbi.com/Redirect?action=InstallApp&appId=66667...9cccc0000&packageKey=b2df4b...dLpHIUnum2pr6k&ownerId=aaaa...22222&buildVersion=5
Get the application ID
Fill in the applicationId information with the application ID from Azure. The applicationId value is used by the application to identify itself to the users from which you're requesting permissions.
To get the application ID, follow these steps:
Sign in to the Azure portal.
From the portal menu, select All services.
On the All services page, in the Identity section, select > App registrations.
Select the application that needs the application ID.

There's an application ID that's listed as a GUID. Use this application ID as the applicationId value for the application.

Get the application secret
Fill in the ApplicationSecret information from the Keys section of your App registrations section in Azure. This attribute works when you use the service principal.
To get the application secret, follow these steps:
Sign in to the Azure portal.
From the portal menu, select All services.
On the All services page, in the Identity section, select > App registrations.

Select Certificates and secrets under Manage.
Select New client secret.
Enter a name in the Description box, and select a duration. Then select Add to get the value for your application, which you'll see under the Value heading for the client secret.
Test your function locally
Follow the steps as described in Run the function locally to run your function.
Configure your portal to issue a POST request to the URL of the function. An example is POST http://localhost:7071/api/install. The request body should be a JSON object that describes key-value pairs. Keys are parameter names as defined in Power BI Desktop. Values are the desired values to be set for each parameter in the template app.
Note
In production, parameter values are deduced for each user by your portal's intended logic.
The desired flow should be:
- The portal prepares the request, per user or session.
- The
POST /api/installrequest is issued to your Azure function. The request body consists of key-value pairs. The key is the parameter name. The value is the desired value to be set. - If everything is configured properly, the browser should automatically redirect to the customer's Power BI account and show the automated installation flow.
- Upon installation, parameter values are set as configured in steps 1 and 2.
Publish your project to Azure
To publish your project to Azure, follow the instructions in the Azure Functions documentation. Then you can integrate template app automated installation APIs into your product and begin testing it in production environments.