Note
Access to this page requires authorization. You can try signing in or changing directories.
Access to this page requires authorization. You can try changing directories.
APPLIES TO:
Power BI Desktop
Power BI service
With Add Column From Examples in Power Query Editor, you can add new columns to your data model by providing one or more example values for the new columns. You can create the new column examples from a selection or provide input based on all existing columns in the table.
Use Add Column From Examples to create new columns quickly and easily in the following situations:
- You know the data you want in your new column, but you're not sure which transformation, or collection of transformations, you need.
- You already know which transformations you need, but you're not sure what to select in the UI to make them happen.
- You know the transformations you need using a Custom Column expression in M language, but one or more of those expressions aren't available in the UI.
Adding a column from an example is easy and straightforward. The next sections show how easy it is.
Add a new column from examples
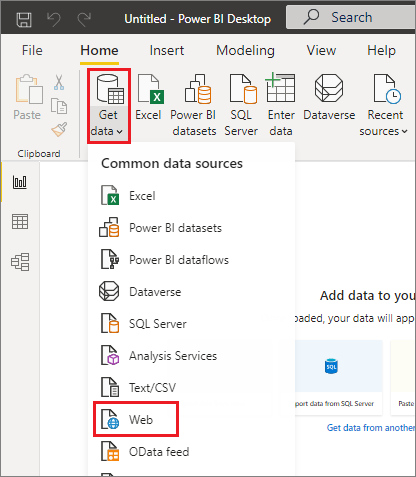
To get sample data from Wikipedia, select Get Data > Web from the Home tab of the Power BI Desktop ribbon.

- Paste the following URL into the dialog that appears and select OK:
https://wikipedia.org/wiki/List_of_states_and_territories_of_the_United_States
In the Navigator dialog box, select the States of the United States of America table, and then select Transform Data. The table opens in Power Query Editor.
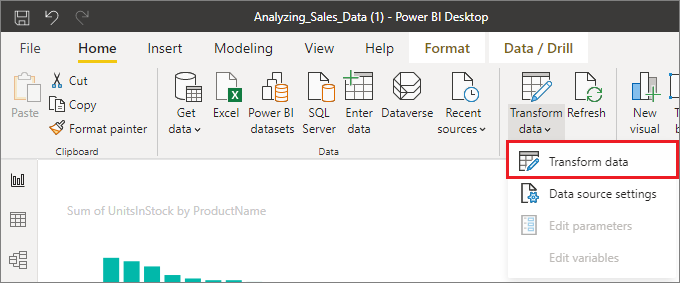
Select Transform data from the Home tab of the ribbon. The data opens in Power Query Editor.

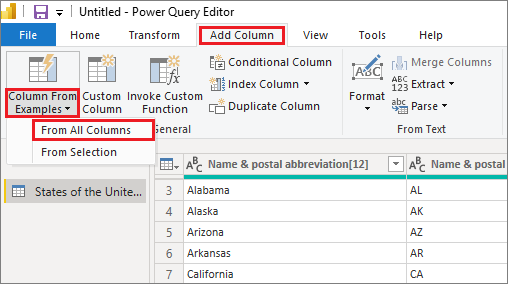
- Once the sample data opens in Power Query Editor, select the Add Column tab on the ribbon, and then select Column from Examples. Select the Column From Examples icon to create the column from all existing columns, or select the drop-down arrow to choose between From All Columns or From Selection. For this walkthrough, use From All Columns.

Add Column From Examples pane
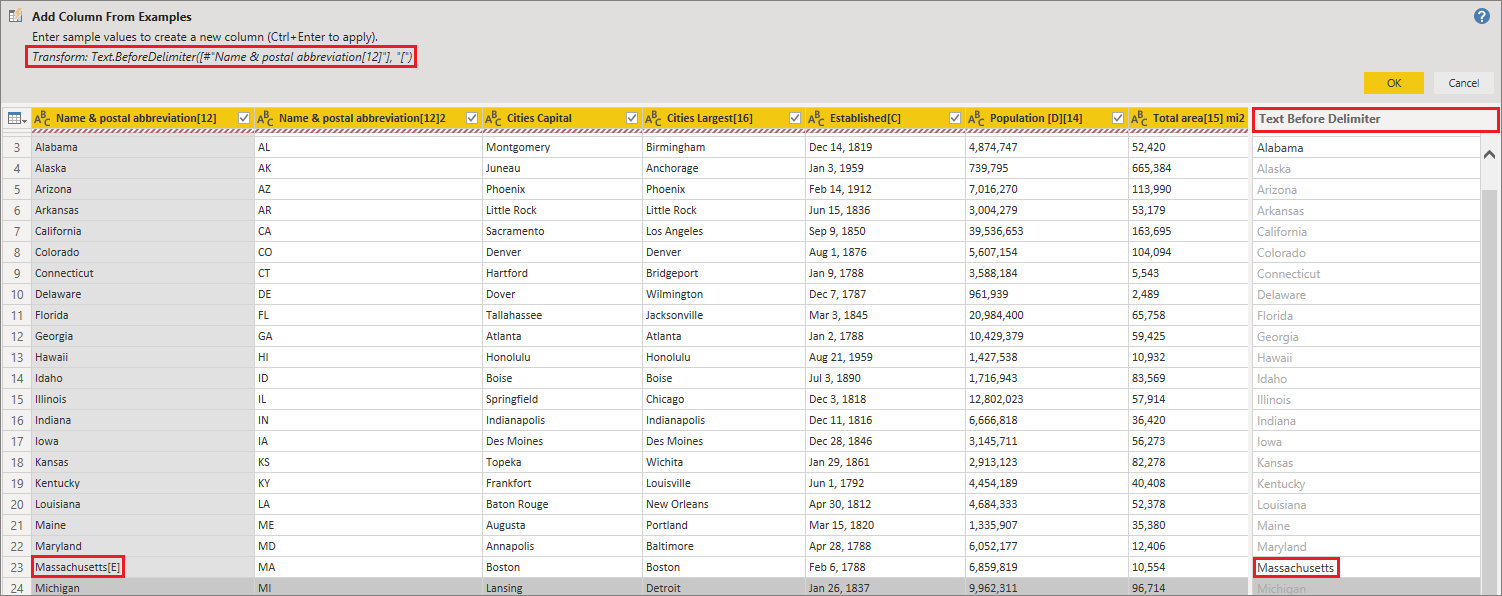
When you select Add Column > From Examples, the Add Column From Examples pane opens at the top of the table. The new Column 1 appears to the right of the existing columns. You might need to scroll to see all of the columns. When you enter your example values in the blank cells of Column 1, Power BI creates rules and transformations to match your examples and uses them to fill the rest of the column.
Notice that Column From Examples also appears as an Applied Step in the Query Settings pane. As always, Power Query Editor records your transformation steps and applies them to the query in order.
As you type your example in the new column, Power BI shows a preview of the rest of the column, based on the transformations it creates. For example, if you type Alabama in the first row, it corresponds to the Alabama value in the first column of the table. When you press Enter, Power BI fills in the rest of the new column based on the first column value, and names the column Name & postal abbreviation[12] - Copy.
Now go to the Massachusetts[E] row of the new column and delete the [E] portion of the string. Power BI detects the change and uses the example to create a transformation. Power BI describes the transformations in the Add Column From Examples pane, and renames the column to Text Before Delimiter.
As you continue to provide examples, Power Query Editor adds to the transformations. When you're satisfied, select OK to commit your changes.
You can rename the new column by double-clicking the column heading or by right-clicking it and selecting Rename.
Watch this video to see Add Column From Examples in action, using the sample data source:
Power BI Desktop: Add Column From Examples.
List of supported transformations
Many transformations are available when using Add Column from Examples. The following list shows the supported transformations:
General
- Conditional Column
Reference
- Reference to a specific column, including trim, clean, and case transformations
Text transformations
- Combine (supports combination of literal strings and entire column values)
- Replace
- Length
- Extract
- First Characters
- Last Characters
- Range
- Text before Delimiter
- Text after Delimiter
- Text between Delimiters
- Length
- Remove Characters
- Keep Characters
Note
All Text transformations take into account the potential need to trim, clean, or apply a case transformation to the column value.
Date transformations
- Day
- Day of Week
- Day of Week Name
- Day of Year
- Month
- Month Name
- Quarter of Year
- Week of Month
- Week of Year
- Year
- Age
- Start of Year
- End of Year
- Start of Month
- End of Month
- Start of Quarter
- Days in Month
- End of Quarter
- Start of Week
- End of Week
- Day of Month
- Start of Day
- End of Day
Time transformations
- Hour
- Minute
- Second
- To Local Time
Note
All Date and Time transformations take into account the potential need to convert the column value to Date or Time or DateTime.
Number transformations
- Absolute Value
- Arccosine
- Arcsine
- Arctangent
- Convert to Number
- Cosine
- Cube
- Divide
- Exponent
- Factorial
- Integer Divide
- Is Even
- Is Odd
- Ln
- Base-10 Logarithm
- Modulo
- Multiply
- Round Down
- Round Up
- Sign
- Sin
- Square Root
- Square
- Subtract
- Sum
- Tangent
- Bucketing/Ranges


