Note
Access to this page requires authorization. You can try signing in or changing directories.
Access to this page requires authorization. You can try changing directories.
APPLIES TO: ![]() Power BI Desktop
Power BI Desktop ![]() Power BI service
Power BI service
You can create a drillthrough button in Power BI. This button drills through to a page with details that are filtered to a specific context.
One way to drill through a report is to right-click in a visual. However, if you want the drillthrough action to be more obvious, you can create a drillthrough button instead. A drillthrough button can increase the discoverability of important drillthrough scenarios in your reports, and you can conditionally determine how the button looks and acts. For example, you can show different text on a button if certain conditions are met.
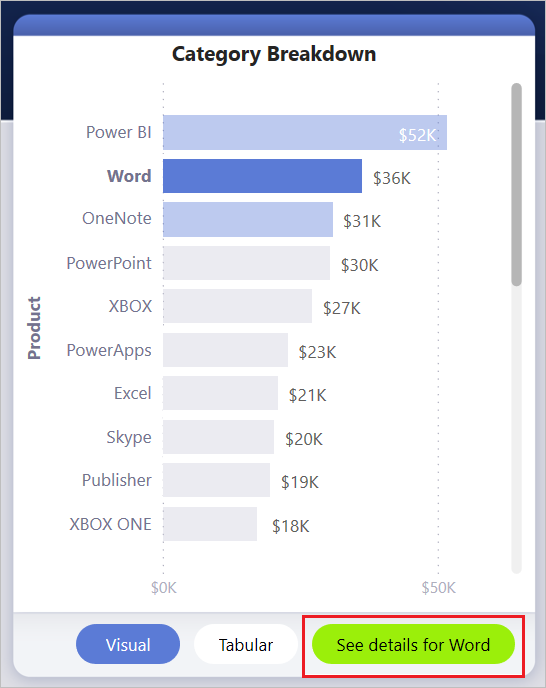
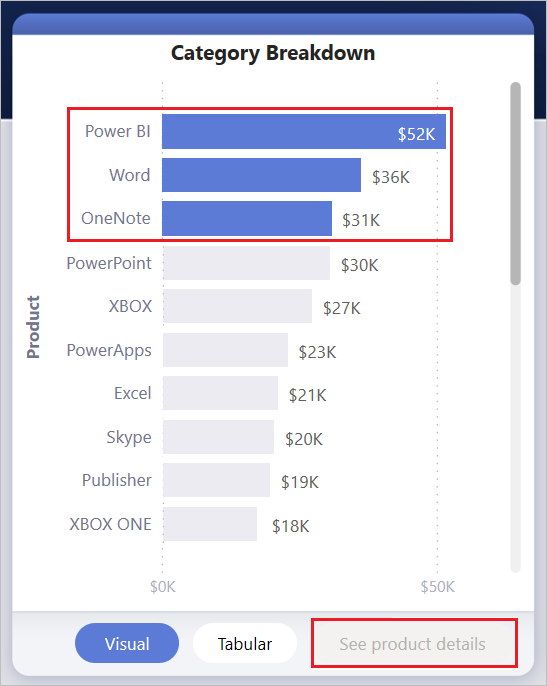
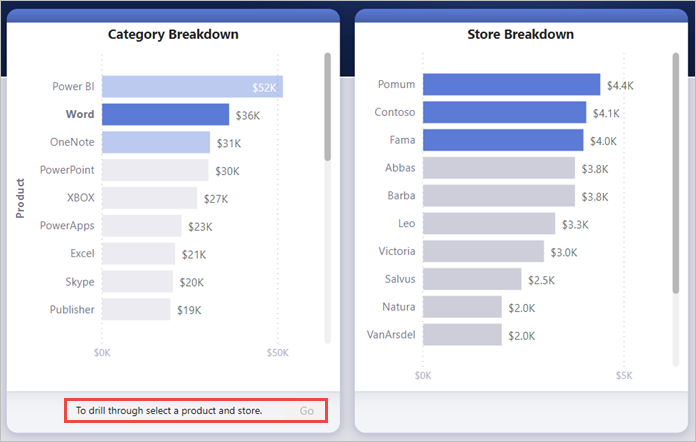
In this example, after you select the Word bar in the chart, the See details drillthrough button is enabled.

When you select the See details button, you drill through to the Market Basket Analysis page. As you can see in the following visual, the drillthrough page is now filtered for Word.

Set up a drillthrough button
To set up a drillthrough button, you first need to set up a valid drillthrough page within your report. Then you create a button with Drill through as the action type and select the drillthrough page as the Destination.
Because the drillthrough button has two states, enabled and disabled, you see two tooltip options.

If you leave the tooltips boxes blank, Power BI automatically generates tooltips. Those tooltips are based on the destination and drillthrough fields.
The following example shows an autogenerated tooltip when the button is disabled:
"To drill through to Market Basket Analysis [the destination page], select a single data point from Product [the drillthrough field]."

The following example shows an autogenerated tooltip when the button is enabled:
"Click to drill through to Market Basket Analysis [the destination page]."
However, if you'd like to provide custom tooltips, you can input a static string. You can also apply conditional formatting to tooltips.
Pass filter context
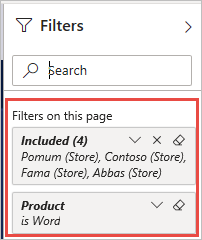
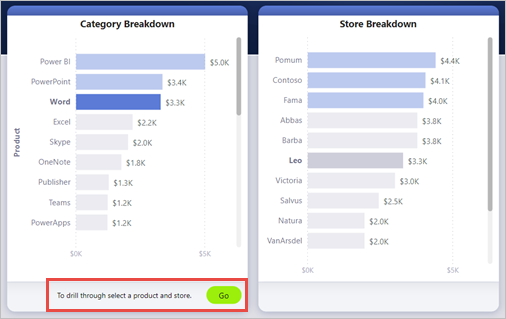
The button works like the regular drillthrough: You can pass filters on more fields by cross-filtering the visuals that contain the drillthrough field. For example, by using Ctrl + click and cross-filtering, you can pass multiple filters on Store Breakdown to the drillthrough page because your selections cross-filter the visual that contains Product, the drillthrough field:

After you select the drillthrough button, you see filters on both Store and Product being passed through to the destination page:
Ambiguous filter context
Since the drillthrough button isn't tied to a single visual, if your selection is ambiguous, then the button is disabled.
In this example, the button is disabled because two visuals both contain a single selection on Product. There's ambiguity about which data point from which visual to tie the drillthrough action to:

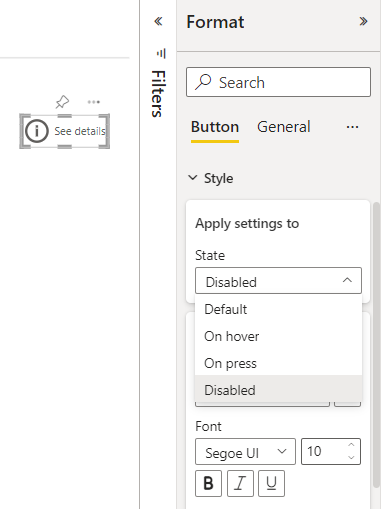
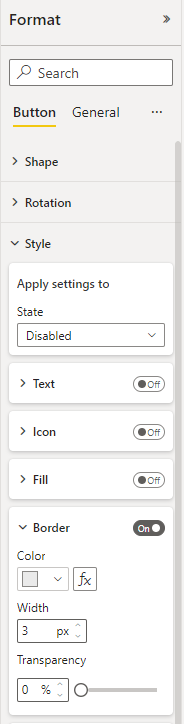
Customize formatting for disabled buttons
You can customize the formatting options for the disabled state of drillthrough buttons.
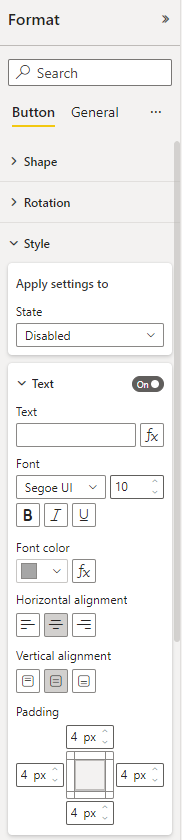
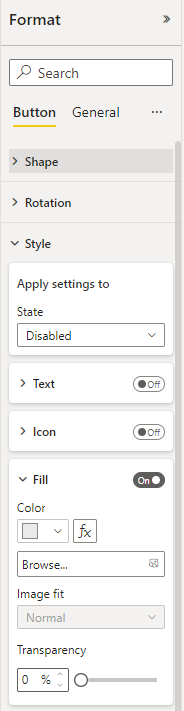
These formatting options include:
Button text controls: text, font family, font size, font color, alignment, and padding
Button fill controls: color, fill image, and transparency
Button icon controls: shape, line color, weight, transparency, alignment, and padding

Button border controls: color, width, transparency
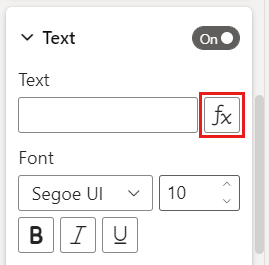
Set formatting for button text conditionally
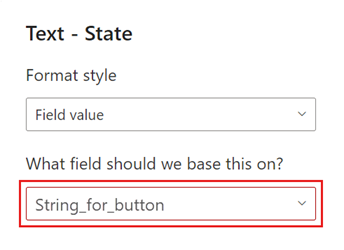
In Power BI Desktop, you can use conditional formatting to change the button text based on the selected value of a field. To do so, create a measure that outputs the desired string based on the DAX function SELECTEDVALUE.
The following example measure outputs "See product details" if a single Product value isn't selected. If a single product value is selected, the measure outputs "See details for [the selected Product]":
String_for_button = If(SELECTEDVALUE('Product'[Product], 0) == 0, "See product details", "See details for " & SELECTEDVALUE('Product'[Product]))
After you create this measure, follow these steps in Power BI Desktop:
Select the Conditional formatting (fx) option for the button text.
Select the measure you created for the button text:
When a single product is selected, the button text reads:
"See details for Word"
When either no products are selected, or more than one product is selected, the button is disabled. The button text reads:
"See product details"
Set formatting for tooltips conditionally
You can conditionally format the tooltip for the drillthrough button when it's enabled or disabled. If you used conditional formatting to dynamically set the drillthrough destination, you might want the tooltip for the button state to be more informative, based on your end user’s selection. Here are some examples:
You can set the disabled state tooltip to be prescriptive on a case-by-case basis using a custom measure. For example, if you want the user to select a single product and a single store before they can drill through to the Market Analysis page, you can create a measure with the following logic:
If the user doesn't select either a single product or a single store, the measure returns: "Select a single product and Ctrl + click to also select a single store."
If the user selects a single product but not a single store, the measure returns: "Ctrl + click to also select a single store."
Similarly, you can set the enabled-state tooltip to be specific to the user’s selection. For example, if you want the user to know which product and store the drillthrough page is filtered to, you can create a measure that returns:
"Click to drill through to [drillthrough page name] to see more details on sales for [product name] at [store name] stores."
Set the drillthrough destination conditionally
You can use conditional formatting to set the drillthrough destination based on a measure's output.
Here are some scenarios where you might want the button drillthrough destination to be conditional:
You only want to enable drillthrough to a page when multiple conditions have been met. Otherwise the button is disabled.
For example, you want users to select a single product and a single store before they can drill through to the market details page. Otherwise the button is disabled.
You want the button to support multiple drillthrough destinations based on user selections.
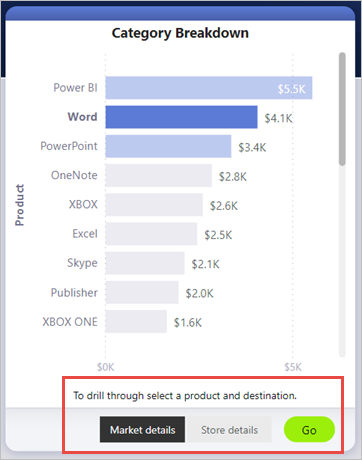
For example, if you have multiple destinations (market details and store details) that users can drill through to, you can have them select a specific destination to drill through to before the button becomes enabled for that drillthrough destination.
You might also have interesting cases for a hybrid scenario to support both multiple drillthrough destinations and specific conditions where you want the button to be disabled. Continue reading for details about these three options.


Disable the button until multiple conditions are met
Let's look at the first case, where you want to keep the button disabled until more conditions are met. In Power BI Desktop, you need to create a basic DAX measure that outputs an empty string (“”) unless the condition is met. When it's met, the measure outputs the name of the drillthrough destination page.
Here’s an example DAX measure that requires that a store is selected before the user can drill through on a Product to store details page:
Destination logic = If(SELECTEDVALUE(Store[Store], “”)==””, “”, “Store details”)
After you create the measure, follow these steps in Power BI Desktop:
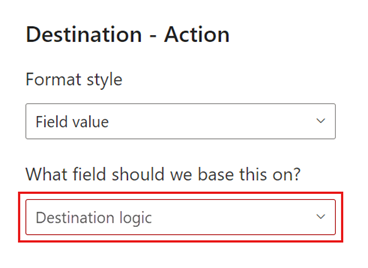
Select Conditional formatting (fx) next to the Destination for the button action.

For the last step, select the DAX measure you created as the field value for the destination.
Now you see the button is disabled even when a single product is selected because the measure also requires you to select a single store.

Support multiple destinations
For the other common case where you want to support multiple destinations, follow these steps:
Create a single-column table with the names of the drillthrough destinations.
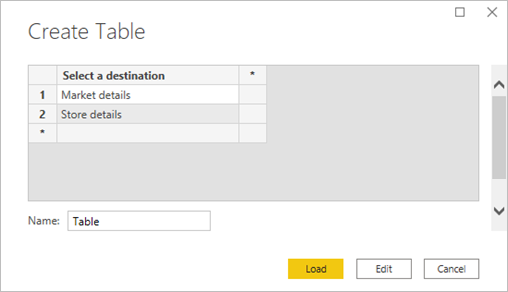
Because Power BI uses an exact string match to set the drillthrough destination, make sure that the entered values align exactly with your drillthrough page names.
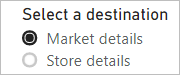
After you create the table, add it to the page as a single-select slicer.
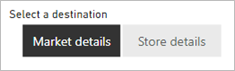
If you need more vertical space, convert the slicer to a dropdown. Remove the slicer header and add a text box with the title next to it.

Alternatively, change the list slicer from vertical to horizontal orientation.
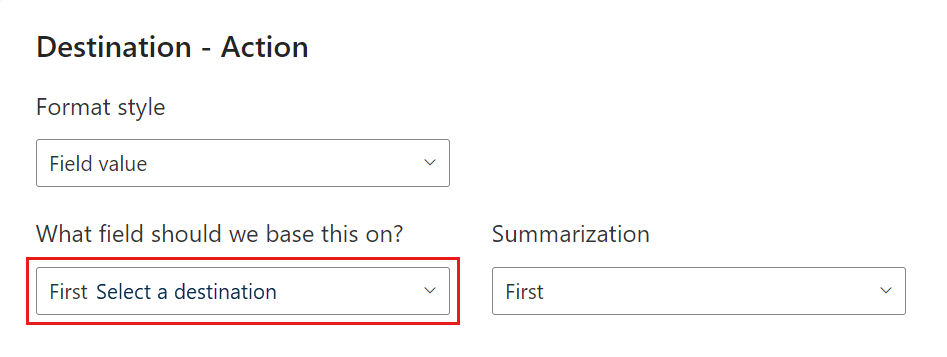
For the destination input for the drillthrough action, select the Conditional formatting (fx) button next to the Destination for the button action.
On the Destination - Action page, select the name of the column you created. In this case, it's Select a destination.
Now you see that the drillthrough button is only enabled when you select a product and a destination:
Hybrid of the two scenarios
If you're interested in a hybrid of the two scenarios, you can create and reference a DAX measure in Power BI Desktop to add more logic for the destination selection.
Here’s an example DAX measure that requires the user to select a store before they can drill through on a product to any of drillthrough pages:
Destination logic = If(SELECTEDVALUE(Store[Store], “”)==””, “”, SELECTEDVALUE(‘Table'[Select a destination]))
In Power BI Desktop, you select the DAX measure you created as the field value for the destination. In this example, the user must select a product, a store, and a destination page before the drillthrough button is enabled:

Considerations and limitations
- This button doesn't allow multiple destinations by using a single button.
- This button only supports drillthroughs within the same report; in other words, it doesn't support cross-report drillthrough.
- The disabled state formatting for the button is tied to the color classes in your report theme. Learn more about color classes.
- The drillthrough action works for all built-in visuals and some visuals imported from AppSource. However, it isn't guaranteed to work with all visuals imported from AppSource.
Related content
For more information about features that are similar or interact with buttons, see the following articles: