Note
Access to this page requires authorization. You can try signing in or changing directories.
Access to this page requires authorization. You can try changing directories.
Important
This article only applies to embed-for-your-customers applications. If you're using the embed-for-your-organization scenario, you need to use either a Pro or Premium license.
After you've developed your application, you need to back your workspace with a capacity before you can move to production. All workspaces (the ones containing the reports or dashboards, and the ones containing the semantic models) must be assigned to a capacity.
Create a capacity
By creating a capacity, you can take advantage of having a resource for your customers. There are two types of capacities you can choose from:
Power BI Premium - A tenant-level Microsoft 365 subscription available in two SKU families, EM and P. When you embed Power BI content, this solution is referred to as Power BI embedding. For more information regarding this subscription, see What is Power BI Premium?.
Azure Power BI Embedded - A subscription that uses A SKUs. You can purchase a capacity from the Azure portal. For details about how to create a Power BI Embedded capacity, see Create Power BI Embedded capacity in the Azure portal.
Note
SKUs of type A don't support the use of a free Power BI license to access Power BI content.
Capacity specifications
The following table describes the resources and limits of each SKU. To determine which capacity best fits your needs, see Which solution should I choose?.
| SKU1 | Capacity Units (CU) | Power BI SKU | Power BI v-cores |
|---|---|---|---|
| F2 | 2 | N/A | N/A |
| F4 | 4 | N/A | N/A |
| F8 | 8 | EM1/A1 | 1 |
| F16 | 16 | EM2/A2 | 2 |
| F32 | 32 | EM3/A3 | 4 |
| F64 | 64 | P1/A4 | 8 |
| F128 | 128 | P2/A5 | 16 |
| F256 | 256 | P3/A6 | 32 |
| F5122 | 512 | P4/A7 | 64 |
| F10242 | 1,024 | P5/A8 | 128 |
| F20482 | 2,048 | N/A | N/A |
1 In the Microsoft 365 or Embed for your organization (user owns data) scenario, SKUs that are smaller than F64 require a Pro or Premium Per User (PPU) license, or a Power BI individual trial to consume Power BI content.
2 These SKUs aren't available in all regions. To request using these SKUs in regions where they're not available, contact your Microsoft account manager.
3 FT (trial) capacities inherit F64 limits (time-limited) unless explicitly documented otherwise.
Development testing
For development testing, you can use free embed trial tokens with a Pro license or Premium Per User (PPU) license. To embed in a production environment, use a capacity.
Important
Free trial tokens are limited to development testing only. After going to production, a capacity must be purchased. Until a capacity is purchased, the Free trial version banner continues to appear at the top of the embedded report.
The number of embed trial tokens a Power BI service principal or master user (master account) can generate is limited. Use the Available features API to check the percentage of your current embedded usage. The usage amount is displayed per service principal or master account.
If you run out of embed tokens while testing, you need to purchase a Power BI Embedded or Premium capacity. There's no limit to the number of embed tokens you can generate with a capacity.
Assign a workspace to a capacity
After you create a capacity, you can assign your workspace to that capacity.
Each workspace that contains a Power BI item related to the embedded content (including semantic models, reports, and dashboards) must be assigned to capacities. For example, if an embedded report and the semantic model bound to it reside in different workspaces, both workspaces must be assigned to capacities.
Assign a workspace to a capacity by using a service principal
To assign a workspace to a capacity by using a service principal, use the Power BI REST API. When you're using the Power BI REST APIs, make sure to use the service principal object ID. The service principal should have administrator permissions for the workspace and capacity assignment permissions for the capacity.
Assign a workspace to a capacity by using a master user
You can also assign a workspace to a capacity from the settings of that workspace by using a master user. The master user must have admin permissions for that workspace, and also capacity assignment permissions for that capacity.
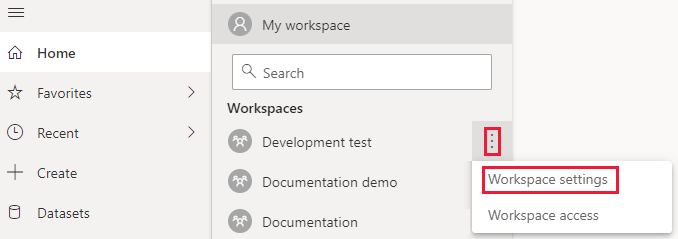
In the Power BI service, expand Workspaces, and then scroll to the workspace you're using for embedding your content. On its More menu, select Workspace settings.
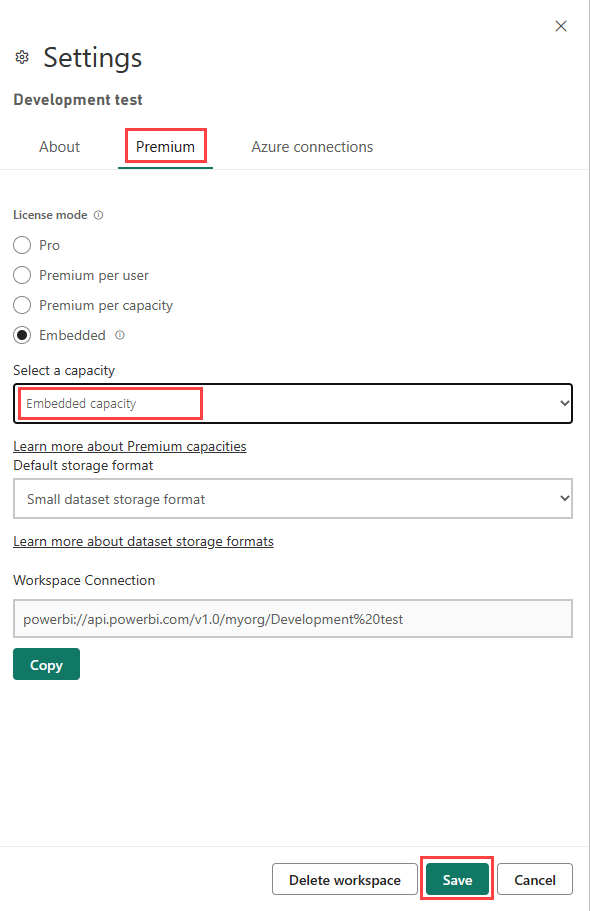
Select the Premium tab, and do the following:
Under Workspace type, select the type of capacity you created: Premium per capacity or Embedded.
Select the capacity you created.
Select Save.
After you assign your workspace to a capacity, a diamond appears next to it in the Workspaces list.
