Note
Access to this page requires authorization. You can try signing in or changing directories.
Access to this page requires authorization. You can try changing directories.
You can use Azure service tags with Power BI to enable an Azure SQL Managed Instance (MI) to allow incoming connections from the Power BI service. In Azure, a service tag is a defined group of IP addresses that you can configure to be automatically managed, as a group, to minimize the complexity of updates or changes to network security rules. By using service tags with Power BI, you can enable a SQL Managed Instance to allow incoming connections from the Power BI service.
The following configurations are necessary to successfully enable the endpoints for use in the Power BI service:
- Enable a public endpoint in the SQL Managed Instance.
- Create a Network Security Group rule to allow inbound traffic.
- Enter the credentials in Power BI.
The following sections look at each of these steps in turn.
Enable a public endpoint
The first part of the process is to enable a public endpoint in the SQL Managed Instance. Take the following steps:
Sign in to the Azure portal and navigate to your SQL Managed Instance.
On the left side of the page, select Networking.
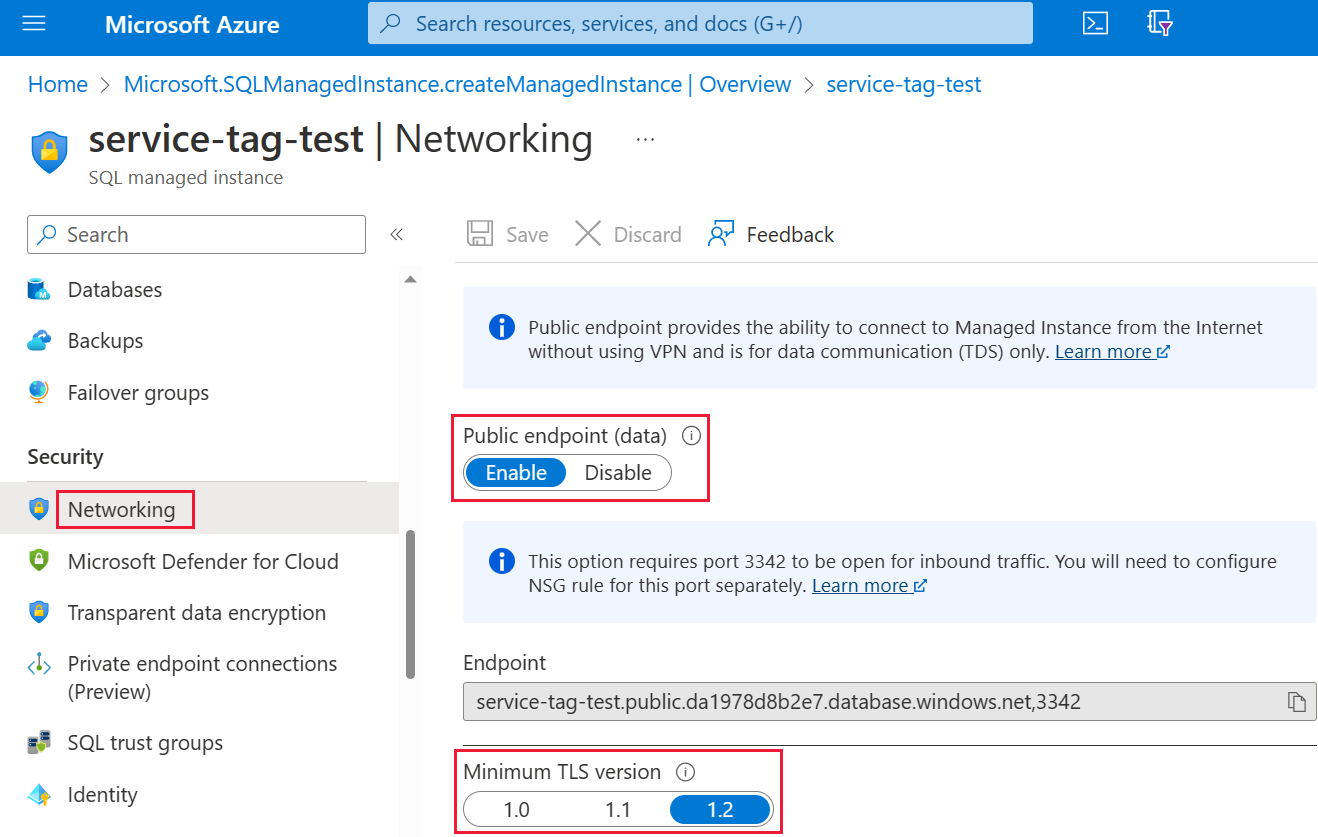
Slide Public endpoint (data) to Enable, then set the Minimum TLS version to 1.2. The following image shows the screen in the Azure portal.
Select Save to save your settings.
Create a network security group rule
The next collection of steps requires that you create a Network Security Group (NSG) rule to allow inbound traffic for the Power BI service. This action can be completed in the Azure portal by leveraging the "Source service tag" of Power BI or by using either the command-line interface (CLI) or PowerShell.
Note
The priority of the rule you set must be higher than the 4096 deny_all_inbound rule, which means the priority value must be lower than 4096. In the following example, a priority value of 400 is used.
The following CLI script is provided as a reference example. For more information, see az network nsg rule. You might need to change multiple values for the example to work properly in your situation. A PowerShell script is provided afterward.
#login to azure
az login

#set subscription that contains SQL MI instance
$subname = "mysubscriptionname"
az account set --subscription $subname

#set NSG rule for inbound PowerBI traffic

#update $RG to your resource group name
$rg = 'myresourcegroup'
#update $nsg to your Network Security Group name
$nsg = 'nsgresourcename'
# Name the NSG rule
$rule = 'allow_inbound_PowerBI'
#set the priority - this must be higher priority (lower number) than the deny_all_inbound rule
$priority = 400
#specifiy the service tag to use
$servicetag = 'PowerBI'
#specify the public endpoint port defined in step 1
$port = 3342
#set the rule to inbound direction
$direction = 'Inbound'
#set the access type to "Allow"
$access = 'Allow'
#Set the protocol as TCP
$protocol = 'tcp'
#Provide a description for the rule
$desc = 'Allow PowerBI Access to SQL MI for Direct Query or Data Refresh.'

#create the NSG rule
az network nsg rule create -g $rg \
--nsg-name $nsg -n $rule --priority $priority \
--source-address-prefixes $servicetag --destination-address-prefixes '*' \
--destination-port-ranges $port --direction $direction --access $access \
--protocol $protocol --description $desc
The following PowerShell script is provided as another reference to create the NSG rule. For more information, see Add a network security group rule in PowerShell. You might need to change multiple values for the example to work properly in your situation.
#login to azure
Login-AzAccount

#get your subscription ID
Get-AzSubscription

####
#Script to create Network Security Group Rule
###

#enter your subscription ID
Set-AzContext -SubscriptionId "yoursubscriptionID"

#Provide the resource group for your Network Security Group
$RGname="yourRG"
#Enter the port for the SQL Managed Instance Public Endpoint
$port=3342
#name the NSG rule
$rulename="allow_inbound_PowerBI"
#provide the name of the Network Security Group to add the rule to
$nsgname="yourNSG"
#set direction to inbound to allow PowerBI to access SQL MI
$direction ="Inbound"
#set the priority of the rule. Priority must be higher (ie. lower number) than the deny_all_inbound (4096)
$priority=400
#set the service tags for the source to \u201cPowerBI\u201d
$serviceTag = "PowerBI"

# Get the NSG resource
$nsg = Get-AzNetworkSecurityGroup -Name $nsgname -ResourceGroupName $RGname

# Add the inbound security rule.
$nsg | Add-AzNetworkSecurityRuleConfig -Name $rulename -Description "Allow app port" -Access Allow `
    -Protocol * -Direction $direction -Priority $priority -SourceAddressPrefix $serviceTag -SourcePortRange * `
    -DestinationAddressPrefix * -DestinationPortRange $port

# Update the NSG.
$nsg | Set-AzNetworkSecurityGroup
Enter the credentials in Power BI
The last part of the process is entering the credentials in the Power BI service.
Sign in to the Power BI service and navigate to the workspace containing the dataset(s) that are using SQL Managed Instance. In the following example, that workspace is called ASAdataset and the dataset is called Contoso SQL MI Demo.
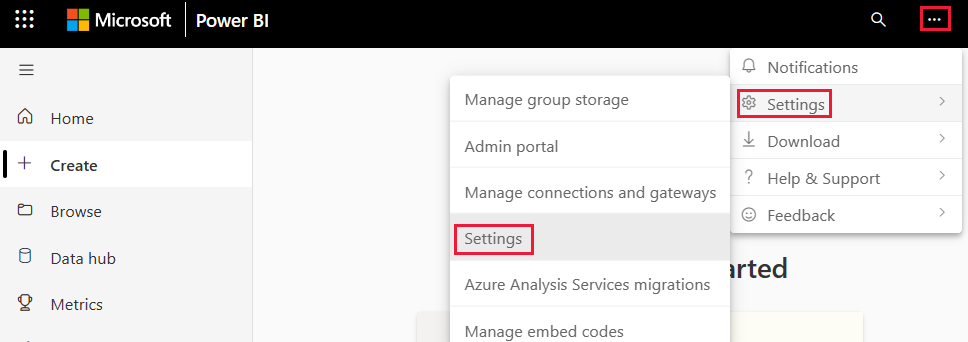
Select Settings from the top-right corner, then choose Settings from the dropdown menu.
Under Datasets, expand the Data source credentials section.
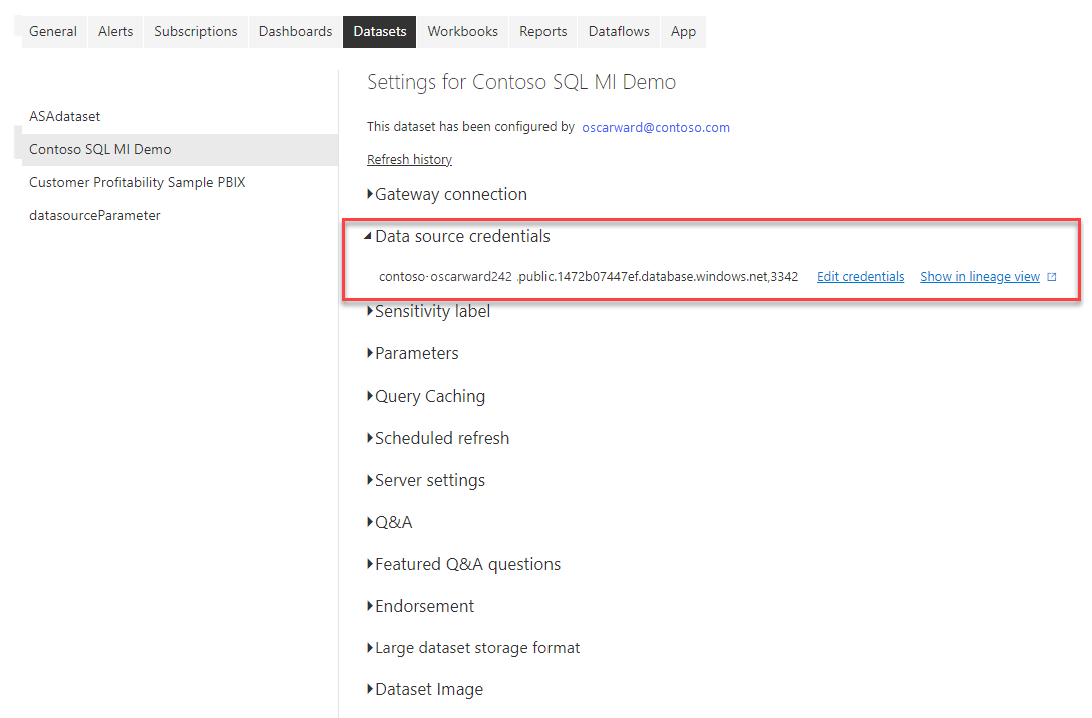
Select the Edit credentials link. In the dialog box that appears, enter valid credentials.
Save your settings and exit. Your SQL Managed Instance is now configured to allow incoming connections from the Power BI service.