Note
Access to this page requires authorization. You can try signing in or changing directories.
Access to this page requires authorization. You can try changing directories.
In this article, you'll learn about Site Checker diagnostics results related to configuration issues, and how to resolve common issues or problems.
Anonymous access to basic forms, lists, and multistep form steps
The following issues relate to configuration of table permissions on Dataverse-enabled components.
Anonymous access to basic/multistep forms and lists
Basic forms, Multistep forms, and lists on Power Pages websites can be excluded from enforcing table permissions by not selecting the Enable Table Permission checkbox while creating or modifying these controls as explained in securing lists and secure your forms.
This method is useful for quickly testing your configurations during development of a portal, but not securing Lists and Forms on a portal can have unintended consequences including unauthorized access to data. We don't advise this method to be used outside a secure dev or test environment.
To fix this issue for List/Basic forms:
Open the Portal Management app.
On the left pane, select List or Basic forms as appropriate.
Find the record mentioned in the Portal Checker rule.
Update the property "Enable Table Permissions" for Lists or Basic forms.
To fix this issue for Multistep forms:
Important
The Site Checker rule doesn't mention Multistep form steps that might have a similar configuration.
Open the Portal Management app.
On the left pane, under Content, select Multistep Forms.
Open each multistep form and go to Form Steps.
Go through each step, and update the Enable Table Permission property to be enabled.
Once these changes are made, appropriate table permissions would need to be created and assigned to appropriate web roles to ensure that all users can access these components.
Note
This method of disabling Table Permissions will be deprecated soon. Therefore, it shouldn't be used. Use proper table permissions, and web role setup to provide access to users for any data instead. More information: Table permission changes for forms and lists on new websites.
Anonymous access available to OData feed
Note
Starting with release 9.3.7.x, lists on all portals (new or existing) that have OData feeds enabled will require appropriate table permissions setup for the feed on these lists to work.
List components in websites can be enabled for OData feed by enabling OData feeds on lists.
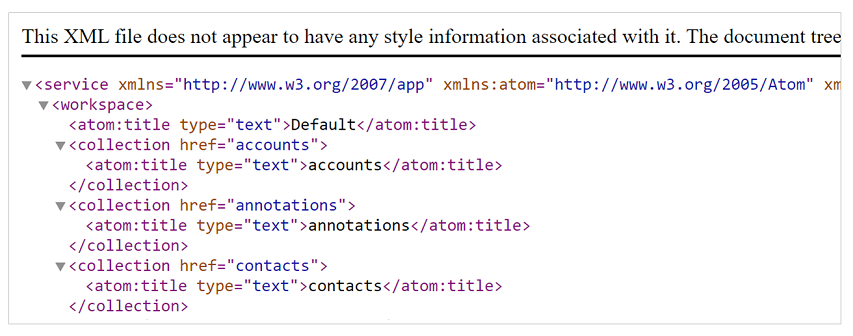
To find anonymous OData feeds enabled on your websites:
Go to '{Portal Url}/_odata' (for example,
https://contoso.powerappsportals.com/_odata) in InPrivate mode without authenticating to the portal.In the UI, you'll see a list of all OData feeds enabled on your portal.
Note
The list of OData feeds on this page might be available anonymously depending on your security configuration. The next steps will help you verify the anonymous access of these feeds.
Go to each OData feed by browsing to the URL format {Portal URL}/_odata/{collection href value} (for example,
https://contoso.powerappsportals.com/_odata/accounts) where the collection href value is highlighted below.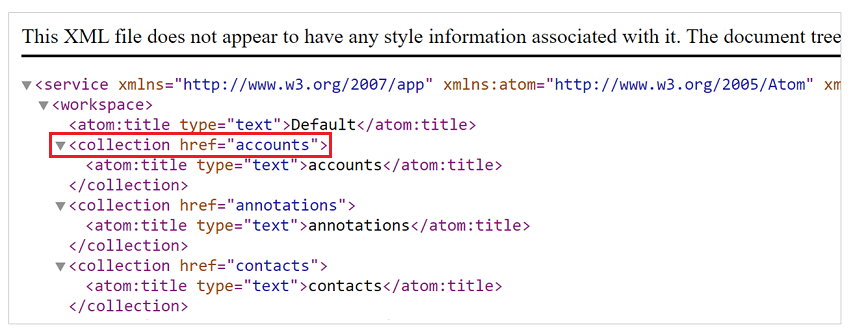
If the OData field is available anonymously, it will return the data with an HTTP 200 response. If the feed isn't enabled anonymously, it will return an HTTP 403 response with a message “Access to OData, with the entity set name of '{table set name}', has been denied.”
If you've unintentionally enabled anonymous access to an OData feed on your site, it could be because of one of these possibilities:
By not securing the list on which the OData feed is enabled as described in Securing lists.
To fix this problem, secure the list as described in Securing lists, and use appropriate table permissions and web roles to provide access to users.
You can also find the lists that aren't secured through Site Checker as described in the above mentioned article.
By securing lists, creating appropriate table permissions to the tables used in lists, and assigning those table permissions to an anonymous web role.
- To fix this problem, check that the table permissions assigned to the Anonymous web role are updated to ensure that only intended data is made available anonymously.
Cyclic parent webpage
This issue occurs when a webpage references itself as a parent page. To fix this issue:
- Open the Portal Management app.
- In the left pane, select Web Pages.
- Select the webpages listed in the Site Checker diagnostic results.
- Update the Parent Page field to point to a valid webpage record that isn't referencing itself.
List of tables with CMS security check failed
To fix this issue, ensure that your table has a proper search page.
List of tables with search result having invalid URL
To fix this issue, ensure that your table has appropriate security permissions.
Loading static resources (CSS/JS) asynchronously
When working on a website implementation, it's important to understand that you completely manage the HTML of the page. That means that standard web development practices should be followed to ensure that your webpage's client-side performance isn't affected.
One of the most common causes of performance issues on webpages is loading numerous static resources (CSS/JS) synchronously on the page. In Power Pages sites, whenever you associate a web file directly to the home page, it creates a dependency in the generated HTML. This means that a web file is always loaded along with the home page. Synchronous loading of a large number of CSS/JS files can lead to long client-side processing time for your webpages.
To avoid this, do the following:
- If a web file isn't needed on the home page, make sure its parent page isn't set to home, and follow the steps described in the section above to load it on demand.
- While loading a JavaScript file on demand on any page, use the
<async>or<defer>HTML attribute to load the file asynchronously. - While loading a CSS file on demand, you can use the
<preload>HTML attribute (https://www.w3.org/TR/preload/) or JavaScript-based approach since preload isn't supported on all browsers yet.
Parent page of an active webpage is inactive
This issue occurs when a parent webpage record is inactive. To fix this issue:
- Open the Portal Management app.
- In the left pane, in the Content section, select Web Pages.
- Select the webpage listed in the Site Checker diagnostic results.
- Select the Parent Page record to navigate to the record.
- Select Activate from the command bar.
Website is inaccessible
This issue may occur when the authentication certificate for the site needs to be renewed.
When a website is created, a new authentication key is generated. The website uses this authentication key to connect to the Microsoft Dataverse environment. When the authentication key is expired, users will see a message that the website is inaccessible.
To fix this issue, renew the authentication key for this site.
Published state configuration
The following issues relate to the publishing states.
Published state isn't available for this website
To fix this issue, ensure that the publishing state Published is available and active.
Published state isn't visible
To fix this issue, ensure that the publishing state Published has the isVisible checkbox selected.
Site markers
The following issues relate to site markers.
Home site marker configuration
The following issues relate to site markers and the home webpage.
An active home site marker isn't available for this website
This issue occurs when the Home site marker isn't available in your website configuration. To fix this issue:
- Open the Portal Management app.
- In the left pane, in the Website section, select Site Markers.
- Create a new site marker with the following values:
- Name: Home
- Website: Select the website of your portal host.
- Page: Select the webpage record that is set as the homepage of your portal.
The Home site marker isn't pointing to any webpage
This issue occurs when the Home site marker is available but isn't pointing to any webpage. To fix this issue:
- Open the Portal Management app.
- In the left pane, in the Website section, select Site Markers.
- Find the Home site marker record.
- Update the Page field to point to an active home page of your website.
The Home site marker is pointing to a deactivated webpage
This issue occurs when the Home site marker is available, but is pointing to a deactivated webpage. To fix this issue:
- Open the Portal Management app.
- In the left pane, in the Website section, select Site Markers.
- Find the Home site marker record.
- Update the Page field to point to an active home page of your website.
The Home site marker isn't pointing to a home page of the website
This issue occurs when the Home site marker is available, but is pointing to a webpage that isn't a home page of your website. To fix this issue:
- Open the Portal Management app.
- In the left pane, in the Website section, select Site Markers.
- Find the Home site marker record.
- Update the Page field to point to an active home page of your website.
Profile site marker configuration
The following issues relate to site marker configuration to the profile page.
An active Profile site marker isn't available for this portal
This issue occurs when the Profile site marker isn't available in your portal configuration. To fix this issue:
- Open the Portal Management app.
- In the left pane, in the Website section, select Site Markers.
- Create a new site marker with the following values:
- Name: Profile
- Website: Select the website of your host.
- Page: Select the webpage record that is set as the profile page of your website.
The Profile site marker isn't pointing to any webpage
This issue occurs when the Profile site marker is available but isn't pointing to any webpage. To fix this issue:
- Open the Portal Management app.
- In the left pane, in the Website section, select Site Markers.
- Find the Profile site marker record.
- Update the Page field to point to an active profile page of your website.
The Profile site marker is pointing to a deactivated webpage
This issue occurs when the Profile site marker is available, but is pointing to a deactivated webpage. To fix this issue:
- Open the Portal Management app.
- In the left pane, in the Website section, select Site Markers.
- Find the Profile site marker record.
- Update the Page field to point to an active profile page of your website.
Page Not Found site marker configuration
The following issues relate to site marker configuration to the Page Not Found webpage.
An active Page Not Found site marker isn't available for this website
This issue occurs when the Page Not Found site marker isn't available in your website configuration. To fix this issue:
- Open the Portal Management app.
- In the left pane, in the Website section, select Site Markers.
- Create a new site marker with the following values:
- Name: Page Not Found
- Website: Select the website of your website host.
- Page: Select the webpage record that is set as the Page Not Found page of your webpage.
The Page Not Found site marker isn't pointing to any webpage
This issue occurs when the Page Not Found site marker is available but isn't pointing to any webpage. To fix this issue:
- Open the Portal Management app.
- In the left pane, in the Website section, select Site Markers.
- Find the Page Not Found site marker record.
- Update the Page field to point to an active Page Not Found page of your website.
The Page Not Found site marker is pointing to a deactivated webpage
This issue occurs when the Page Not Found site marker is available, but is pointing to a deactivated webpage. To fix this issue:
- Open the Portal Management app.
- In the left pane, in the Website section, select Site Markers.
- Find the Page Not Found site marker record.
- Update the Page field to point to an active Page Not Found page of your website.
Access Denied site marker configuration
The following issues relate to site marker configuration to the Access Denied page.
An active Access Denied site marker isn't available for this portal
This issue occurs when the Access Denied site marker isn't available in your website configuration. To fix this issue:
- Open the Portal Management app.
- In the left pane, in the Website section, select Site Markers.
- Create a new site marker with the following values:
- Name: Access Denied
- Website: Select the website of your portal host.
- Page: Select the webpage record that is set as the Access Denied page of your website.
The Access Denied site marker isn't pointing to any webpage
This issue occurs when the Access Denied site marker is available but isn't pointing to any webpage. To fix this issue:
- Open the Portal Management app.
- In the left pane, in the Website section, select Site Markers.
- Find the Access Denied site marker record.
- Update the Page field to point to an active Access Denied page of your website.
The Access Denied site marker is pointing to a deactivated webpage
This issue occurs when the Access Denied site marker is available, but is pointing to a deactivated webpage (root or content page can be deactivated). To fix this issue:
- Open the Portal Management app.
- In the left pane, in the Website section, select Site Markers.
- Find the Access Denied site marker record.
- Update the Page field to point to an active Access Denied page of your website.
Search site marker availability
The following issues relate to site marker configuration to the site search page.
An active Search site marker isn't available for this website
This issue occurs when the Search site marker isn't available in your website configuration. To fix this issue:
- Open the Portal Management app.
- In the left pane, in the Website section, select Site Markers.
- If a site marker named Search is available and deactivated, activate it.
- If not available, create a new site marker with following values:
- Name: Search
- Website: Select the website of your portal host.
- Page: Select the webpage record that is set as the search page of your website.
- Select Save & Close.
Web files
The following are issues when configuring web files.
Web file isn't active
To fix this issue, ensure that the web file is in the active state.
The partial URL of a web file is misconfigured
To fix this issue, ensure that the partial URL is the file name with Home as the root page.
Web file doesn't have a file attachment
To fix this issue, add the corresponding CSS file in the notes section of the web file.
File attachment doesn't have content
To fix this issue, add the CSS file with its entire contents in the notes section of the web file.
MIME type of file isn't text/CSS
To fix this issue, ensure that there are no plug-ins or flows that override the MIME type of the CSS files.
Webpages
The following issues relate to webpages.
Webpage associated a localized content page as a parent webpage
This issue occurs when a webpage record has its Parent Webpage associated to a language content page. To fix this issue:
- Open the Portal Management app.
- In the left pane, in the Content section, select Web Pages.
- Select the webpages listed in the Site Checker diagnostic results.
- Update the Parent Page field to point to a valid webpage record that isn't a content page.
Webpage belongs to different website
This issue occurs when a parent webpage is associated with a different website than a child webpage. To fix this issue:
- Open the Portal Management app.
- In the left pane, in the Content section, select Web Pages.
- Select the webpages (either parent webpage or children webpages) listed in the Site Checker diagnostic results.
- Update the Web site field to point to the appropriate website.
Webpage doesn't have a publishing state
This issue occurs when a webpage record doesn't have a corresponding publishing state. To fix this issue:
- Open the Portal Management app.
- In the left pane, in the Content section, select Web Pages.
- Select the webpages listed in the Site Checker diagnostic results.
- Update the Publishing State field to point to a publishing state record.
Webpage has a page template that belongs to a different website
This issue occurs when a page template is associated with a different website. To fix this issue:
- Open the Portal Management app.
- In the left pane, in the Content section, select Web Pages.
- Select the webpages listed in the Site Checker diagnostic results.
- Update the Web site field to point to the appropriate website.
- Alternatively, update the Page Template to point to a page template in the same website.
Webpage has a publishing state that belongs to a different website
This issue occurs when a publishing state is associated with a different website. To fix this issue:
- Open the Portal Management app.
- In the left pane, in the Content section, select Web Pages.
- Select the webpages listed in the Site Checker diagnostic results.
- Update the Publishing State field to point to a publishing state record in the same website.
Webpage is trying to use an inactive page template
This issue occurs when the page template record is inactive. To fix this issue:
- Open the Portal Management app.
- In the left pane, in the Content section, select Web Pages.
- Select the webpages listed in the Site Checker diagnostic results.
- Select the Page Template record to navigate to the record.
- Select Activate from the command bar.
- Alternatively, update the Page Template to point to an active page template in the webpage.
Webpage needs at least one active localized language content page
This issue occurs when the webpage doesn't have at least one language content page. To fix this issue:
Open the Portal Management app.
In the left pane, in the Content section, select Web Pages.
Select the webpages listed in the Site Checker diagnostic results.
Scroll down to the Localized Content section.
Select + New Web Page to create a new language content page.
Note
The configuration fields on the home page of a content page are not inherited to the existing content pages. They are used only in creation of new content pages. You must update the content page configurations individually.
Webpage publishing is hidden
This issue occurs when the publishing state IsVisible field isn't checked. To fix this issue:
- Open the Portal Management app.
- In the left pane, in the Content section, select Web Pages.
- Select the webpages listed in the Site Checker diagnostic results.
- Select the Publishing State record to navigate to the record.
- Select the IsVisible field and make sure that it's checked (set to true).
Webpage without a page template
This issue occurs when a webpage record doesn't have a corresponding page template. To fix this issue:
- Open the Portal Management app.
- In the left pane, in the Content section, select Web Pages.
- Select the webpage listed in the Site Checker diagnostic results.
- Update the Page Template field to point to an active page template record.