Note
Access to this page requires authorization. You can try signing in or changing directories.
Access to this page requires authorization. You can try changing directories.
Content snippets are small chunks of editable content that can be placed by a developer in a header, footer, web page or a web template, allowing for customizable content to populate any portion of a webpage's layout easily.
A developer can place a snippet using Liquid: {{ snippets["<<snippet name>>"] }}, {% editable snippets '<<snippet name>>' %}, or {% include 'snippet' snippet_name:'<<snippet name>>' %}.
Edit snippets
Snippets can be created and edited through the Portal Management app. The main power of the snippet is the fact that you can abstract a bit of content (other than the main copy of the page) and edit it separately, allowing essentially any static content on your site to be fully content-managed and editable.
Open the Portal Management app.
Go to Content > Content Snippets.
To create a new snippet, select New.
To edit an existing snippet, select an existing Content Snippet in the grid.
Enter values for the following fields:
| Name | Description |
|---|---|
| Name | The name can be used by a developer to place the snippet value into website code. |
| Website | The website that is associated with the snippet. |
| Display Name | Display name for the content snippet. |
| Type | Type of content snippet, Text, or HTML. |
| Content Snippet Language | Select a language for the content snippet. To add more languages, go to enable multiple language support. |
| Value | The content of the snippet to be displayed in the website. You can enter plain text or HTML markup. You can also use liquid objects with both text or HTML markup values. |
Use snippet
You can use snippets to show text or HTML. The content snippets can also use liquid objects, and reference other content such as entities.
For example, you can use the steps explained earlier in this article to create/edit a content snippet. While editing the snippet, you can include sample code to a record. Ensure you replace the ID of the Account table record with the correct ID from your environment. You can also use another table instead of Account.
After you create a snippet with text, HTML, or liquid objects shown in the example above, you can use it in a webpage.
To do add snippet on a webpage:
Create a web template and use snippets liquid object to call the snippet you created.
Create a page template using the web template created earlier.
Use the design studio to create a new page using the page layout created earlier.
Example
The following example uses a Microsoft Dataverse database with sample data.
Note
You will need to configure table permissions for the Account table (or whatever table you will use).
Open the Portal Management app.
Go to Content > Content Snippets.
To create a new snippet, select New.
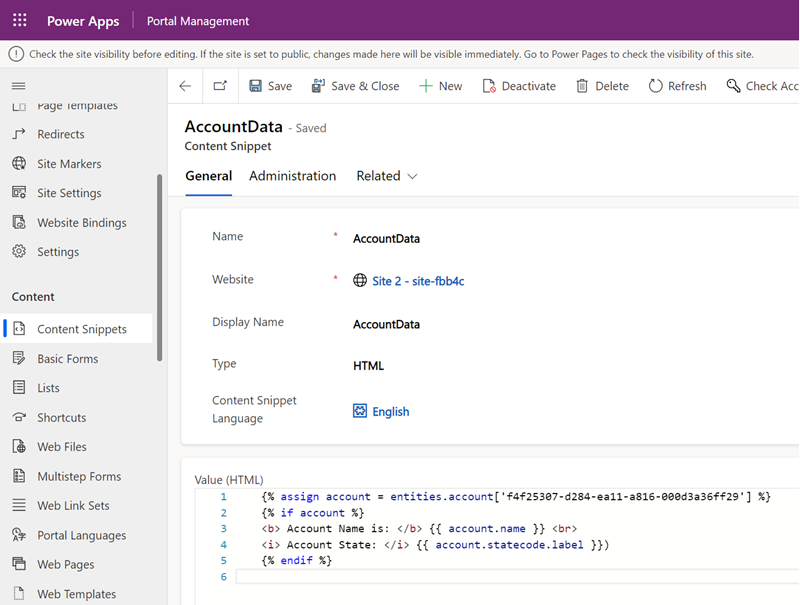
Enter name. For example, AccountData.
Select your website.
Enter Display Name. For example, AccountData.
Select type as HTML for this example. You can also select text instead.
Select a language.
Copy and paste sample value:
{% assign account = entities.account['f4f25307-d284-ea11-a816-000d3a36ff29'] %}
{% if account %}
<b> Account Name is: </b> {{ account.name }} <br>
<i> Account State: </i> {{ account.statecode.label }})
{% endif %}
Replace the GUID of the record with an account table record from your Dataverse database.

Save content snippet.
In the Power Pages design studio, create a new webpage or choose an existing webpage.
Select Edit code.
In between existing
<div></div>tags, copy and paste the following source value:{% include 'snippet' snippet_name:'AccountData' %}If different, update the value for snippet_name with your snippet name.

Select CTRL-S.
In the design studio select Sync
Select Preview.
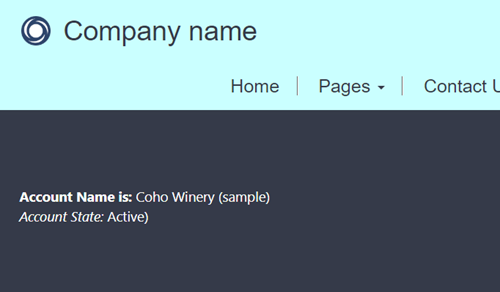
You will see the account information rendered as part of the snippet:

You can follow the same steps with content snippet of Text type instead of HTML, for example:
{% assign account = entities.account['f4f25307-d284-ea11-a816-000d3a36ff29'] %}
{% if account %}
Account Name is: {{ account.name }}
Account State: {{ account.statecode.label }}
{% endif %}
Replace the GUID of the record with an account table record from your Dataverse database.
When you browse the page with this content snippet, the table information is displayed using liquid object along with text instead of HTML. Likewise, you can also use only HTML to display content without using liquid objects.