Note
Access to this page requires authorization. You can try signing in or changing directories.
Access to this page requires authorization. You can try changing directories.
Cascading Style Sheets (CSS) allows you to control the formatting and styling of your site.
By default, new Power Pages sites have bootstrap.min.css, theme.css and portalbasictheme.css files installed as part of the site templates.
You can modify the style using the Styling workspace or you can upload your own custom CSS files.
When you upload a new custom CSS file, it's available as a web file in the Portal Management app.
Note
Power Pages sites use Bootstrap 3.3.x. Site developers should not replace Bootstrap 3 with other CSS libraries as some of the scenarios in Power Pages are dependent on Bootstrap 3.3.x. More information: Bootstrap overview.
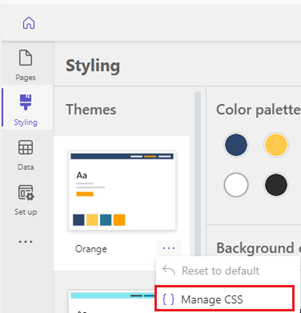
Manage custom CSS files in the Styling workspace
Go to Power Pages.
Select Edit on the site you want to add a page.
Select the Styling workspace.
Select the Manage CSS option under more options in Styling Workspace.
Upload CSS files
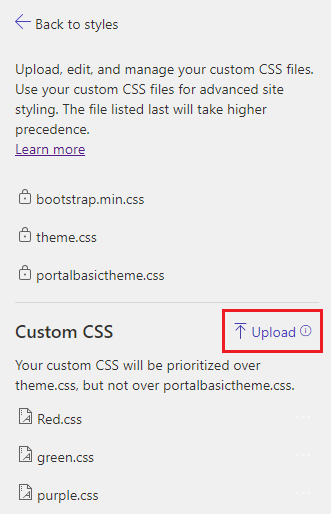
In the Manage CSS panel a list of the default CSS files is displayed:
- bootstrapmin.css
- theme.css
- portalbasictheme.css
To upload your custom CSS file, select Upload and choose your custom CSS file.
Note
- You can upload custom CSS files of a size up to 1 MB.
- Once the custom CSS file is uploaded the preview will reflect on right side.
- The uploaded custom CSS files will be applicable for all themes.
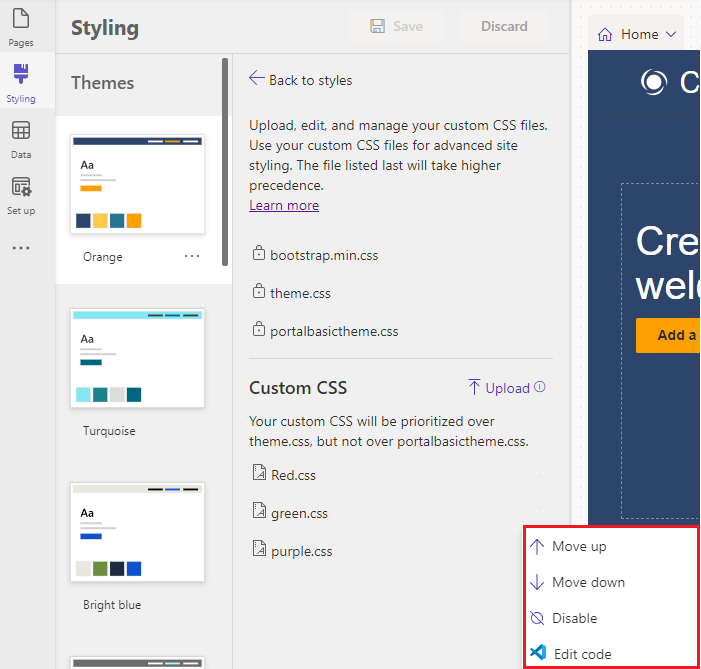
More options
Select the ... (ellipse) to right of the custom CSS file, where you can move the file higher or lower in precedence and disable the custom CSS file.
Note
CSS files listed at bottom take higher precedence, meaning that if two files contain an update the same property, the update contained in the file lower in the list will be applied.
Architecture
Any custom CSS file is at lower priority than the default portalbasictheme.css and higher than theme.css. This prioritization is to encourage customizing styles using style panel for out of box styling options.
Note
We recommend custom CSS should be used to format only styles which aren't provided out of box in style pane.
Warning
Do not deactivate, delete or change the display order of any of the default CSS files (bootstrap.min.css, theme.css, or portalbasictheme.css). You will see an error in the design studio.
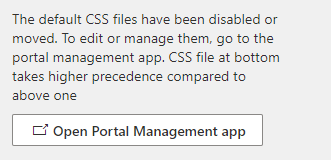
Open the Portal management app and to restore the default state and display order of the default CSS files to resolve the issue.
Delete a custom CSS file
The CSS files are stored as web files. To remove the custom CSS file, go to the Portal Management app and select Web Files.
Locate the custom CSS file record. You may need to filter on the Name and Website values to locate the correct record.
Once the web file record is selected, select Delete.
In the design studio, select Sync configuration to clear the styling changes from the custom CSS.