Note
Access to this page requires authorization. You can try signing in or changing directories.
Access to this page requires authorization. You can try changing directories.
Page permissions give makers another way to control user access to their Power Pages sites. You can use page permissions to make content available to anyone who visits your site or to restrict access to users who have specific roles.
Child pages can inherit the permissions of a parent page or have their own permissions. Similarly, web files on a page, such as downloadable documents, CSS files, or JavaScript files, can inherit the permissions of the page or have their own.
You can manage page permissions in the Power Pages design studio and in the Portal Management app. We recommend you use the design studio, where managing page permissions is simpler.
Important
You can only manage restrict read permissions, which control user access to pages, in the design studio. To manage grant change permissions, which control who can manage and publish pages with the legacy site content editor, use the Portal Management app.
Manage page permissions in the design studio
Use the design studio to customize your site and manage page permissions quickly and efficiently.
Sign in to Power Pages and open your site for editing.
Select the ellipses (…) to the right of a page and select Page Settings.
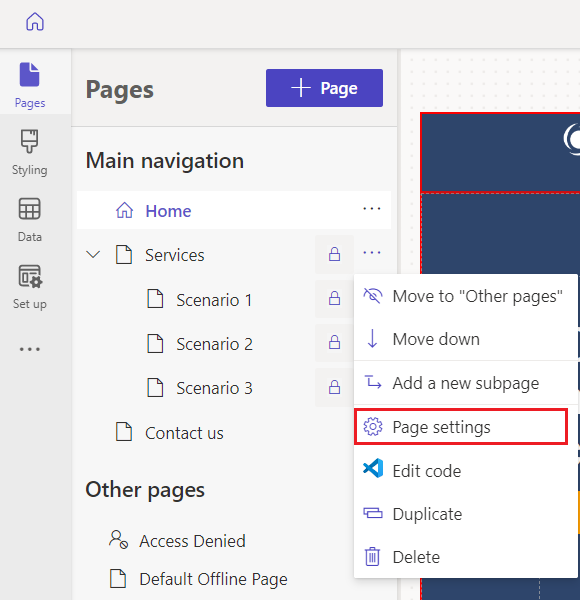
Select the Permissions tab.
The options under Permissions vary depending on the page you selected. For example, the options for a parent page are different from the options for a child page that inherited permissions from the parent.
Manage page permissions with the Portal Management app
Using the Portal Management app, you can manage page permissions through webpage access control rules. These rules allow you to control the publishing actions that a web role can perform on the pages of your site and which pages are visible to which web roles. After you create an access control rule, it's associated with the selected page and affects both the page you assign the rule to and all child pages—in other words, the entire branch of the site.
Sign in to Power Pages and open your site for editing.
In the left side panel, select More items (…) > Portal Management.
In the left side panel of the Portal Management app, scroll down to Security and select Web Page Access Control Rules.
Select a rule to edit, or select New to create a rule.
Enter or select the attributes of the rule, and then select Save & Close.
Web page access control rule attributes
The following table describes the attributes you can set when you create or edit a web page access control rule.
| Name | Description |
|---|---|
| Name | A descriptive name for the rule |
| Website | The website the rule applies to; must match the website of the page to which the rule is applied |
| Web Page | The page the rule applies to<br/ >The rule affects not only this page but its child pages, too. If the rule is applied to the home page, it applies to the entire site. |
| Right | Grant change or Restrict read |
| Scope | All content: All descendant content is included in security validation. This value is the default.<br/ >Exclude direct child web files: All child web files that are directly related to the page are excluded from security validation. This option doesn't exclude the descendants of the child web file, however. |
| Description | (Optional) A description of the rule |
View access control rules for a page
In the Portal Management app, select Content > Web Pages.
Select a page.
Select the Access Control Rules tab.
All the access control rules for the page are listed.
Types of web page access control rules
There are two types of access control rules: grant change and restrict read. Grant change rules are permissive. They grant users the ability to do something. Restrict read rules are restrictive. They restrict an action to a limited set of users.
Grant change
Use a grant change rule to allow a user who has the web role associated with the rule to publish content changes for the page and all child pages. Grant change rules take precedence over restrict read rules.
For example, you want users who have the news editor web role to be able to edit the news branch in your site. These users might not have access to the entire site, and certainly can't edit the entire site. In the news branch, however, you want them to have full content publishing authority. In this case, you create a web page access control rule called "grant news publishing to news editors." You set Right to Grant Change and Web Page to the parent page of the entire news branch. Then you assign the role to any users you want to designate as news editors.
A grant change rule should always be present and applied to the home page in any site that you want to be able to edit on the front end. Because it applies to the home page, it's the default rule for the entire site. Associate the rule with a web role that grants content publishing rights and assign your content editors to the role.
Note
Grant change rules don't just allow editing. They also grant read access that overrides restrict read rules. Users with a grant change rule can view the page and all child pages, even if a restrict read rule otherwise block them.
Restrict read
Use a restrict read rule to limit viewing the contents of a page, and its child pages, to specific users.
For example, only employees may view a certain branch of your site. You want to restrict the ability to read this branch to people who have the employee web role. In this case, you create a rule called "restrict read to employees only." You set Right to Restrict Read and Web Page to the page at the top of the branch that's intended only for employees. Then you associate the rule with the employee web role and assign users to the role.
Warning
Grant change rules on the home page with scope 'All content' override restrict read rules site-wide. To restrict pages from a role with home page grant change, remove that role from the home page rule.
Note
If you apply the restrict read right to the home page of a site and select Exclude direct child web files as the Scope, the home page's direct child web files are accessible to all users.
Options for page permissions
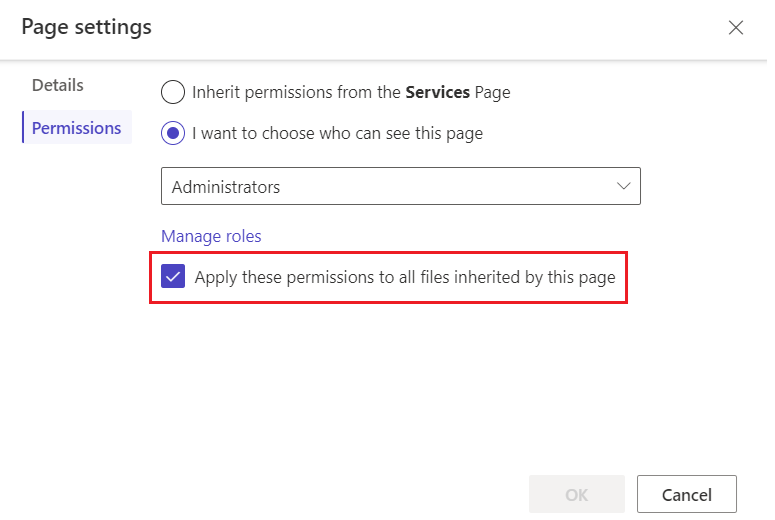
Anyone can see this page: This option is available on the home page and on child pages that have a parent page with this setting selected. When it's selected, the page is public on the web and available to anyone. When it's not selected, a lock icon appears next to it in the list of pages to indicate the page has restrictions. To make the page available for only specific roles, turn off this option.
I want to choose who can see this page: When this option is selected, you can choose the roles that have access to the page.
Note
If you select the Anonymous Users role using the Portal Management app, you'll see an alert.
Apply these permissions to all files inherited by this page: When this option is selected, child web files of the page are only available to users who can access the page.
Caution
You can't select this setting for the home page of a site. Files the site needs, such as
Bootstrap.min.cssandTheme.css, are under the home page. If you restrict these files to only authenticated users, styles aren't applied to any pages, including the sign-in pages that are available anonymously. Troubleshoot permissions that apply to child files.
Options for child page permissions
A child page can inherit permissions from the parent page or have its own permissions.
Inherit permissions from a parent page: This option is available when a child page has a parent page with the Anyone can see this page option not selected. When it's selected, the child page is available to all users who can access its parent page. Every child page has this option selected by default. When it's not selected, the child page, including any pages that this child page is a parent of, aren't available to the users who have the selected roles for the parent page.
Configure child page with unique permissions: Use this setting to select specific roles to allow to access the child page and the pages that it's a parent of.
Permissions apply to child files: When this option is selected, the child web files of the page are available only to users who can access the page. When it's not selected, anyone can access the page's child web files.
Page hierarchy changes and inheritance
A page can be promoted to a higher level in the page hierarchy, or made a subpage and placed at a lower level, with the following effects on permissions:
- If a page is made a subpage, it inherits permissions from its new parent.
- If a page is promoted, it retains its original permissions.
Troubleshoot page permissions
Unforeseen effects of the choices you make when you set page permissions can sometimes cause difficulties. This section covers some of the most commonly encountered issues.
Anonymous users role alert
If you use the Portal Management app to set the Anonymous users role for a page, you see the following alert: "Anonymous user role should not be assigned directly to web pages."
To fix this problem, change the permissions.
Note
Roles with Anonymous Users Role set to Yes can't be assigned directly to users.
Multiple page permissions error
If you apply multiple active permissions on the same page in the Portal Management app, you see the following error: "There are multiple, conflicting access control rules applied to this page. Deactivate the extra rules so there is only one with restricted read-write access."
To fix this error, deactivate the permissions the page doesn't need so that only one permission is active.
Restrict read rule doesn't work for admins
If your restrict read rule doesn't prevent admins from viewing a page, check if there's a grant change rule on the home page assigned to the admins web role. Grant change rules take precedence over restrict read rules, so admins with a grant change rule on the home page with scope "All content" can access all pages regardless of restrict read rules.
To fix this problem, remove the admins role from the grant change rule on the home page, or change the scope of the rule.
Troubleshoot child files permissions
This section covers some common problems related to using the Permissions apply to child files setting.
Child page not inheriting permissions from parent page
If you change Permissions apply to child files so that the child permissions no longer inherit from their parents, you see the following error, with invalid web roles highlighted: "One or more roles applied to this page are not used for the parent page. This page and its subpages won't be available to those roles. Either add those roles to the parent page or delete them from this page."
To fix this problem, either add the missing web roles or remove them from the page.
Styles not applied after adjusting page permissions
If your site's pages have no styling after you change page permissions, make sure that Apply these permissions to all files inherited by this page is turned off for your site's home page.