Note
Access to this page requires authorization. You can try signing in or changing directories.
Access to this page requires authorization. You can try changing directories.
I'm an admin
Power Platform admins can purchase licenses for Power Automate and then manage those licenses in their organization.
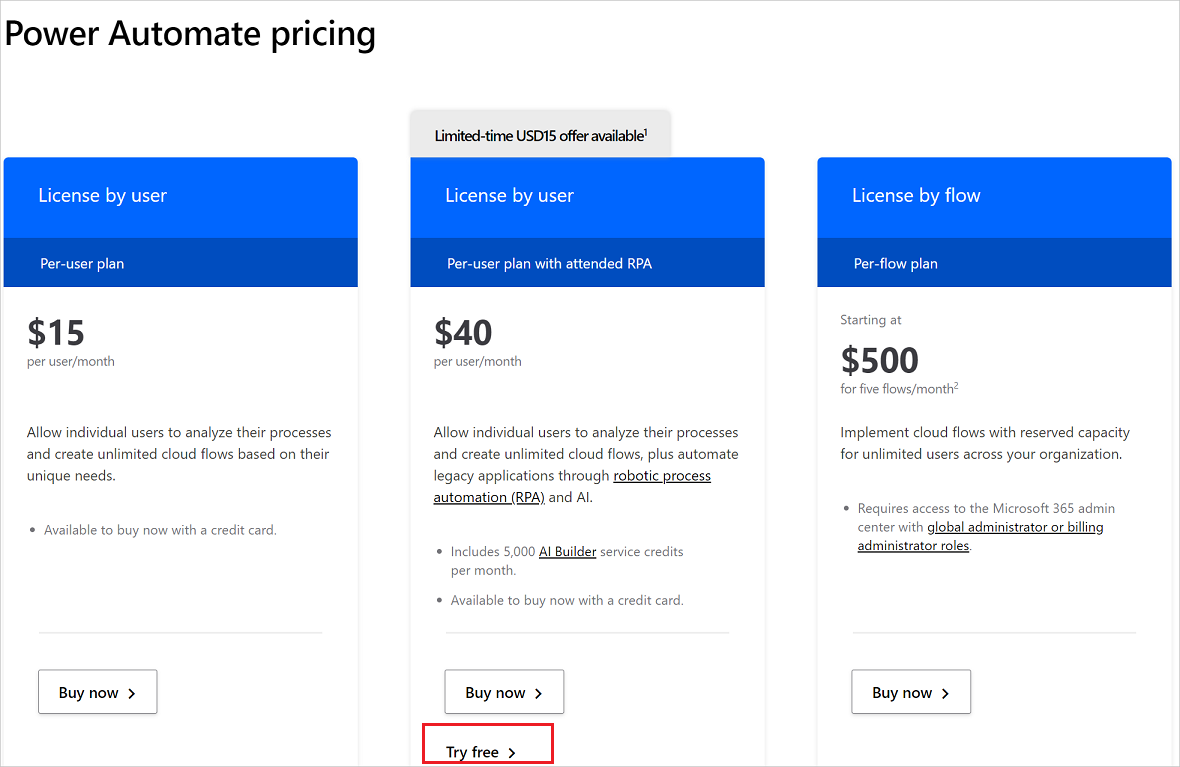
Buy Power Automate plans
You can purchase Power Automate plans from Microsoft 365 admin center.
Sign in to the Microsoft 365 admin center.
Go to Marketplace > All products, and then search for "Power Automate" to find all relevant plans.
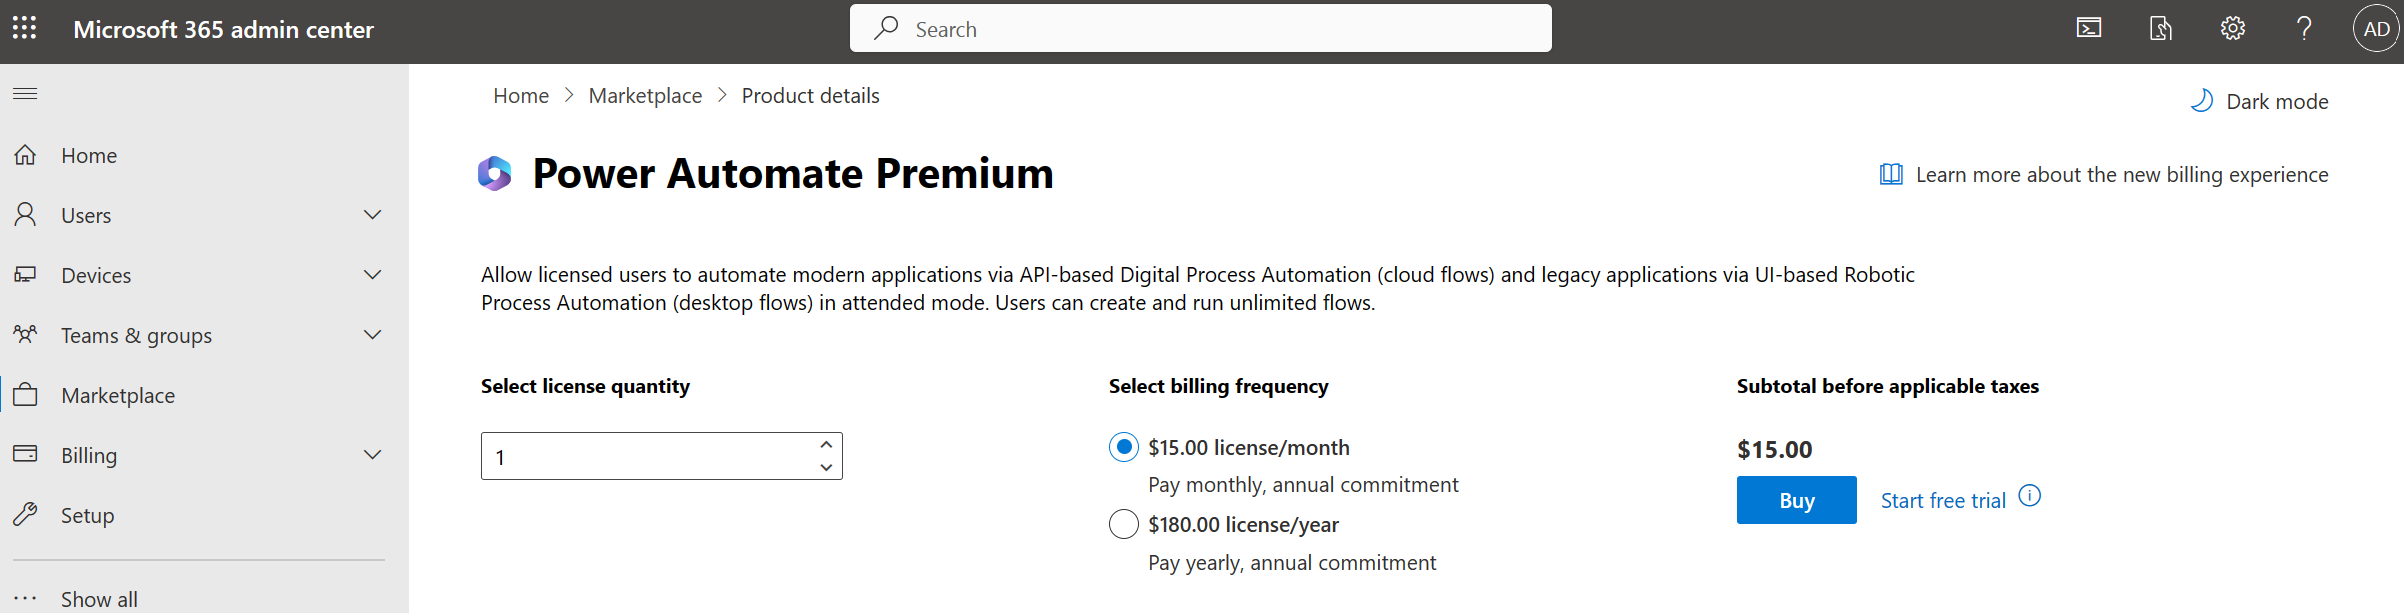
Select the plan that you want to buy.
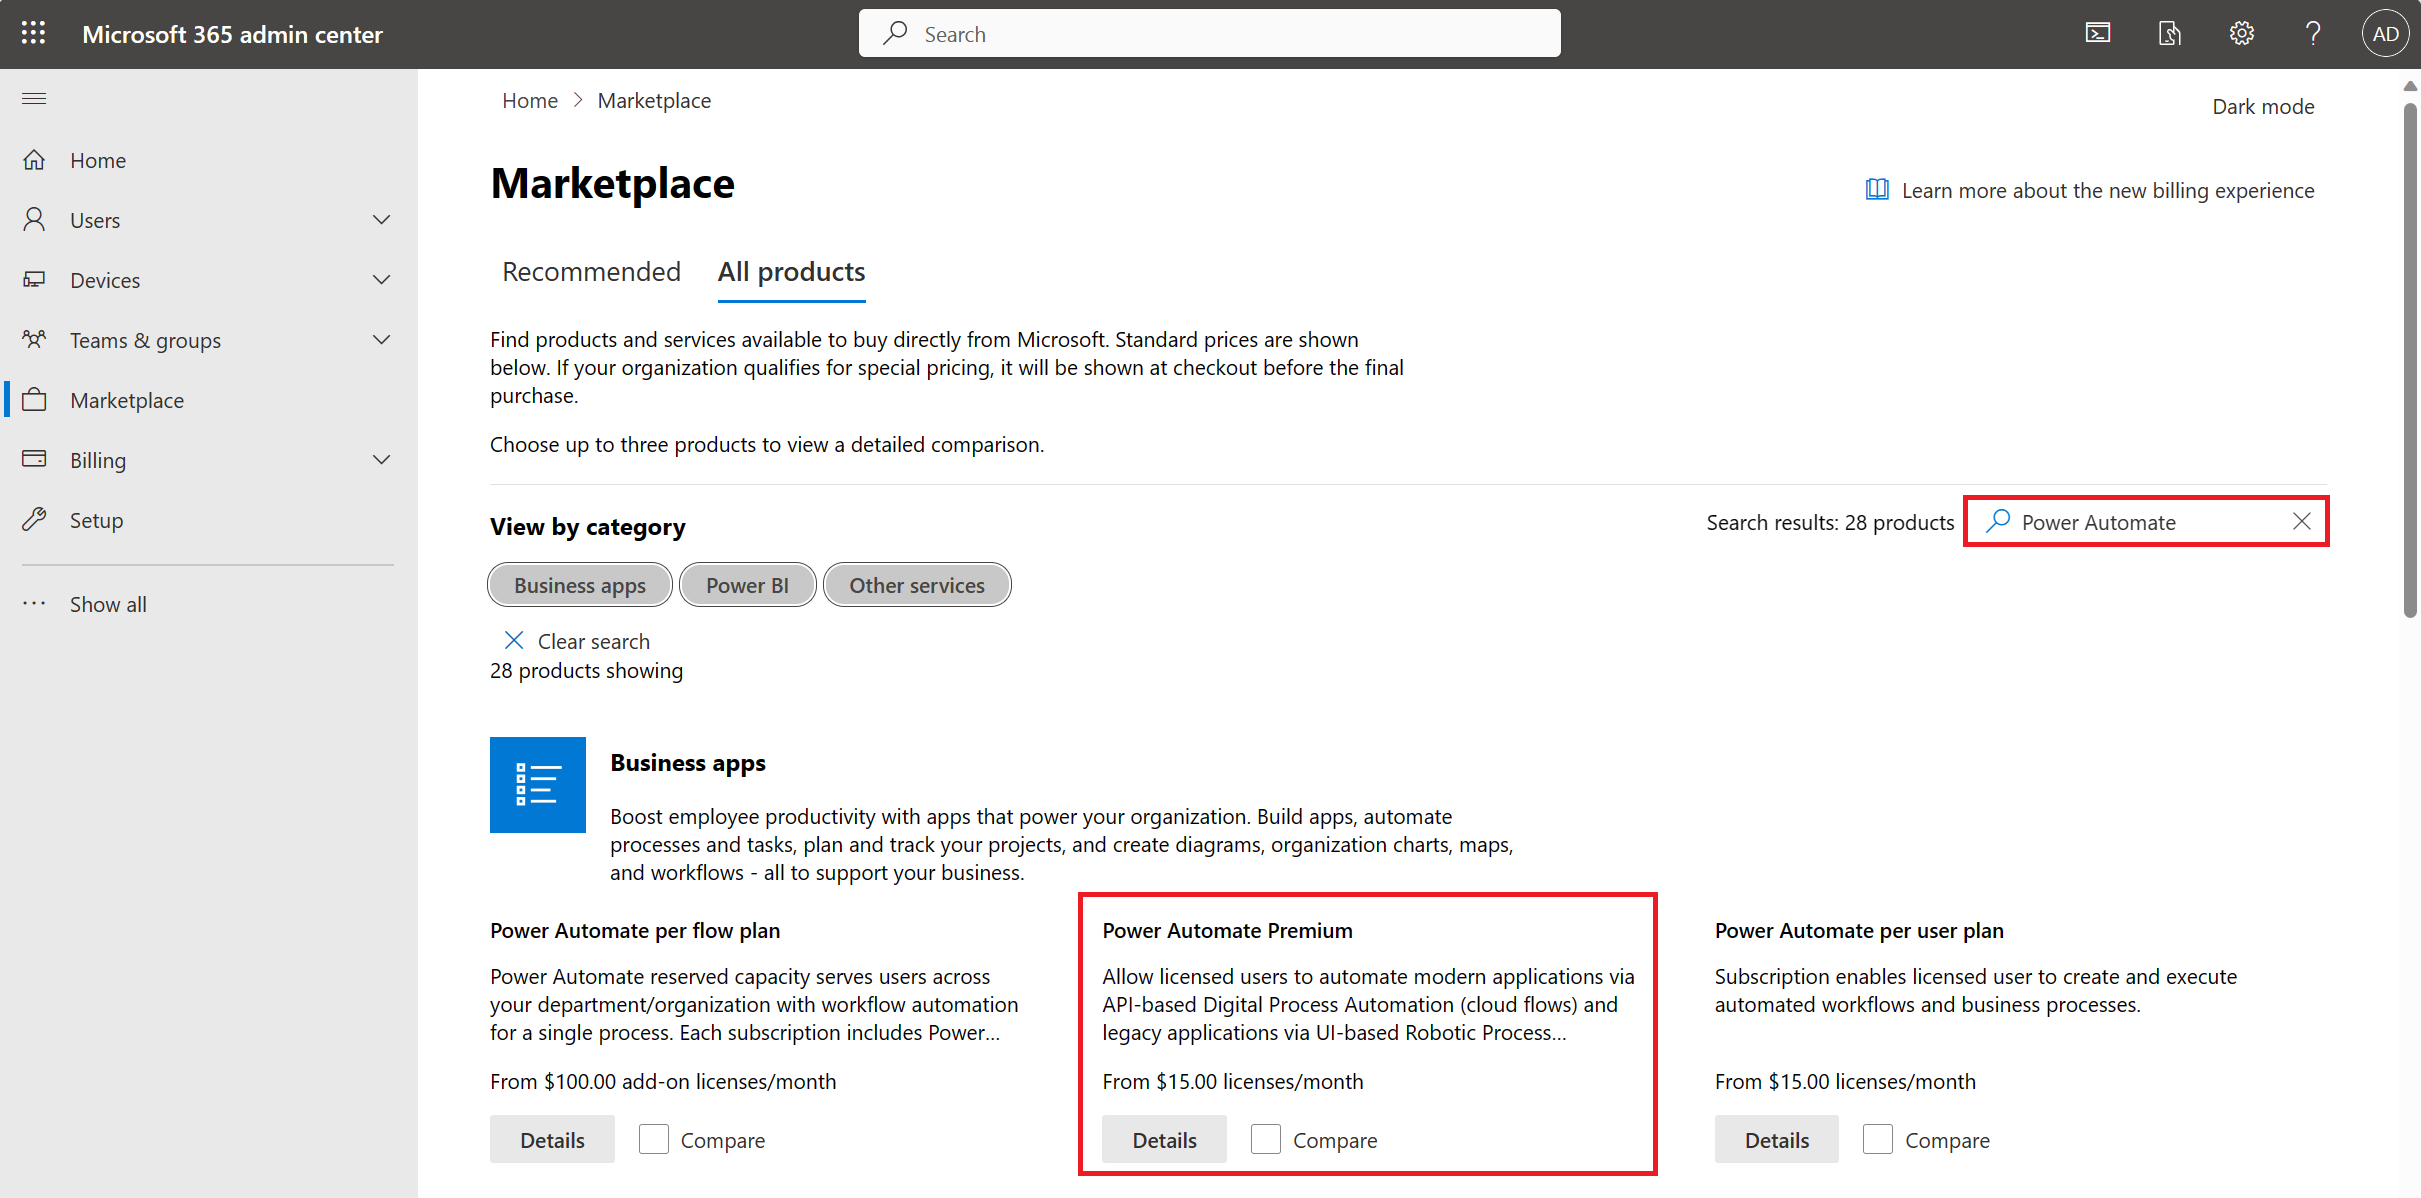
Provide the Details of the plan and then select Buy.


Manage licenses
Tip
To learn more about how to allocate capacity based licenses to an environment in the Power Platform admin center, see capacity add-ons for Power Apps and Power Automate.
Assign Hosted Process license
It's easy and scalable to assign the Hosted Process licenses you purchased to the environments that need the licenses. In the Power Platform admin center under capacity, you see a new section appears if your organization purchased the licenses.
Follow these steps to assign Hosted Process capacity to an environment:
Sign in to the Power Platform admin center.
Select Licensing in the navigation pane.
In the Licensing pane, select Capacity add-ons.
Select Add-ons.
Select the edit button on an environment.
Enter the amount of each add-on you would like to allocate to each environment.
Note
The Hosted Process is environment specific. So, if you have multiple environments that need hosted RPA capabilities, you need to assign the Hosted Process license in each environment.
Select Save.
After you assign the Hosted Process licenses to an environment, you can create hosted machines and/or hosted machine group in that environment.
Assign Process license
Here are the two steps you must take if you want to assign a Process license.
Allocate the Process license to an environment in the Power Platform admin center.
Assign a Process license to a flow.
Note
To run unattended desktop flows in an environment, you need to assign one Process license per machine that is used for unattended desktop flows. If you need to run multiple unattended desktop flows in parallel on a machine, you also need to assign one Process license for each additional Desktop Flow you want to run concurrently on the machine.
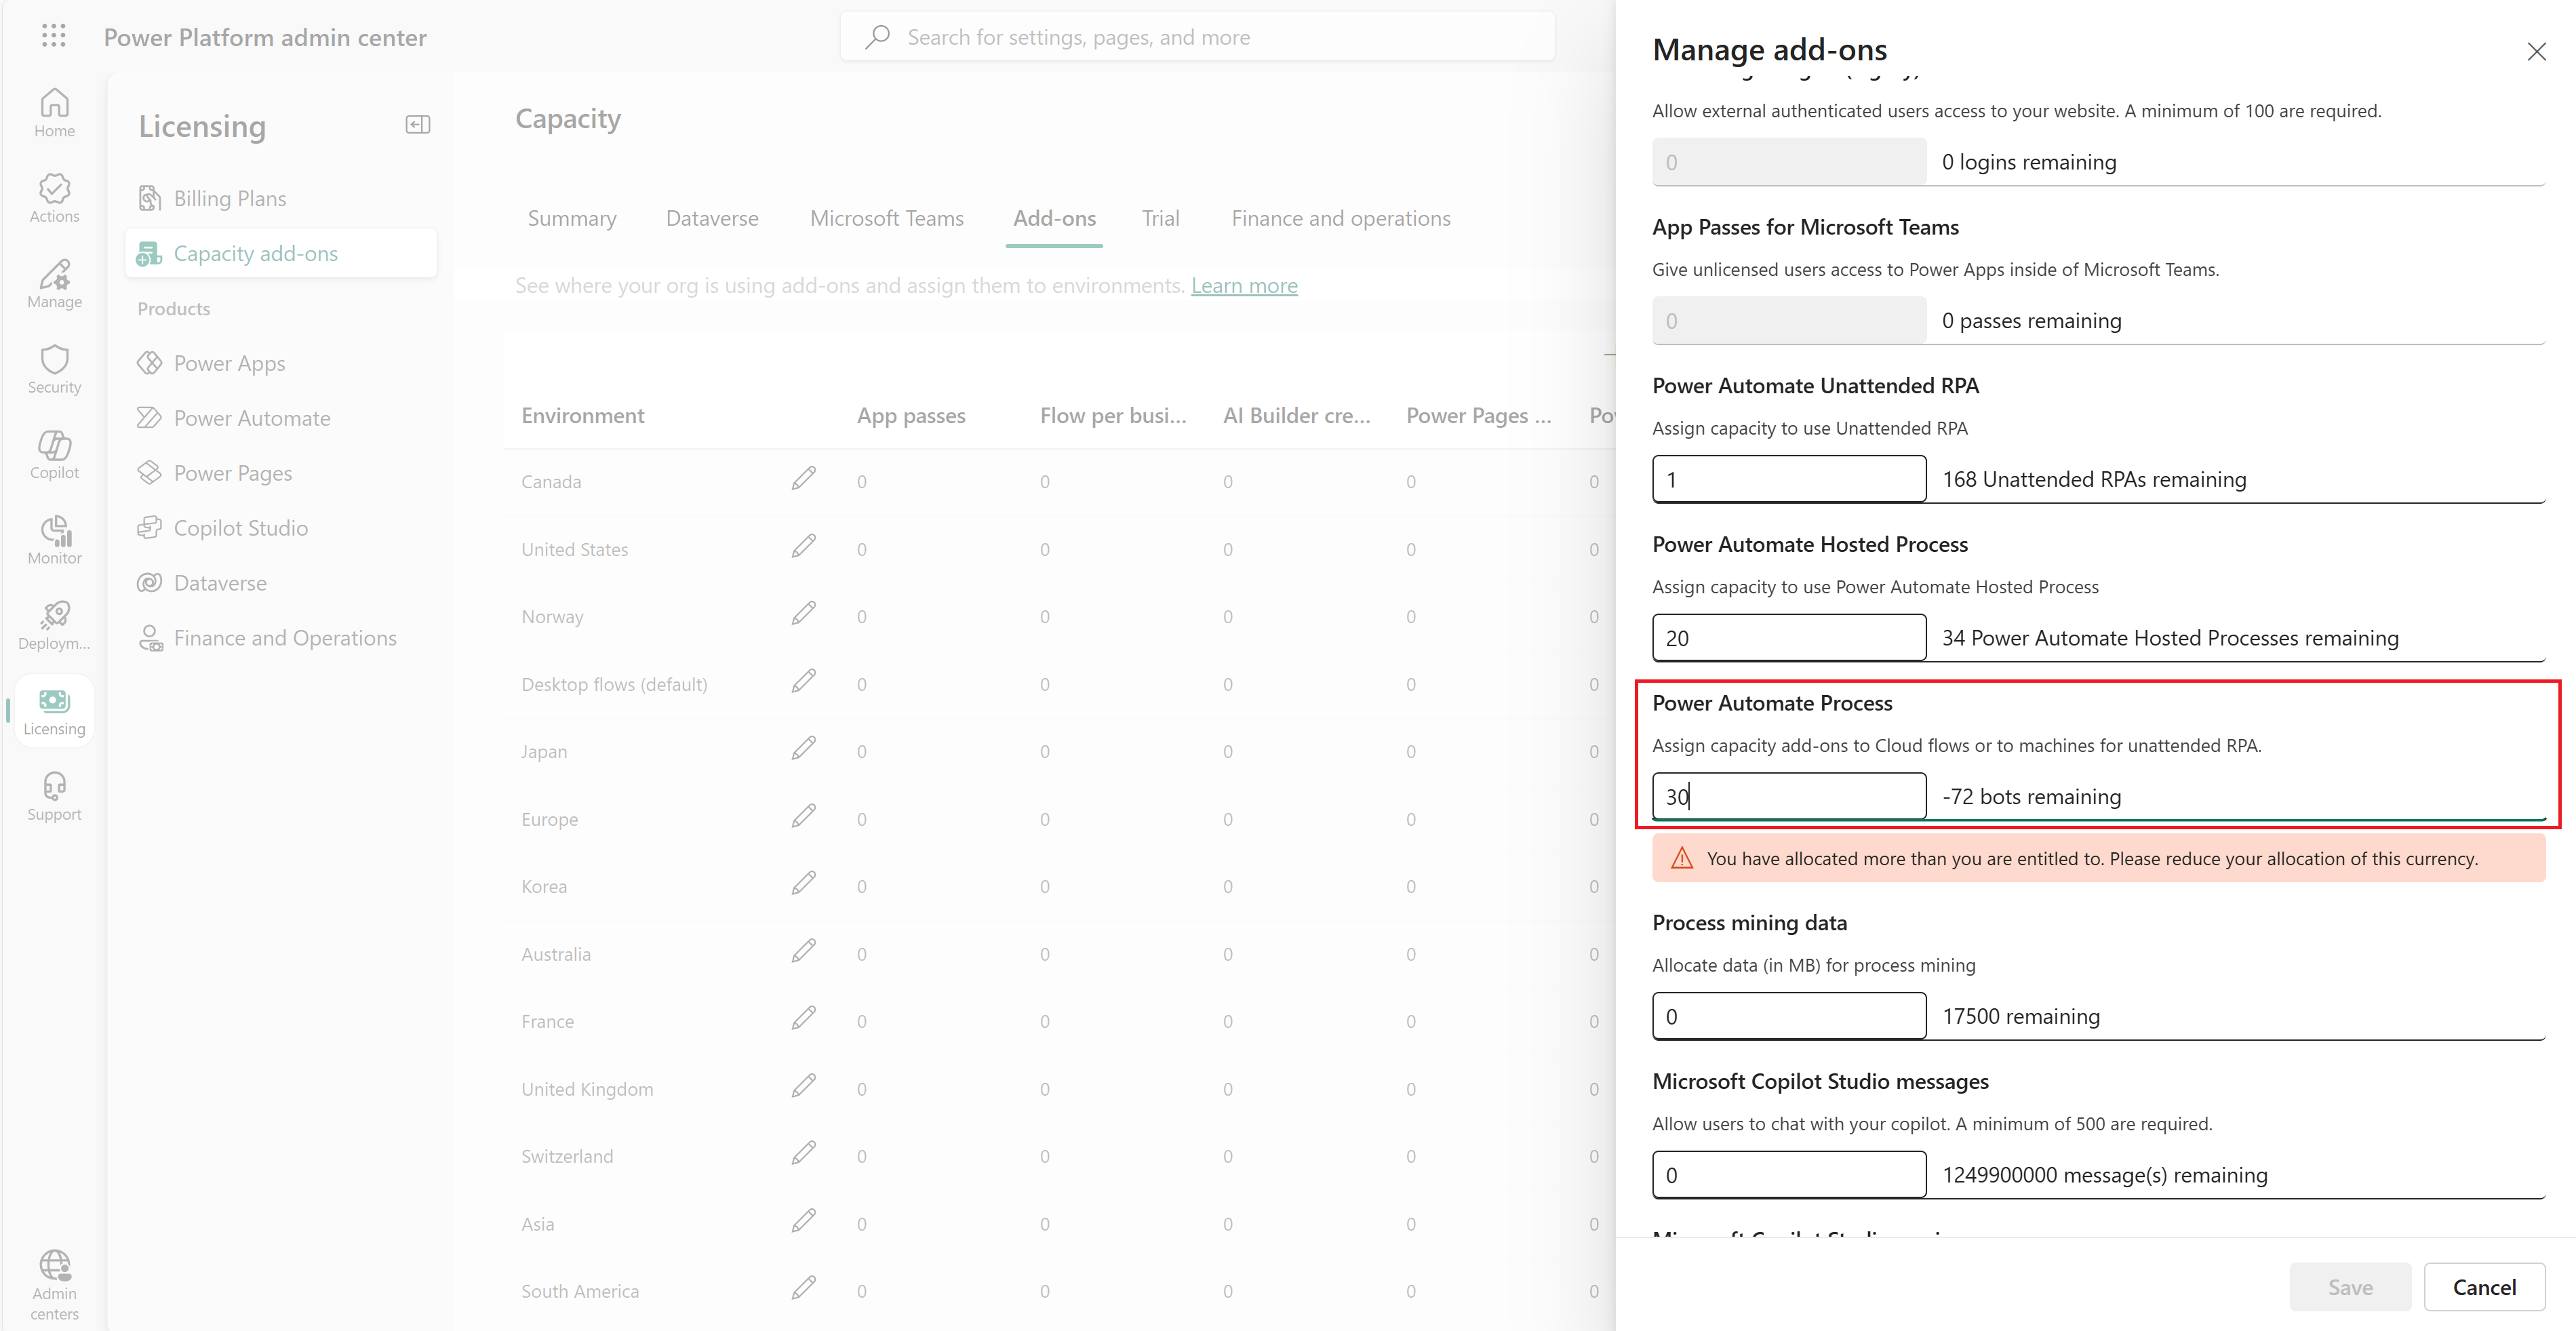
It's easy and scalable to assign the Process licenses you purchased to the environments that need the licenses. In the Power Platform admin center under capacity, you see a new section appears if your organization purchased the licenses.
Allocate the Process license to an environment
Follow these steps to assign Process capacity to an environment.
Sign in to the Power Platform admin center.
Select Licensing in the navigation pane.
In the Licensing pane, select Capacity add-ons.
Select Add-ons.
Select the edit button on an environment.
Enter the amount of each add-on you would like to allocate to each environment.
Tip
Power Automate Process is the same as Process license.
Note
The Process license is environment specific. So, if you have multiple environments that need to run a flow and/or unattended desktop flow, you need to assign the Process license in each environment.
Select Save.


Assign a Process license to a flow
After you assign the Process licenses to an environment, you can choose which flows can use the Process licenses.
In Power Automate, choose the flow to which you want to add the license. Owners, co-owners of the flow and admins can assign a Process license to a flow.
When you select a flow, you see a new section in the details pane that tells you if the flow is assigned to a user, or if it's part of the Process license. The default for a flow is to use the license of the user.
To have a flow use the Process license, select Edit in the details panel. You then see the Name, Description, and Plan that the flow uses. If your environment has the Process license assigned, you can move that flow to use the Process license. Otherwise, you need to assign capacity.
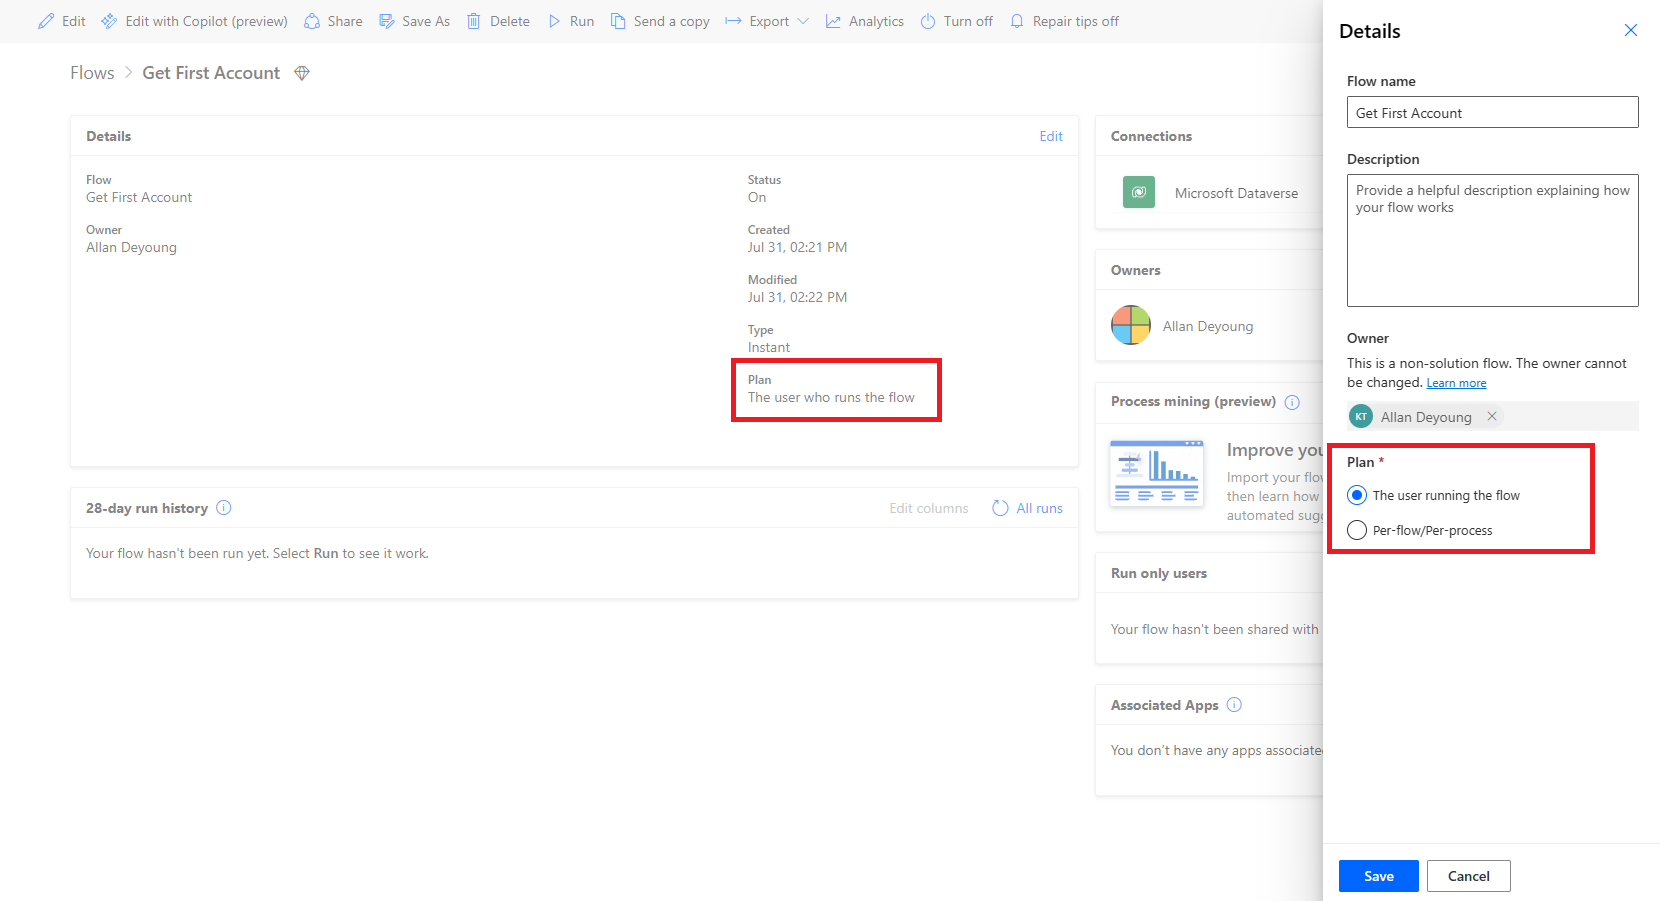

After you update your flow, anyone will be able to use that flow, even if it uses premium connectors. Additionally, capacity is dedicated to that flow.
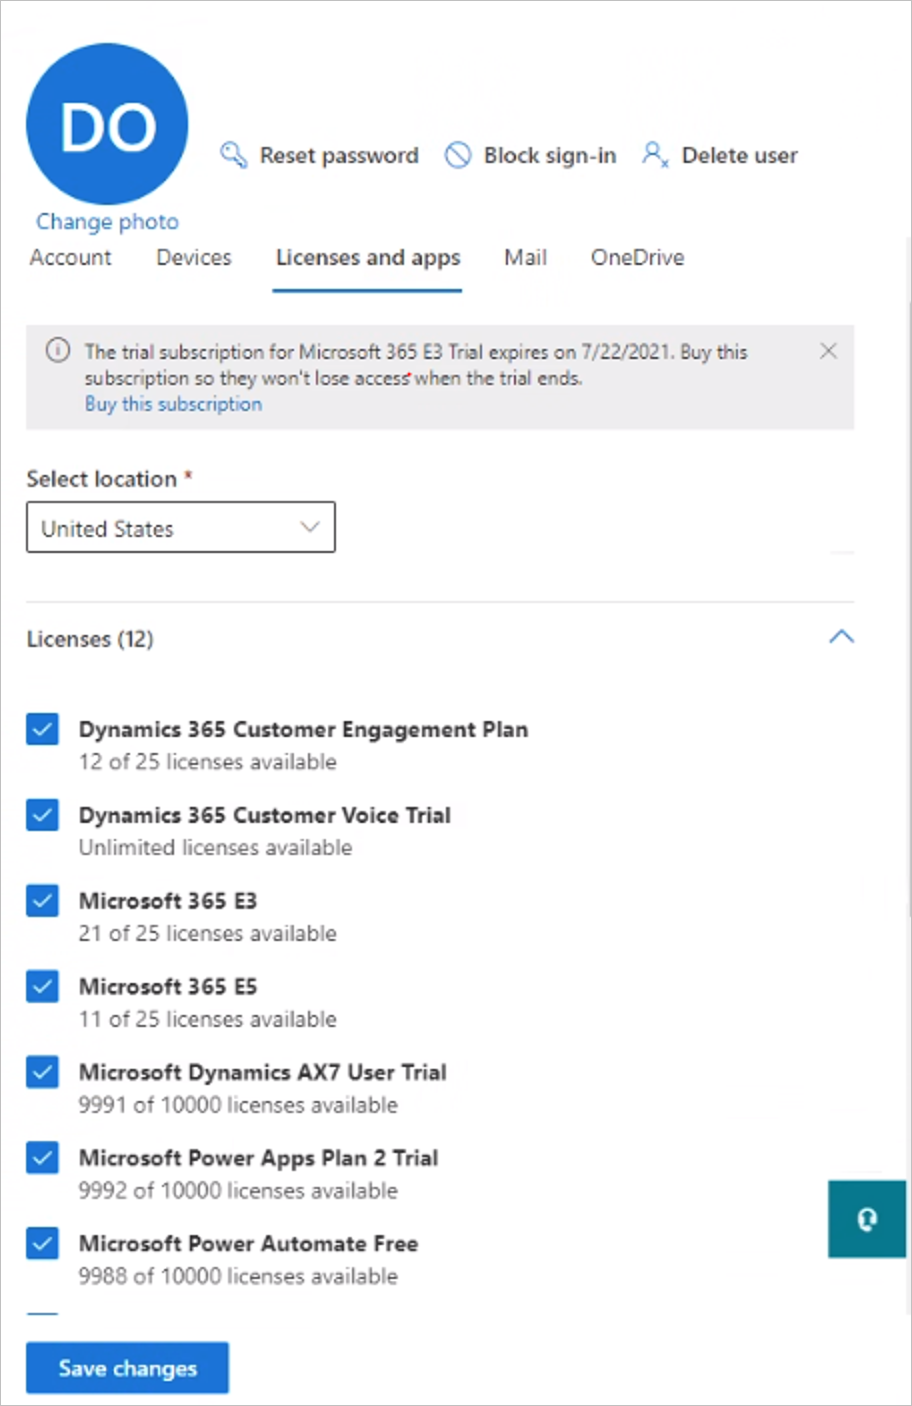
Assign per user licenses to user
Sign in to the Microsoft 365 admin center, select Users > Active users.
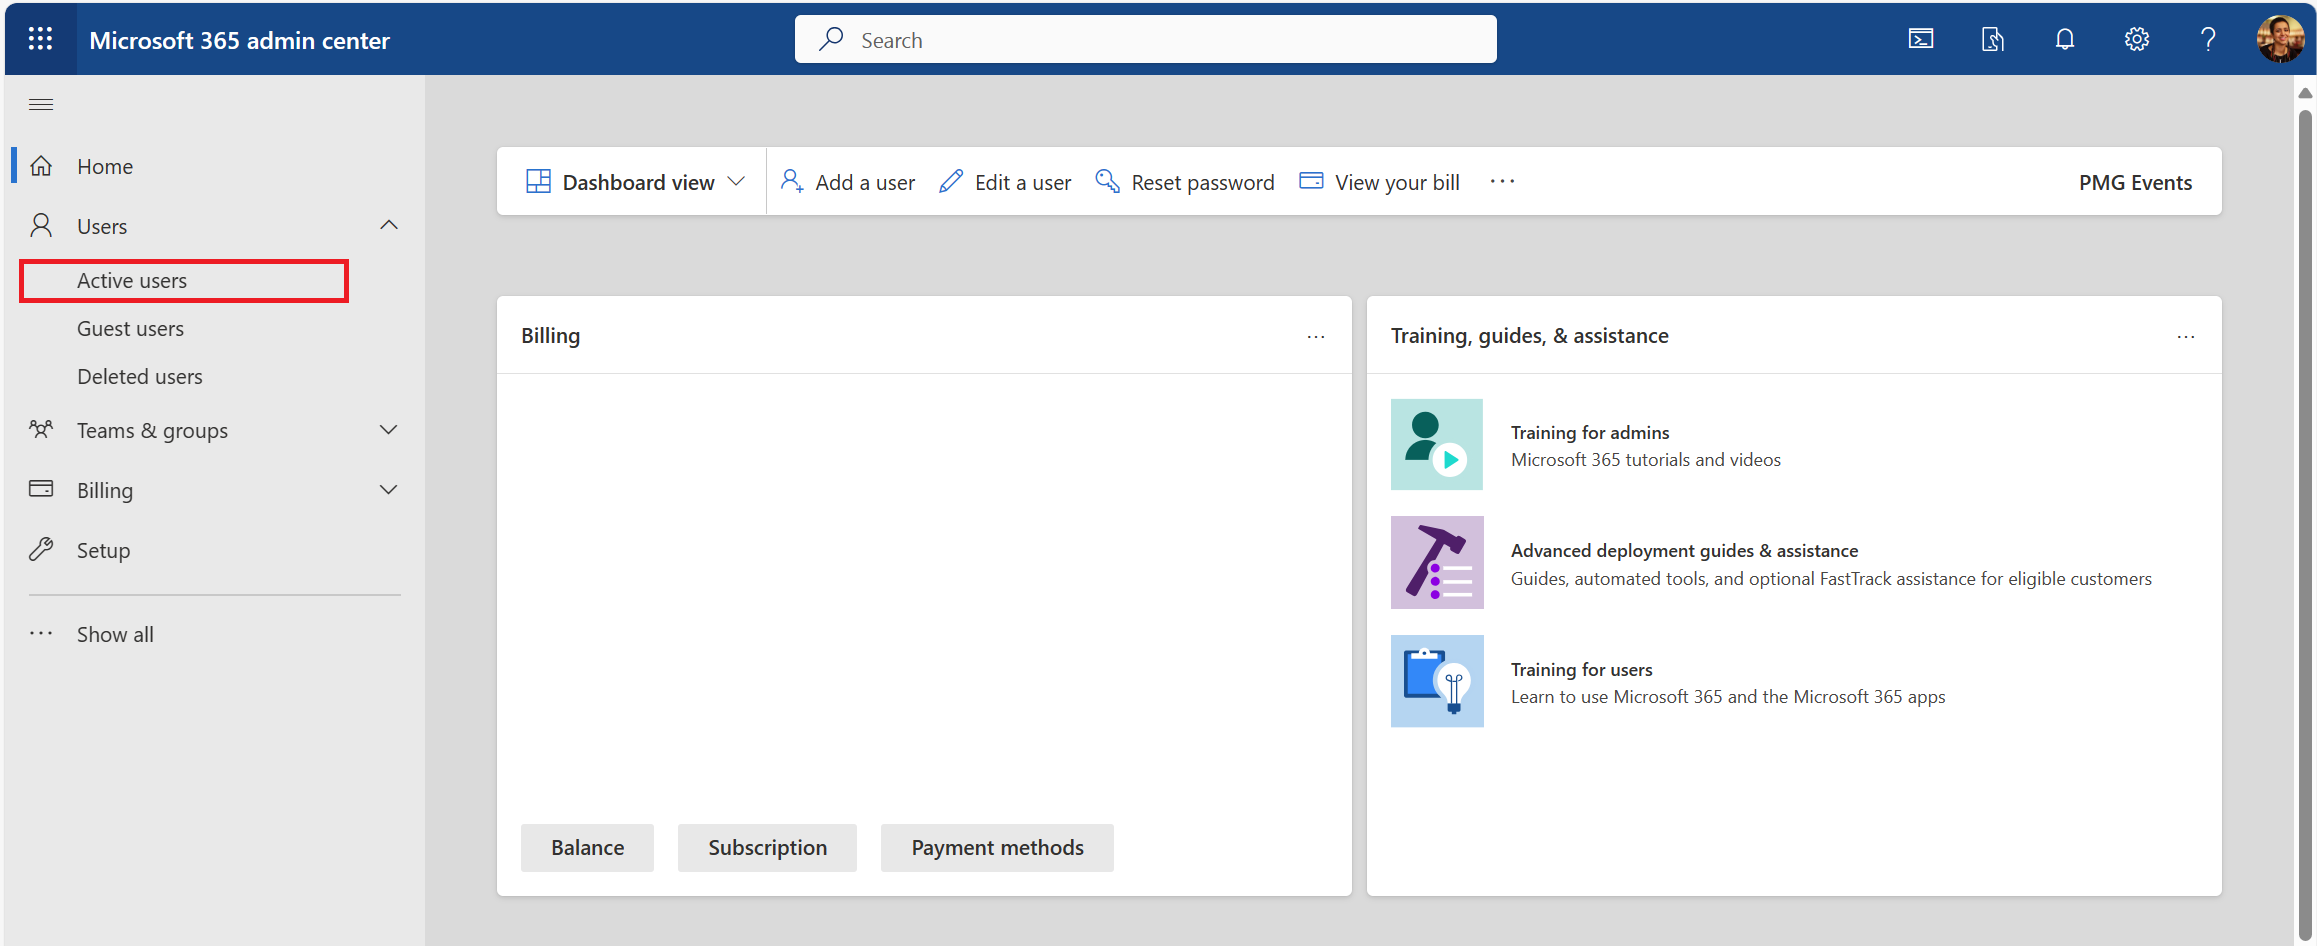
Select the user to whom you assign the license.
Select Licenses and apps.
Select the checkbox for the license you want to assign to the user, and then save your changes.


Assign per flow license
Here are the two steps you must take if you want to assign a per flow license.
It's easy and scalable to allocate the per flow add-ons you purchased to the environments that need add-ons. In the Power Platform admin center under capacity, you see a new section appears if your organization purchased add-ons.
Tip
To learn more about how to allocate the per flow license to an environment in the Power Platform admin center, see capacity add-ons for Power Apps and Power Automate section.
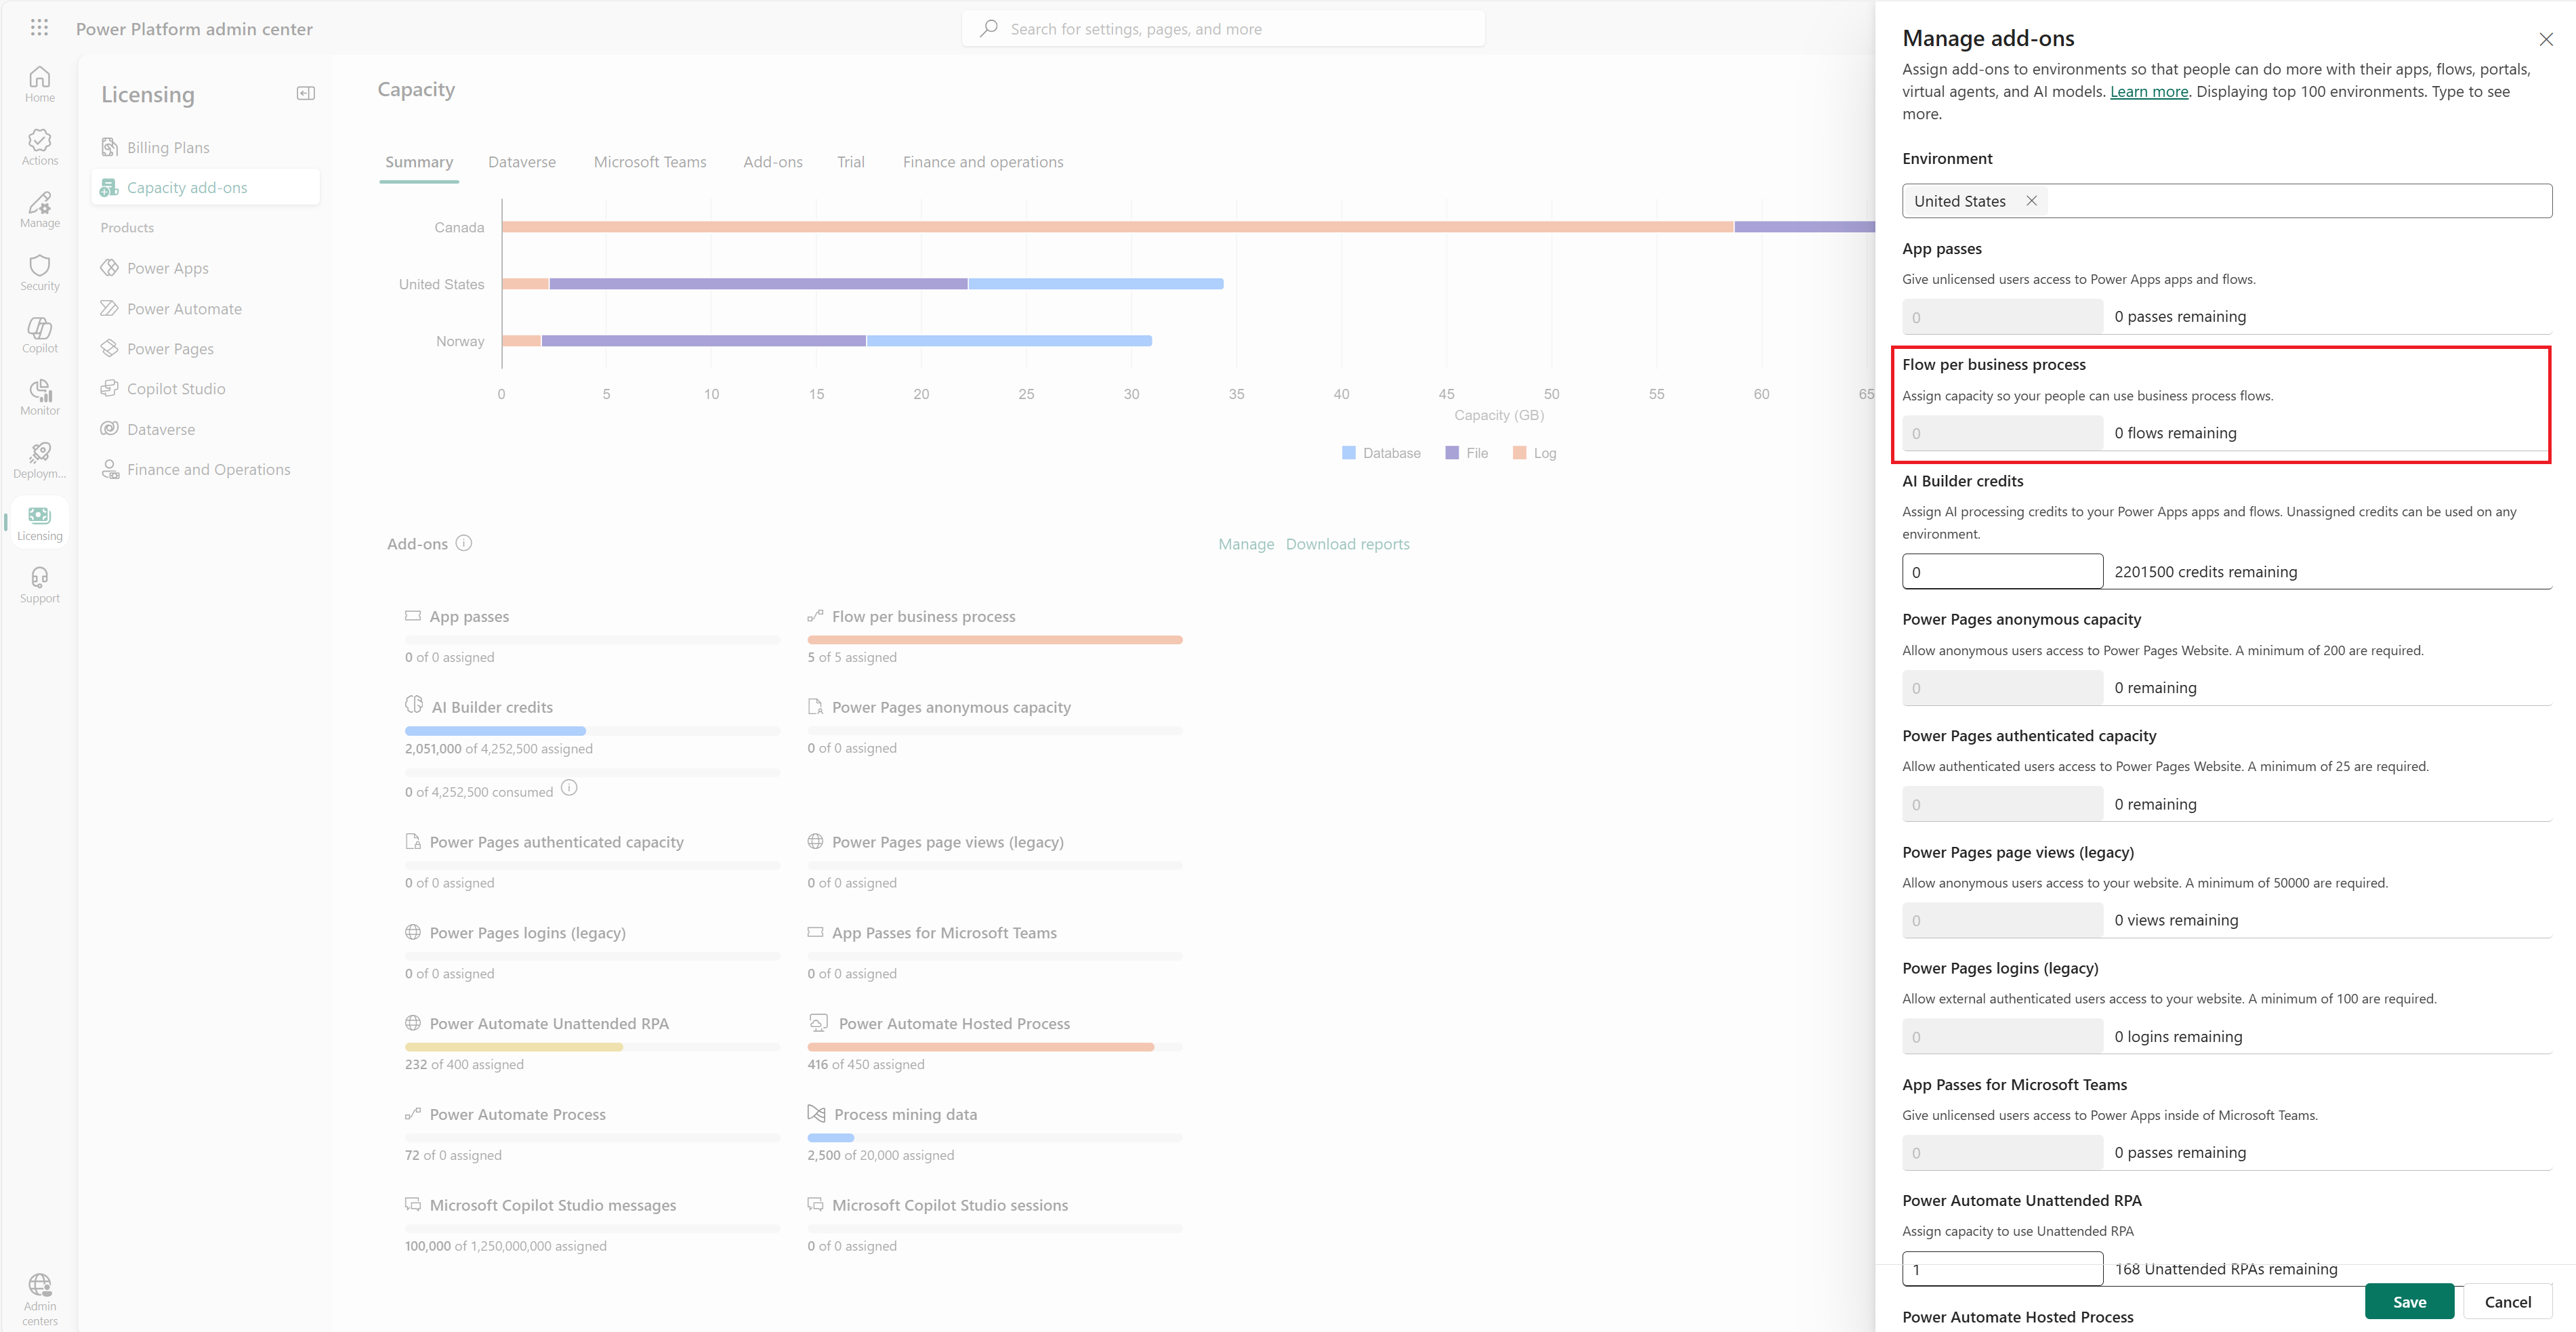
Allocate the per flow license to an environment
Follow these steps to allocate add-ons to an environment.
Sign in to the Power Platform admin center.
Select Licensing in the navigation pane.
In the Licensing pane, select Capacity add-ons.
Select Add-ons > Manage in the add-on section.
Select an environment.
Enter the amount of each add-on you would like to allocate to each environment.
Tip
Flow per business process is same as per flow license.
Note
The per flow plan is environment specific. So, if you have multiple environments that need to run a flow, you need to assign per flow license to the flow in each environment.
Select Save.


Assign a per flow license to a flow
After you assign a per flow plan add-on to an environment, you can choose which flows can use that add-on.
In Power Automate, choose the flow to which you want to add the license. Owners, co-owners of the flow and admins can assign a per flow license to a flow.
When you select a flow, you see a new section in the details pane that tells you if the flow is assigned to a user, or if it's part of the per-flow plan. The default for a flow is to use the license of the user.

To have a flow use the per-flow plan, select Edit in the details panel. You then see the Name, Description, and Plan that the flow uses. If your environment has the per flow add-on allocated, you can move that flow to use the per flow plan. Otherwise, you need to allocate capacity.

After you update your flow, anyone will be able to use that flow, even if it uses premium connectors. Additionally, capacity is dedicated to that flow.
Assign unattended RPA add-on to an environment
- Sign in to the Power Platform admin center.
- Select Licensing in the navigation pane.
- In the Licensing pane, select Capacity add-ons.
- Select Add-ons > Manage in the add-on section.


Users can now run unattended desktop flows within the environment that has the unattended capacity.
Note
The unattended add-on is environment specific. So, if you have multiple environments that need to run unattended RPA, you need to assign add-on capacity to each of them. Also, if you need to run multiple unattended desktop flows in parallel in a single environment, you need to assign the right number of unattended add-ons to the environment to support the parallel flow runs.
Assign capacity add-on to an environment
Consult this article to learn more about capacity add-ons for Power Apps and Power Automate
Monitor license usage
Follow these steps to monitor license usage.
Sign in to the Microsoft 365 admin center.
Go to Billing > Licenses to see all licenses that are assigned or available.
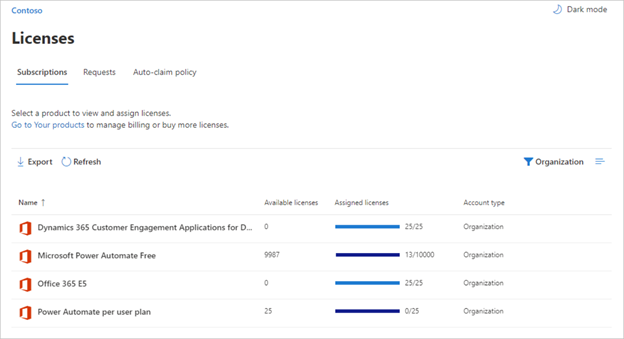
Select the progress bar in the Assigned licenses column to see which users have licenses assigned to them.

FAQ
I assigned a premium license to a user, but the user can't use premium features. Why?
It might take up to a week for all the downstream systems to receive updates. To force an update for a particular flow, turn the flow off and on or edit and save the flow.
How do I remove Power Automate from the app launcher for a user?
If a user was assigned a Power Automate license, you can take the following steps to remove the license for that user. This action removes the Power Automate icon from the app launcher.
- Go to the Microsoft 365 admin center.
- In the left navigation bar, select Users > Active Users.
- Find the user for whom you want to remove the license, and then select their name.
- On the user details pane, select the Licenses and Apps tab, and then uncheck the license for Power Automate.
- At the bottom, select Save changes.
It's also possible to do a bulk removal of licenses through PowerShell. See Remove licenses from user accounts with Microsoft 365 PowerShell for a detailed example.
Additional guidance about bulk removal of services within a license can be found in the Disable access to services with Microsoft 365 PowerShell article.
Note
This action removes the Power Automate tile by default. A user may still choose to use Power Automate as an individual.
Why did 10,000 licenses for Power Automate show up in my Microsoft 365 tenant?
Any person can try out Power Automate free for 90 days, and these trial licenses represent the available capacity for new Power Automate users in your tenant. There's no charge for these licenses.
If at least one user in your tenant has signed up for a Microsoft Power Automate free license, you see 10,000 licenses (minus any assigned licenses) under Billing > Licenses for your organization.
You can choose to assign additional licenses to users yourself through the Microsoft 365 admin center but note that these are trial licenses for Power Automate, and they'll expire 90 days after you assigned them to a user.
Is trial free? Will I be charged for these licenses?
No user can incur any cost to your organization without your express consent, so neither free nor trial licenses can cause any charges to your organization. Moreover, they also don't use any quotas, such as run quotas.
I removed the Power Automate free license and users can still access it
The Power Automate free license is included only for tracking purposes. It's not possible to prevent another person from using Power Automate for individual purposes. Thus, the presence of a Power Automate free license doesn't actually grant or remove any capabilities.
Why can't I see all Power Automate licenses in the Microsoft 365 admin center?
Users can use Power Automate either as individuals or as a part of their organization. Licenses at the organizational level will always be visible in the Microsoft 365 admin center. However, if a user signs up for a trial as an individual then that isn't managed by their Microsoft 365 admin and it won't display in the Microsoft 365 admin center.
How can I restrict my users' ability to access my organization's business data?
Power Automate allows you to create data groups for business and non-business data. After you implement these data loss prevention policies, users can't design nor run flows that combine business and non-business data. For more details, See Data loss prevention (DLP) policies.

I'm a maker
What is my license?
- Sign in to Power Automate.
- Select your profile picture in the top right corner of the screen.
- Select View account.
- Select the View on the Subscriptions tile.
- Search for Power Automate under the Licenses section.
You see the licenses that you have for Power Automate.
Alternatively, see your subscription page to see licenses and trials assigned to you.
Can a maker buy licenses?
Yes. To get started, use the self-service purchase method for Microsoft Power Platform (Power BI, Power Apps, and Power Automate).
Important
This capability isn't available to government, non-profit, or education tenants in the United States.
Customers can make a self-service purchase from Power Automate. To do this, they first provide their email address to confirm if they're a user in an existing Microsoft Entra tenant. Next, they need to sign in by using their Microsoft Entra credentials. After customers sign-in, they need to indicate the number subscriptions they want to purchase and provide a credit card for payment. When the purchase is complete, they can start using their subscription. The purchaser can also access a limited view of the Microsoft 365 admin center where they can enable other people in their organization to use the product.

Admins can turn off self-service purchasing on a per product basis via the MSCommerce PowerShell module.
Central procurement and IT teams view all users who buy and deploy self-service purchase solutions through the Microsoft 365 admin center. Admins can turn off self-service purchasing on a per product basis via PowerShell.
You can find more FAQs on self service purchases.
Where does the self-service purchaser see and manage their purchases?
Self-service purchasers can manage their purchases in the limited view of the Microsoft 365 admin center. Self-service purchasers can always get to the admin center from the Admin tile in the app launcher built into all Microsoft 365 and Dynamics online apps. Self-service purchasers can view the purchases they made, buy additional subscriptions to the same service, and assign licenses for those subscriptions to other users in their organization. Additionally, purchasers can view and pay their bill, update their payment method, and cancel their subscription.
FAQ
Are there differences between Microsoft Accounts and work or school accounts for billing?
Yes. If you sign in with a Microsoft Account (such as an account that ends with @outlook.com or @gmail.com), you can use only the free plan. To take advantage of the features in the paid plan, sign in with a work or school email address.
I'm trying to upgrade, but I'm told my account isn't eligible
To upgrade, use a work or school account, or create a Microsoft 365 trial account.
Who can buy Microsoft Power Apps and Power Automate plans?
Any customer can sign up for a free trial. Microsoft 365 admins can buy Power Automate plans for their teams or organization. Contact your Microsoft 365 admin when you're ready to buy.
Can makers request admins to assign license to them?
Yes.
Go to the Microsoft Power Automate pricing page and select Buy now for the license that you need.
Fill in the details, and then send the request to your admin.
Admins can see your request in the Microsoft 365 admin center and assign a license to you.

