Note
Access to this page requires authorization. You can try signing in or changing directories.
Access to this page requires authorization. You can try changing directories.
Note
The new and improved Power Platform admin center is now generally available. We're currently updating the documentation to reflect these changes, so check back to ensure that you're getting the latest updates.
As an administrator, you traditionally assign licenses to users manually. Auto-claim for Power Automate licenses allows administrators to easily set up policies in the Microsoft 365 admin center, similar to other Microsoft products and services. Once a policy is configured, any user in the organization who requires an individual Power Automate user license is automatically assigned a license.
You can create and manage these auto-claim policies in the Microsoft 365 admin center.
Auto-claim policies scope
The current scope of Power Automate license auto-claim policy applies to the following licenses:
- Power Automate premium plan
- Power Automate per user plan (legacy)
When the auto-claim policy is configured, the following scenarios automatically assign a license to a user when the user lacks the required entitlement.
Power Automate per user plan
In the Power Automate portal:
- User triggers / saves / turns on a premium cloud flow (or standard flow for managed environments)
- User requests the Power Automate per user license
Power Automate premium
In addition to the scenarios listed for the Power Automate per user plan, users perform these tasks.
In the Power Automate portal:
- User triggers / saves / turns on a premium cloud flow with attended RPA (Robotic Process Automation)
- User requests the Power Automate premium license
In the Power Automate for desktop application (installer version 2.43 or later version):
- User selects Go Premium
- User has a self-assisted premium trial and is actively using RPA capabilities
Create an auto-claim policy for Power Automate licenses
Use the information described here to set up an auto-claim policy for Power Automate.
For more information on managing auto-claim policies in the Microsoft 365 admin center, go to Manage auto-claim policies in the Microsoft 365 admin center.
Who can create and manage auto-claim policies?
You must have Microsoft 365 global admin privileges to create and manage auto-claim policies. For more information, go to Admin roles in the Microsoft 365 admin center.
Turn on the auto-claim policy feature
You must first enable the auto-claim policy feature in the Microsoft 365 admin center before creating an auto-claim policy.
- Sign in to Microsoft 365 admin center.
- On the Navigation menu, select Billing > Licenses.
- Select the Auto-claim policy tab.
- Select Turn on setting.
After you turn on the feature, you can create an auto-claim policy.
Create an auto-claim policy for Power Automate
The auto-claim policy tab displays the policies you created. You can view the policy's name, the associated app, the assigned product, the available licenses, and the policy's status.
To create a new policy, complete the following steps:
In the Microsoft 365 admin center, select Billing > Licenses.
Select the Auto-claim policy tab, and then select Add a policy.
On the Name this auto-claim policy page, enter a name for the policy, and then select Next.
On the Set an auto-claim app and product page, select from the following plans displayed in the dropdown list based on your license type:
License Type Auto-claim app Product assigned Power Automate per user plan Power Automate per User Plan Power Automate per user plan Power Automate premium Power Automate RPA Attended Power Automate Premium On the Select apps page, select or clear the checkboxes for the apps to include or exclude with the license and then select Next.
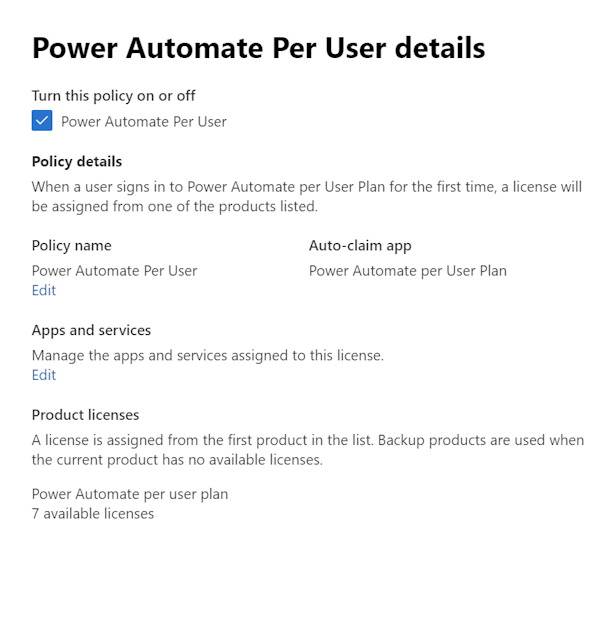
On the Review and finish page, verify the new policy information, make any necessary changes, and then select Create policy.
The policy details display.
View license assignment in auto-claim policy report
The auto-claim policy report displays all license assignments from the auto-claim policy in the last 90 days.
To view the auto-claim policy report:
- In the Microsoft 365 admin center, select Billing > Licenses, and then select the Auto-claim policy tab.
- Select View report. The Auto-claim policy report page lists all licenses assigned from each policy in the last number of days. By default, the page shows the past 90 days.
To change the time period shown, select the Past 30 days dropdown list. You can view reports for the past 1, 7, 30, and 90 days.
Auto-claim policy enabled by default
To simplify license management for administrators, auto-claim policies are enabled by default in the following scenarios:
Tenants with new Power Automate premium license: Starting February 2024, tenants with a new Power Automate premium license have a new auto-claim license policy in the Microsoft 365 admin center for Power Automate. This policy ensures that users who need a Power Automate premium license receive it automatically, if the license is available in your tenant. By default, this policy is applied across all environments.
Tenants with Managed Environments: Starting April 2024, tenants using managed environments have a new auto-claim license policy in the Microsoft 365 admin center for Power Automate. This policy ensures that users who need a Power Automate premium or per-user plan (legacy) license receive it automatically, if the license is available in your tenant. By default, this policy is applied to users in managed environments. However, admins can also choose to extend this policy to apply to standard environments in the Power Platform admin center.
Can administrators update the policy?
Yes, administrators can manage the policy in the Microsoft 365 admin center just like any other auto-claim policy. Administrators can disable the policy, delete it, and view reports on which users were assigned licenses.
In the Power Platform admin center, administrators can decide whether the policy should apply to Managed Environments only or all environments.
- Sign in to Power Platform admin center.
- Select Settings > Auto-claim policies.
- On the Auto-claim policies pane, select whether the policy should be applicable to All Environments or Only Managed Environments.
Support for group-based license assignment
Auto-claim policies support individual license assignment, which means that licenses are assigned to individual users. If your organization already has an existing process for license assignment, administrators can still make use of the auto-claim policy while maintaining their current workflow.
Administrators can review the list of users to whom licenses were assigned through the auto-claim policy in the Microsoft 365 admin center. Then, they can make changes, as needed, such as unassigning auto-claim-assigned licenses and moving users to designated groups to use Microsoft Entra group-based licensing. For more information about group based licensing, go to Group-based licensing scenarios.
Here are some commands that can help in unassigning licenses and adding users to the required Microsoft Entra group.
##
#Install and import AzureAD PowerShell module prior to running these commands
##
##You might be able to get a list of users, that have been auto-assigned a
##license directly, via Microsoft Admin Center. Follow instructions at
##https://learn.microsoft.com/en-us/microsoft-365/commerce/licenses/manage-auto-claim-policies?view=o365-worldwide#view-an-auto-claim-policy-report
##
##Once you have a list of users, you can use the following commands to remove
##the direct license assignment and add the user to a licensed group, or
##you might tweak the script to iterate through a list of users and
##perform this in bulk
##
##Please note that adding a user to a licensed group might not result in an
##immediate license assignment. Refer to https://learn.microsoft.com/en-us/entra/identity/users/licensing-group-advanced for more information
#############################################>

$Credential = Get-Credential

# Connect to Azure AD
Connect-AzureAD -Credential $Credential

#The user that will get a group based license
$LicensedUser = Get-AzureADUser -SearchString "<UPN, display name or object ID of the user for which you want to assign a license>"

#The group that has the license assigned
$LicensedGroup = Get-AzureADGroup -SearchString "<Object ID or name of the group that has a relevant license assigned>"

#SKU part number of the sku that needs to be unassigned
# Power Automate premium = "POWER_AUTOMATE_ATTENDED_RPA"
# Power Automate per user (legacy) = "FLOW_PER_USER"
$SkuPartName = "POWER_AUTOMATE_ATTENDED_RPA"

#Get the SkuID of the license that needs to be unassigned from the user
$LicenseSku = Get-AzureADSubscribedSku | Where-Object {$_.SkuPartNumber -eq $SkuPartName}

#Create the AssignedLicenses Object, used for removing direct license assignment from the user
$LicensesToRemove = New-Object -TypeName Microsoft.Open.AzureAD.Model.AssignedLicenses
$LicensesToRemove.RemoveLicenses = $LicenseSku.SkuId

#Remove directly assigned license from the user
#Note that this command will result in an error if the user does not have the relevant license assigned directly
Set-AzureADUserLicense -ObjectId $LicensedUser.ObjectId -AssignedLicenses $LicensesToRemove

#Add user to a licensed group
Add-AzureADGroupMember -ObjectId $LicensedGroup.ObjectId -RefObjectId $LicensedUser.ObjectId
Limitations
This section presents all the limitations of the auto-claim policy for Power Automate.
Auto-claim policy might take up to two hours to activate after creation
After creating the Power Automate license auto-claim policy, it might take up to two hours for the configured policy to be activated and propagated across the relevant Microsoft services.
Successful license auto-claim isn't immediately reflected in Power Automate portal
When a Power Automate user license is auto-claimed, there might be a slight delay before the license status is updated in the Power Automate portal. During this period, the portal might indicate that the user doesn't have the auto-claimed license. However, the user does have access to premium features despite the portal's display.