Note
Access to this page requires authorization. You can try signing in or changing directories.
Access to this page requires authorization. You can try changing directories.
This article provides you with information about the various scenarios on how to implement and practice healthy application lifecycle management (ALM) for customizing forms in your model-driven app solutions.
The following sections describe how form merge works and how to maintain customizations. The basic development scenarios with recommendations for maintaining successful ALM for a model-driven app form are covered in detail within each section that follows. Every scenario includes steps to follow that can help you implement a proper ALM process when updating your solution or model-driven app.
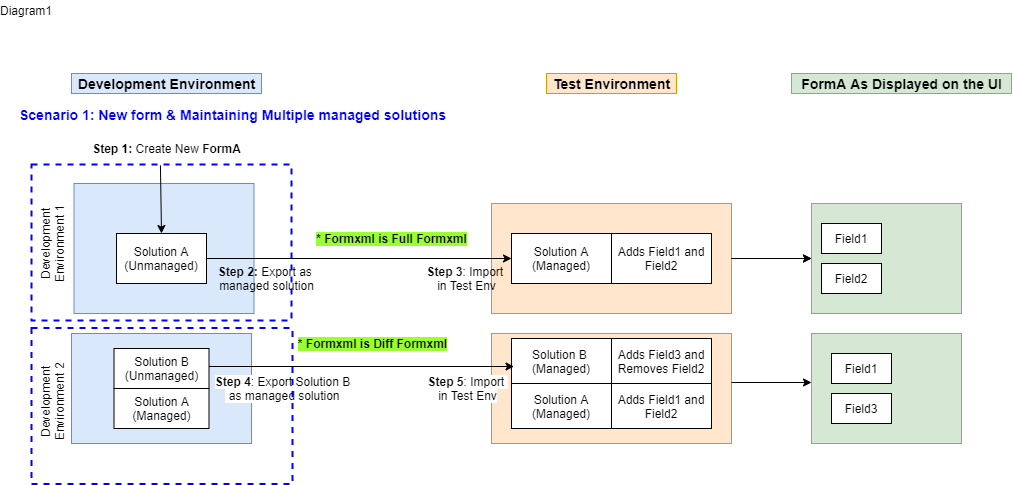
Creating a new form and maintaining it using multiple managed solutions
Follow these steps to implement healthy form ALM for this scenario.
- Create a new form named FormA in your development environment and perform customizations on the form.
- Create a new solution (named Solution A in the diagram) in the development environment, which will be an unmanaged solution and add your new form. Export the solution as managed. This step exports a full FormXml for the form.
- In your test environment, import the managed solution from step 2, which creates FormA in the test environment. In the diagram, FormA gets created in the test environment and the UI for the form shows Field1 and Field2 that Solution A added to the form.
- When you further customize the form you created in step 1 using a new development (source) environment, import the managed Solution A created in step 2, make sure the development instance you're using has FormA in a managed state. As shown in the diagram, managed Solution A is imported in the development environment and the form is customized creating active customizations. Then, FormA can then be added to a new unmanaged solution (Solution B in the diagram) and exported as a managed solution from the development environment. This step exports a differential (diff) FormXml for the form.
- In your test environment, import the managed solution (Solution B) from step 4. As shown in the diagram Solution B is adding a new Field3 to FormA and removing Field2, which was added by Solution A. The UI for the form in the test environment now shows Field3 and Field1 on the form but not Field2 after the merge.
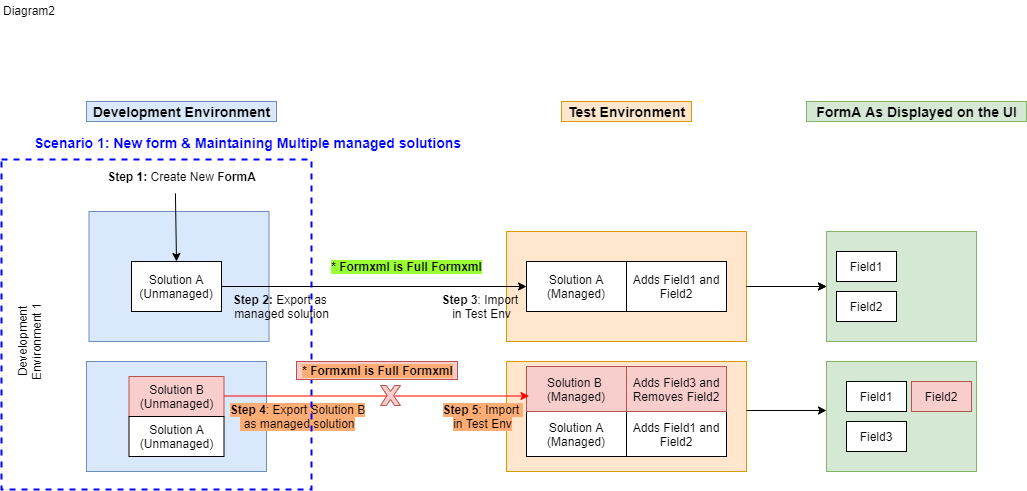
Unhealthy example for this scenario
As seen in the this diagram, it isn't a healthy ALM practice to create multiple managed solutions from the development environment where the base solution (Solution A) is in an unmanaged state. This is because, when you create another unmanaged solution (Solution B) for the unmanaged form, the FormXml is exported as a full FormXml, instead of a diff FormXml as shown in the valid scenario above. Subsequently, changes like removing a column won't take effect.
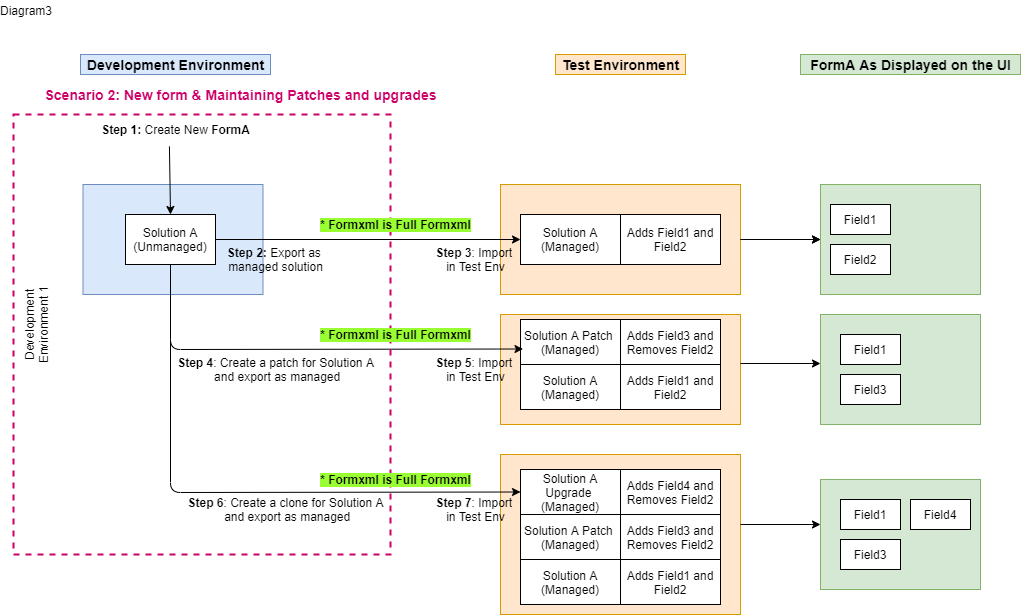
Creating a new form and making customizations using patches and upgrades
Follow these steps to implement healthy form ALM for this scenario.
Create a new form named FormA in your development environment and perform customizations on the form.
Create a solution (Solution A in the diagram), which will be an unmanaged solution and add your new form. Export the solution as managed. This step exports a full FormXml for the form.
In your test environment, import the managed solution from step 2, thus creating the form in the test environment. In the diagram FormA gets created in the test environment and the UI for the form shows Field1 and Field2 that Solution A added to the form.
When you further customize the form you created in Step 1 using patches, use the same environment where Solution A is in an unmanaged state and create a patch for the solution and customize the form. Next, export the patch as a managed solution. This step exports a full formXml for the form.
In your test environment, import the managed patch solution from step 4. As shown in the diagram, the Solution A patch is adding a new Field3 to FormA and removing Field2, which was added by Solution A.
Note
Patches containing full formXml are always compared to the base layer that the patch was created from and ignores any intermediate patches between the base and the current patch. As a result, Field2 is removed since it exists in the base layer Solution A,* and the removal is detected. On the other hand, Field3 is added by this patch solution and can't be removed by subsequent patches. Thus, fields added through patch solutions are additive in nature.
When you further customize the form you created in Step 1 using upgrades, use the same environment where Solution A is in an unmanaged state and clone Solution A to create the upgrade solution and customize the form. Then, export the Solution A upgrade as a managed solution. This step exports a full FormXml for the form.
In your test environment, import the managed Solution A upgrade from step 6. As shown in the diagram, the Solution A upgrade is adding a new Field4 to FormA and removing Field2, which was added by Solution A. The UI for the form in the test environment now shows Field1, Field3, and Field4 on the form, but Field2 will be removed after the form is merged from the import.
Customizing an existing managed form and maintaining it using multiple managed solutions
Follow these steps to implement healthy form ALM for this scenario.
- Edit an existing managed form, named FormB in this example, in your development environment and perform customizations on the form. Note that solution A is the managed solution already installed for the form in the development environment.
- Create a new solution (Solution B in the below diagram), which is an unmanaged solution, and add FormB. Export the solution as managed. This step exports a differential (diff) FormXml for the form.
- In your test environment, import the managed solution from step 2, thus creating a second solution layer for the form. In the diagram, FormB gets the merged changes from Solution A and Solution B in the test environment and the UI for the form shows Field1 and Field3 on the form but not Field2, which was removed by Solution B.
- When you further customize the form you customized in step 1 using new managed solutions, make sure to use a new development environment which has FormB in a managed state. As shown in the diagram, Solution A and Solution B managed solutions are imported in the new development environment. FormB is customized creating active customizations, which can then be added to a new solution (Solution C in the diagram) and exported as a managed solution.
- In your test environment, import the managed Solution C from step 4. As shown in the diagram, Solution C is adding a new Field4 to FormB and removing Field3, which was added by Solution B. The UI for the form in the test environment now shows Field1 and Field4 on the form, but not Field2 and Field3.
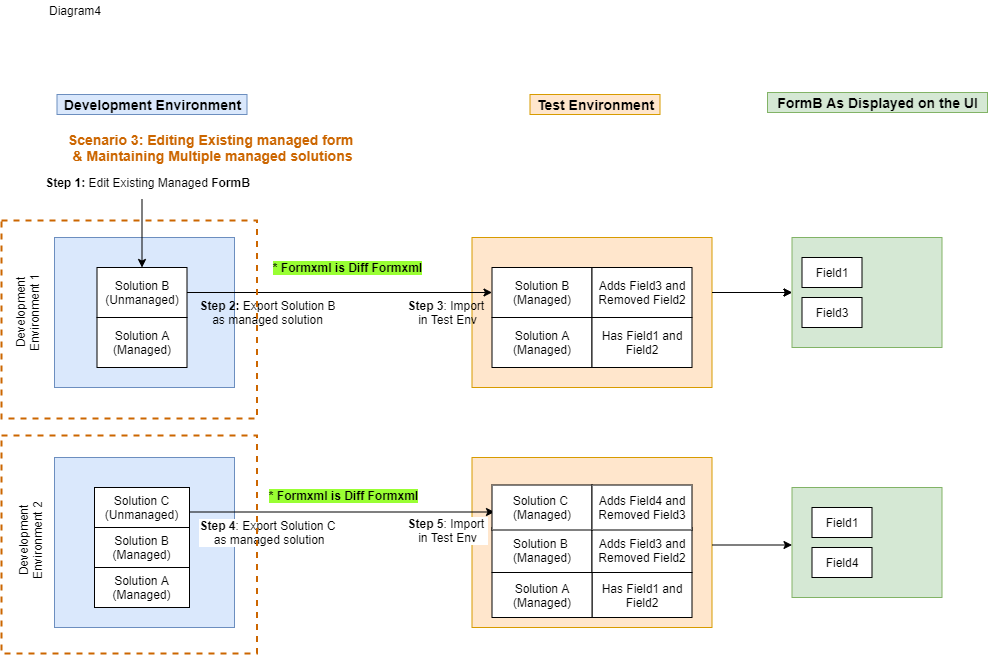
Unhealthy example for this scenario
As shown in the diagram, it isn't a healthy ALM practice to create multiple managed solutions from the development environment that contains another unmanaged solution you created for the same form. Notice that Solution B is in unmanaged state. When you create another unmanaged solution (Solution C) for FormB, the FormXml is exported as a diff FormXml as shown in step 4 in the above scenario. But, FormB also contains the changes from Solution B, which will get overwritten by your new changes.
For example, as seen in the diagram, Field3 is added to FormB in Solution B. But now when you create a new Solution C in this environment, with Solution B in unmanaged state, and remove Field3, Field3 will also be removed in the development environment. Field3 won't be tracked in the diff FormXml when the solution is exported, since the change of adding and removing this column was made in the same active layer. That means when managed Solution C is imported in the test environment, the form will still render the Field3 because the diff FormXml never records it as removed (like it was removed in step 5 in the healthy form ALM scenario above). Performing your form customizations this way will lead to the development environment being inconsistent with the test environment.
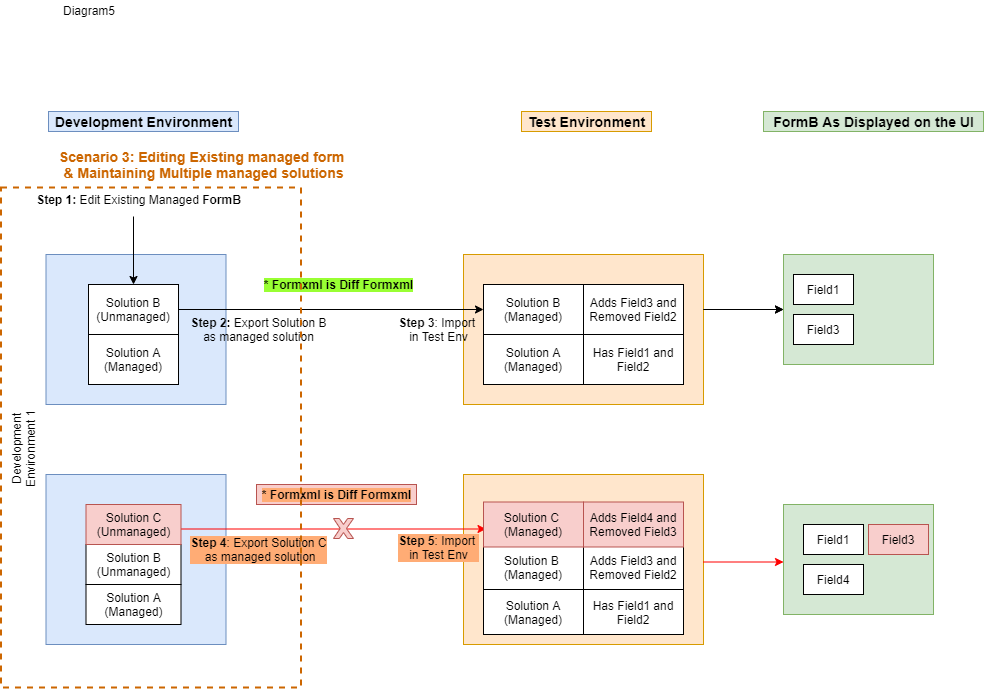
Customizing an existing managed form and maintaining it using patches and upgrades
Follow these steps to implement healthy form ALM for this scenario.
Customize an existing managed form, named FormB in this example, in your development environment and perform customizations on the form. Note that Solution A is the managed solution already installed for the form in the development environment.
Create a solution (Solution B), which will be an unmanaged solution and add FormB. Export the solution as managed. This step exports a diff FormXml for the form.
In your test environment, import managed Solution B from step 2, thus creating a second solution layer for the form. In the diagram, FormB gets the merged changes from Solution A and Solution B in the test environment. Additionally, the UI for FormB shows Field1 and Field3 on the form but not Field2, which was removed by Solution B.
When you further customize the form you customized in Step 1 using a patch solution, you can use the same development environment as step 1 where Solution B exists in an unmanaged state. As shown in the diagram, Solution A is in a managed state and Solution B is in an unmanaged state. The form is further customized and you create a patch for Solution B adding your form to this solution and exporting it as a managed patch solution. This step exports a diff FormXml.
In your test environment, import managed patch Solution B from step 4. As shown in the diagram, Solution B Patch is adding a new Field4 to FormB and removing Field3, which was added by Solution B.
Note
Patches are additive in nature and can't remove components, such as columns, from the form. So, Field3 won't be removed from the form. The UI for the form in the test environment now shows Field1, Field3, and Field4 on the form, but not Field2.
When you further customize the form you created in Step 1 using upgrades, use the same environment where Solution B is in an unmanaged state and clone Solution B to create the upgrade solution and customize FormB. Export the upgrade as a managed solution. This step exports a diff FormXml for the form.
In your test environment, import the managed Solution B upgrade solution from step 6. As shown in the diagram, Solution B Upgrade is adding a new Field5 to FormB and removing Field3, which was added by Solution B. The UI for the form in the test environment now shows Field1, Field4, and Field5 on the form, but Field2 and Field3 are removed.
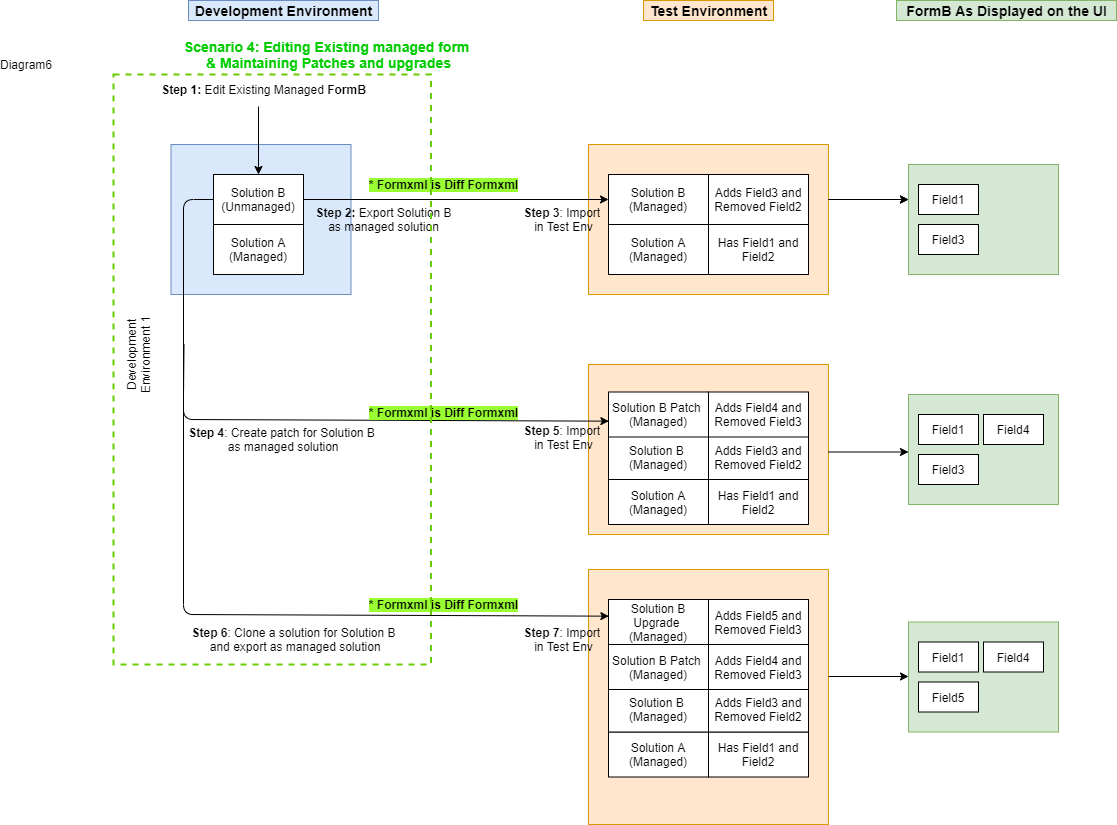
Maintaining unmanaged solutions and customizations for a new form across multiple development environments
Follow these steps to implement healthy form ALM for this scenario.
- In Development Environment 1, create a new FormA and perform customizations on the form.
- Create a solution (Solution A in the diagram), which will be an unmanaged solution, and add your new form. Export the solution as unmanaged. This step exports a full FormXml for the form.
- In Development Environment 2, import the unmanaged solution from step 2, which creates the form in Development Environment 2. In the diagram, FormA gets created and the UI for the form shows Field1 and Field2 that Solution A added to the form.
- You further customize the form in Development Environment 2 making active customizations in the environment, such as adding a new column named Field3. FormA now shows Field1, Field2, and Field3.
- In your Development Environment 1, you further customize the form also by adding Field4. The UI for the form in the Development Environment 1 now shows Field1, Field2, and Field4.
- Export unmanaged Solution A with the changes made in step 5. This step exports a full FormXml for the form.
- In Development Environment 2, import unmanaged Solution A Upgrade from step 6. Since the solution you're importing contains the full FormXml for FormA, it overwrites the active customization made in Development Environment 1. So, the form now shows only Field1, Field2, and Field4, but not Field3, which was the additional active customization done in Development Environment 1. This behavior occurs with any unmanaged solution import that has the full FormXml for the form.
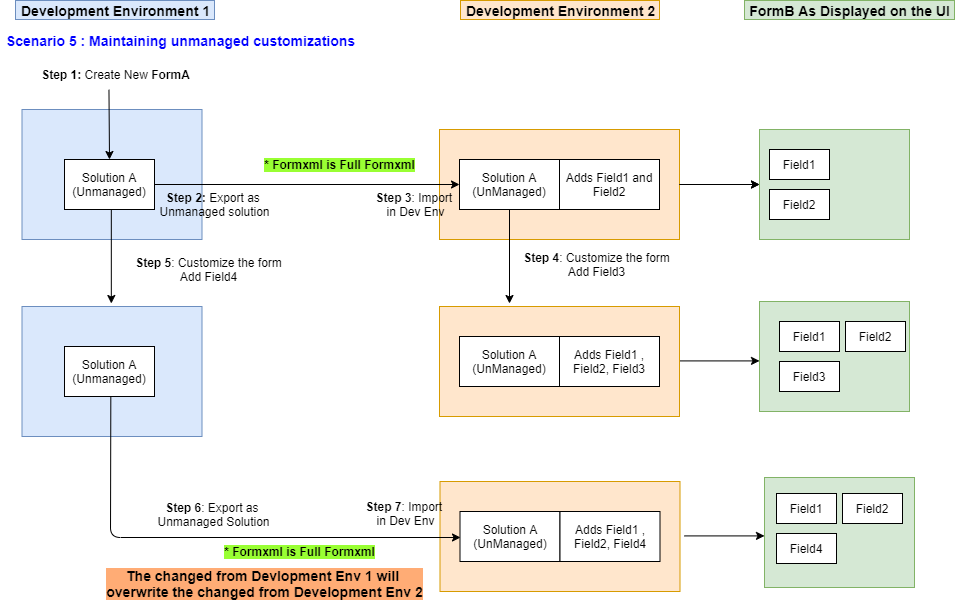
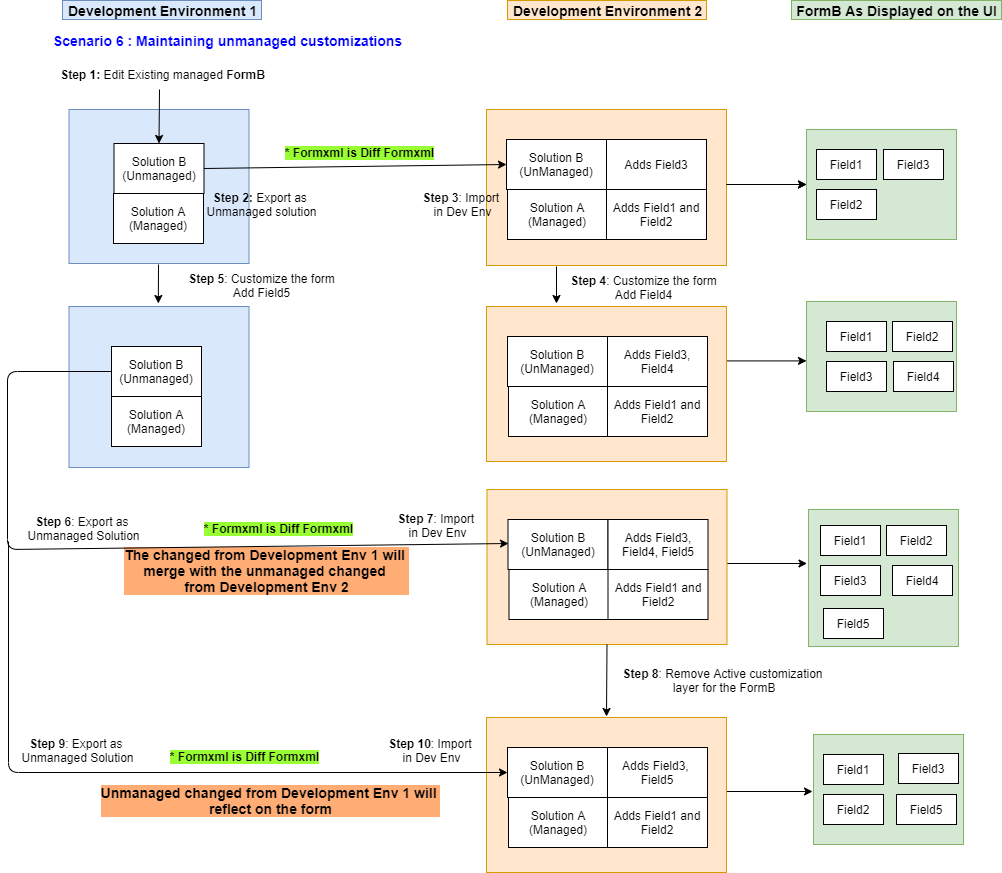
Maintaining unmanaged solutions and customizations for an existing form across multiple development environments
Follow these steps to implement healthy form ALM for this scenario.
- In Development Environment 1, customize an existing form, named FormB in this example. Then perform customizations on the form.
- Create a solution (Solution B in the diagram), which will be an unmanaged solution, and add FormB. Export the solution as unmanaged. This step exports a diff FormXml for the form.
- In Development Environment 2, import the unmanaged solution from step 2, thus creating a second solution layer for the form. The FormB UI shows Field1, Field2, and Field3 after the form merge.
- You further customize the form in Development Environment 2, making active customizations in the environment, such as adding a new column named Field4. FormB now shows Field1, Field2, Field3, and Field4.
- In Development Environment 1, you further customize the form adding a new column named Field5. The UI for the form in Development Environment 1 now shows Field3 and Field5.
- Export unmanaged Solution B with the changes made in step 5. This step exports a diff FormXml for the form.
- In Development Environment 2, import unmanaged Solution B Upgrade from step 6. Since the solution you're importing contains the diff FormXml for FormB, it will merge with the active customization made in Development Environment 1. So, the form now shows Field1, Field2, Field3, Field4, and Field5. This behavior occurs for any unmanaged solution import that has the diff FormXml for the form.
- If the form merge in step 7 isn't what you want even though you're importing a diff FormXml with the unmanaged solution and you want to be able to overwrite the active customizations made in Development Environment 2, then remove the active layer for FormB. More information: Remove an unmanaged layer.
- Export unmanaged Solution B with the changes made in step 5. This step exports a diff FormXml for the form.
- In Development Environment 2, import unmanaged Solution B Upgrade from step 9. Since there's no active layer for the form in Development Environment 2, (step 8), all the changes from unmanaged Solution B are imported even though you're importing diff FormXml for FormB. So, the form now shows only Field1, Field2, Field3, and Field5. This behavior occurs for any unmanaged solution import that has the diff FormXml for the form. This is the same result as step 7 in the Maintaining unmanaged solutions and customizations for an existing form across multiple development environments scenario.
Full and differential form XML
Every exported solution package includes a customizations.xml file. Whenever a form is included in a solution, the related form definition exists within the FormXml sections of the customizations.xml file. FormXml can either be full or differential (diff).
Full FormXml
The FormXml you get on exporting a solution for a form in an unmanaged state is called a full FormXml. Full means it contains the entire form definition. When you create a new form and export it, the form will always be a full FormXml because the form in the environment you're exporting from is in an unmanaged state and also is in a create state. If you export any further solutions from this same environment, those will also include a full FormXml. Because the solutionaction attribute indicates a diff FormXml, the full FormXml in the customization.xml file in the solution you export won't contain any solutionaction attributes.
Differential (diff) FormXml
The FormXml you get when exporting a solution for a form in a managed state is called a differential or diff FormXml. Diff means the FormXml contains only the changes done in the active customizations in that environment and not the entire form definition. When you customize an existing managed form and export it, the form will always be a diff FormXml because it will only contain the active changes done to it. The diff FormXml in the customization.xml file in the solution you export will contain solutionaction attributes defining what the changes are, like Added, Removed, Modified.
Diff FormXml ensures that your solution will only express the changes your app needs and will be impacted less by changes from other layers. Diff FormXml also makes the solution less bulky and helps it import faster.
