Note
Access to this page requires authorization. You can try signing in or changing directories.
Access to this page requires authorization. You can try changing directories.
This multi-part tutorial covers the creation of a new data source extension for Power Query. The tutorial is meant to be done sequentially—each lesson builds on the connector created in previous lessons, incrementally adding new capabilities to your connector.
In this lesson, you will:
- Create a new Data Connector project using the Power Query SDK
- Author a base function to pull data from a source
- Test your connector in the Power Query SDK
- Register your connector in Power BI Desktop
Creating a basic OData connector
In this section, you create a new Data Connector project, provide some basic information, and test it in the Power Query SDK.
Open Visual Studio Code. We recommend that you create a new workspace and then create a new extension project. To create the new extension project, open the explorer and in the Power Query SDK section select the Create an extension project button.

After selecting this button, you're prompted to enter the name of the new project. Name this new project TripPin.

Open the TripPin.pq file and paste in the following connector definition.
section TripPin;

[DataSource.Kind="TripPin", Publish="TripPin.Publish"]
shared TripPin.Feed = Value.ReplaceType(TripPinImpl, type function (url as Uri.Type) as any);

TripPinImpl = (url as text) =>
    let
        source = OData.Feed(url)
    in
        source;

// Data Source Kind description
TripPin = [
    Authentication = [
        Anonymous = []
    ],
    Label = "TripPin Part 1 - OData"
];

// Data Source UI publishing description
TripPin.Publish = [
    Beta = true,
    Category = "Other",
    ButtonText = { "TripPin OData", "TripPin OData" }
];
This connector definition contains:
- A Data Source definition record for the TripPin connector
- A declaration that Implicit (Anonymous) is the only authentication type for this source
- A function (
TripPinImpl) with an implementation that calls OData.Feed - A shared function (
TripPin.Feed) that sets the parameter type toUri.Type - A Data Source publishing record that allows the connector to appear in the Power Query Get Data dialog
Open the TripPin.query.pq file. Replace the current contents with a call to your exported function.
TripPin.Feed("https://services.odata.org/v4/TripPinService/")
Before you can test your connector, you have to build it. To do this, go to the Terminal and select the Run Build Task... option (Keyboard shortcut Ctrl + Shift + B). We recommend choosing the MakePQX option, but either option available to build should work.

The outcome of this operation creates a new Bin folder where your built connector is stored as TripPin.mez.

The <project>.query.pq file is used to test out your extension without having to deploy it to your Power BI Desktop's bin folder. Using the tools available inside the Power Query SDK:
- Select the option to Set credential.
- Select TripPin as the data source.
- Select the TripPin.query.pq file as the query/test file.
- Select anonymous as the authentication kind.
In the output dialog, a message appears that confirms that you've set a credential for the data source and the details for each credential created.

Note
You can always clear the credentials using the Clear ALL credentials command or check the available credentials using the List credentials command within the Power Query SDK tools.
With the credential now in place, you select the TripPin.query.pq file and either right select in the document to Evaluate current power query file or use the option to Evaluate current file from the Power Query SDK tools.

The output dialog displays a message of the results from your evaluation as well as a new window with the name PQTest result.

The PQTest result window consists of three tabs:
- Output: Displays a preview of your data in a grid.
- Summary: General evaluation details such as StartTime, EndTime, Duration, the file that was used for the evaluation, the status, and more.
- DataSource: Provides information about the Data Source that was used from the Kind, the Function Name, and the path.
You can try out a few different OData URLs in the test file to see what how different results are returned. For example:
https://services.odata.org/v4/TripPinService/Mehttps://services.odata.org/v4/TripPinService/GetPersonWithMostFriends()https://services.odata.org/v4/TripPinService/People
The TripPin.query.pq file can contain single statements, let statements, or full section documents.
let
    Source = TripPin.Feed("https://services.odata.org/v4/TripPinService/"),
    People = Source{[Name="People"]}[Data],
    SelectColumns = Table.SelectColumns(People, {"UserName", "FirstName", "LastName"})
in
    SelectColumns
Important
Make sure to always save your files as you work. If you make changes to your TripPin.pq file, you should always trigger a subsequent build task to make sure that you're testing against the latest version of your connector.
Open Fiddler to capture HTTP traffic, and run the query. You should see a few different requests to services.odata.org, generated by the mashup container process. You can see that accessing the root URL of the service results in a 302 status and a redirect to the longer version of the URL. Following redirects is another behavior you get “for free” from the base library functions.
One thing to note if you look at the URLs is that you can see the query folding that happened with the SelectColumns statement.
https://services.odata.org/v4/TripPinService/People?$select=UserName%2CFirstName%2CLastName
If you add more transformations to your query, you can see how they impact the generated URL.
This behavior is important to note. Even though you didn't implement explicit folding logic, your connector inherits these capabilities from the OData.Feed function. M statements are compose-able—filter contexts will flow from one function to another, whenever possible. This is similar in concept to the way data source functions used within your connector inherit their authentication context and credentials. In later lessons, you'll replace the use of OData.Feed, which has native folding capabilities, with Web.Contents, which doesn't. To get the same level of capabilities, you'll need to use the Table.View interface and implement your own explicit folding logic.
Loading your extension in Power BI Desktop
To use your extension in Power BI Desktop, you'll need to copy your connector project's output file (TripPin.mez) to your Custom Connectors directory.
- Create a [My Documents]\Power BI Desktop\Custom Connectors directory.
- Copy the extension file (TripPin.mez) into this directory.
- Check the option (Not Recommended) Allow any extension to load without validation or warning in Power BI Desktop (under File > Options and settings > Options > Security > Data Extensions).
- Restart Power BI Desktop.
- Select Get Data > More to bring up the Get Data dialog.
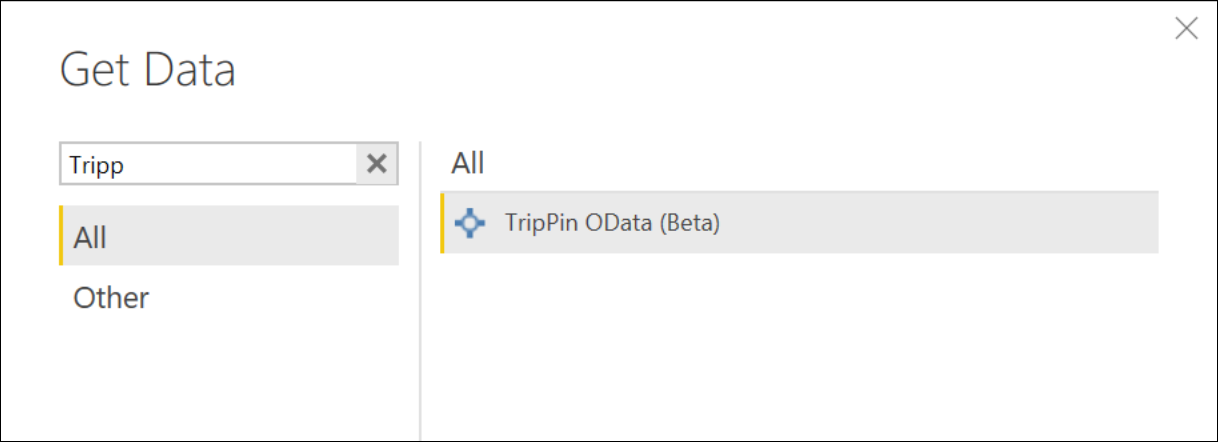
You can locate your extension by typing its name into the search box.
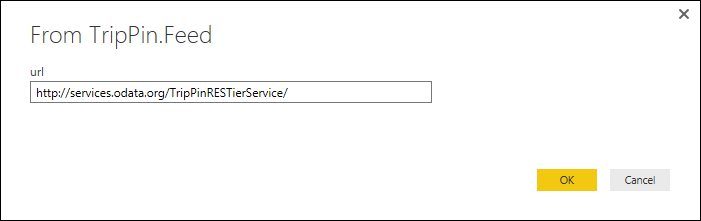
Select the function name, and select Connect. A third-party message appears—select Continue to continue. The function invocation dialog now appears. Enter the root URL of the service (https://services.odata.org/v4/TripPinService/), and select OK.
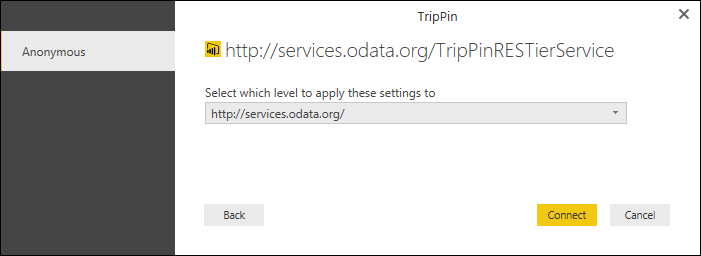
Since this is the first time you're accessing this data source, you'll receive a prompt for credentials. Check that the shortest URL is selected, and then select Connect.
Notice that instead of getting a simple table of data, the navigator appears. This is because the OData.Feed function returns a table with special metadata on top of it that the Power Query experience knows to display as a navigation table. This walkthrough will cover how you can create and customize your own navigation table in a future lesson.
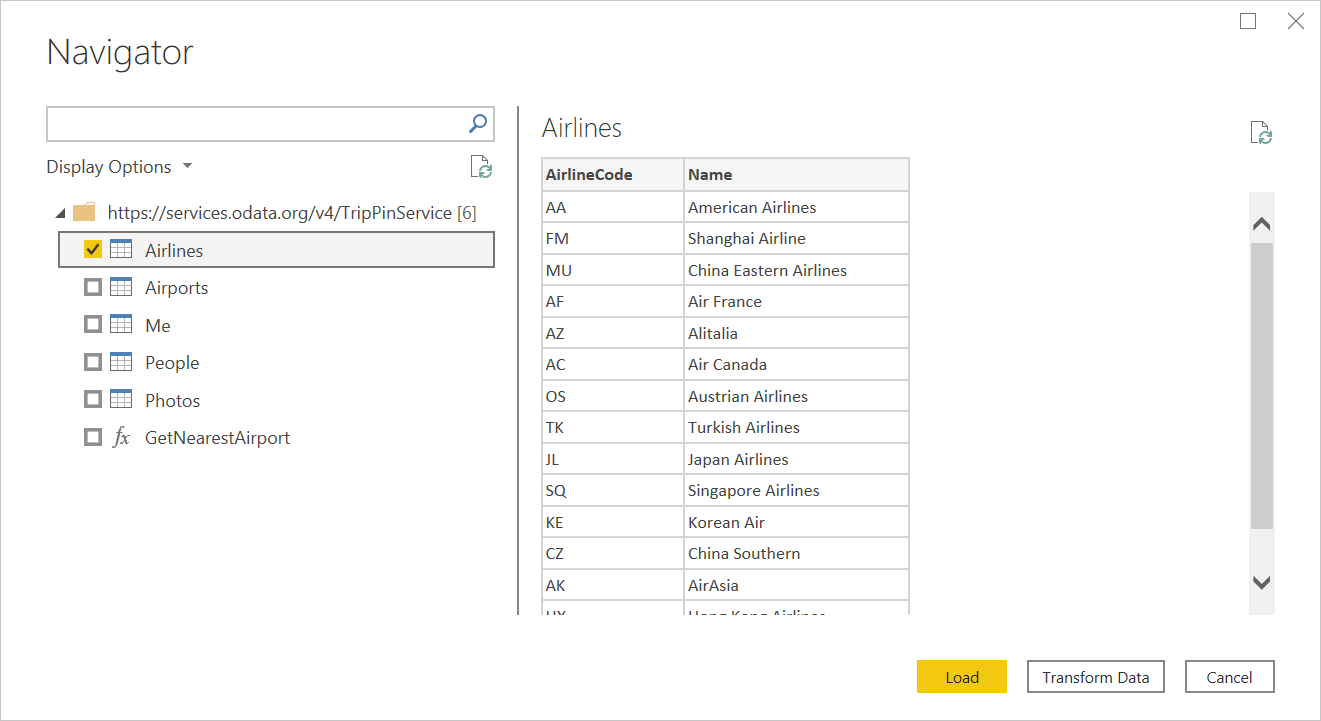
Select the Me table, and then select Transform Data. Notice that the columns already have types assigned (well, most of them). This is another feature of the underlying OData.Feed function. If you watch the requests in Fiddler, you'll see that you've fetched the service's $metadata document. The engine's OData implementation does this automatically to determine the service's schema, data types, and relationships.

Conclusion
This lesson walked you through the creation of a simple connector based on the OData.Feed library function. As you saw, little logic is needed to enable a fully functional connector over the OData base function. Other extensibility enabled functions, such as ODBC.DataSource, provide similar capabilities.
In the next lesson, you'll replace the use of OData.Feed with a less capable function—Web.Contents. Each lesson implements more connector features, including paging, metadata/schema detection, and query folding to the OData query syntax, until your custom connector supports the same range of capabilities as OData.Feed.