Note
Access to this page requires authorization. You can try signing in or changing directories.
Access to this page requires authorization. You can try changing directories.
The transpose table operation in Power Query rotates your table 90 degrees, turning your rows into columns and your columns into rows.
Imagine a table like the one in the following image, with three rows and four columns.

Screenshot of a table with four columns named Column 1 through Column 4, with all columns set to the Text data type. Column 1 contains Events in row 1, Participants in row 2, and Funds in row 3. Column 2 contains Event 1 in row 1, 150 in row 2, and 4000 in row 3. Column 3 contains Event 2 in row 1, 450 in row 2, and 10000 in row 3. Column 4 contains Event 2 in row 1, 1250 in row 2, and 15000 in row 3.
The goal of this example is to transpose that table so you end up with four rows and three columns.

Screenshot of a table with three columns named Events with a Text data type, Participants with a Whole number data type, and Funds with a whole number data type. The Events column contains, from top to bottom, Event 1, Event 2, and Event 3. The Participants column contains, from top to bottom, 150, 450, and 1250. The Funds column contains, from top to bottom, 4000, 10000, and 15000.
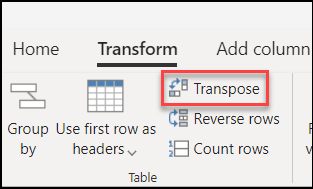
On the Transform tab in the ribbon, select Transpose.

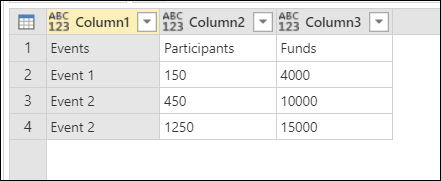
The result of that operation looks like the following image.

Screenshot of a table with three columns named Column 1, Column 2, and Column 3, with all columns set to the Any data type. Column 1 contains, from top to bottom, Events, Event 1, Event 2, and Event 3. Column 2 contains, from top to bottom, Participants, 150, 450, and 1250. Column 3 contains, from top to bottom, Funds, 4000, 10000, and 15000.
Note
Only the contents of the table are transposed during the transpose operation; the column headers of the initial table are lost. The new columns have the name Column followed by a sequential number.
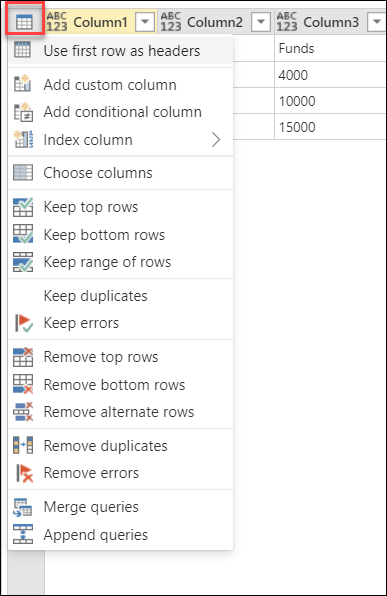
The headers you need in this example are in the first row of the table. To promote the first row to headers, select the table icon in the upper-left corner of the data preview, and then select Use first row as headers.

The result of that operation gives you the output that you're looking for.

Screenshot of the final table with three columns named Events with a Text data type, Participants with a Whole number data type, and Funds with a whole number data type. The Events column contains, from top to bottom, Event 1, Event 2, and Event 3. The Participants column contains, from top to bottom, 150, 450, and 1250. The Funds column contains, from top to bottom, 4000, 10000, and 15000.
Note
To learn more about the promote headers operation, also known as Use first row as headers, go to Promote or demote column headers.