Note
Access to this page requires authorization. You can try signing in or changing directories.
Access to this page requires authorization. You can try changing directories.
Use the Catalog and CatalogAssignment tables to create a structure to expose actions used in your solution as business events. Microsoft Dataverse Business events enable many scenarios to create integrations with other applications through Dataverse. More information: Microsoft Dataverse business events
Your catalog will describe those events that are relevant to your solution so that people can use them. If you do not catalog the events relevant to your solution, they may not be available to people using your solution.
Use the Catalog table to create a two level hierarchy. This will create a Catalog and Category group where the second level catalog represents the category.
The first level catalog must represent your solution. Use multiple second-level catalogs related to your first level catalog to group different categories of functionality within your solution.
For each second-level catalog that represents the categories within your solution, you will use the CatalogAssignment table to specify any Tables, custom API, or Custom Process actions you want to be available as events.
Important
Users with the Environment Maker security role can view the Catalog data in the Power Automate Dataverse connector When an action is performed trigger. Other security roles must have an appropriate access level Read privilege to these these tables: Custom API, Process, SDK Message.
More information:
Example: Contoso Customer Management
To introduce the idea of a catalog, let's start with an example.
Contoso Customer management solution contains many components. The only components of interest here are:
- Tables
- Custom API
- Custom Process Action (workflow)
Tables
Contoso Customer management is a solution which includes the following tables:
| SchemaName | Display Name | Description |
|---|---|---|
Account |
Account | A Dataverse system table |
Contact |
Contact | A Dataverse system table |
contoso_Membership |
Membership | A custom organization-owned table |
Custom API
They have also created a number of custom API actions which are called by their point-of-sale system, their Web site, and ERP systems to notify Dataverse of events that do not originate within Dataverse:
| UniqueName | DisplayName |
|---|---|
contoso_CustomerEnteredStore |
Entered Store |
contoso_CustomerVisitWebSite |
Visit Web Site |
contoso_CustomerPurchasedProduct |
Purchased Product |
contoso_CustomerReturnedProduct |
Returned Product |
Catalog structure
The Contoso Customer management solution catalog looks like this:
| Catalog | Description |
|---|---|
| Contoso Customer Management | Root Catalog |
| Tables | 2nd Level Catalog Category |
| Account | CatalogAssignment: Entity |
| Contact | CatalogAssignment: Entity |
| Membership | CatalogAssignment: Entity |
| Customer Events | 2nd Level Catalog Category |
| Entered Store | CatalogAssignment: CustomAPI |
| Visit Web Site | CatalogAssignment: CustomAPI |
| Purchase Product | CatalogAssignment: CustomAPI |
| Return Product | CatalogAssignment: CustomAPI |
Events available
When you make a CatalogAssignment to a table, some system bound operations for that table become available as events.
With this catalog, the following events will be available:
| Table | Event | Why available |
|---|---|---|
| Account | Create Update Delete |
Standard Data Operation |
| Account | GrantAccess ModifyAccess RevokeAccess |
User owned entity can be shared. |
| Contact | Create Update Delete |
Standard Data Operation |
| Contact | GrantAccess ModifyAccess RevokeAccess |
User owned entity can be shared. |
| Membership | Create Update Delete |
Standard Data Operation |
| N/A | contoso_CustomerEnteredStore |
Explicit Catalog Assignment |
| N/A | contoso_CustomerVisitWebSite |
Explicit Catalog Assignment |
| N/A | contoso_CustomerPurchasedProduct |
Explicit Catalog Assignment |
| N/A | contoso_CustomerReturnedProduct |
Explicit Catalog Assignment |
Most tables will support Create, Update, and Delete events. There are some exceptions. User-owned tables will expose events for changes to sharing: GrantAccess, ModifyAccess, and RevokeAccess
Note
Any custom API or Custom Process Actions, that are bound to the table will also be included.
Custom Process Actions that are disabled will be shown, but the event will never occur until they are enabled and used.
Create a Catalog in Power Apps
You can create Catalog and Catalog Assignment records in Power Apps (https://make.powerapps.com).
You should always create a catalog as part of a solution. Use the following instructions to create catalog records:
Sign in to Power Apps,
In the left navigation pane, select Solutions.
Create or select a solution that you want to use, then click New.
Select Catalog from the menu and a new window will open.
Enter the following fields:
Field Description Parent Catalog Do not set a parent catalog for the solution root catalog. Otherwise, set the solution root catalog. Unique Name The unique name must have a customization prefix and have no spaces. This prefix should be the same as the customization prefix for the solution publisher. Name Enter a name for the catalog. Usually the same as the Unique Name, but without the customization prefix and with spaces. Display Name Typically the same as the Name. Description Enter a meaningful description of the catalog. Save and close the form.
Create a Catalog Assignment in Power Apps
Using the same solution that contains the catalog in Power Apps
Click New.
Select Catalog Assignment from the menu and a new window will open.
Enter the Name. This value must begin with a customization prefix and have no spaces. You should use the same customization prefix defined for your solution publisher.
Set the Catalog Assignment Object. This lookup allows for setting three different types of records:
- Custom APIs
- Entities
- Processes
You should be able to discover the type you are looking for by typing the name.
Select a catalog
Note
The catalog you select must be a second-level catalog representing a category.
Save and close the form
Block customization of catalog items in your managed solution
Unless you want to allow people who install your managed solution to be able to customize the catalog and catalog assignments, you should make sure to set the IsCustomizable property to false because the default value allows them to be customized.
To set this in the Power Apps UI:
Select each catalog or catalog assignment within your solution
In the menu, click the ellipses (...) and select Managed Properties.
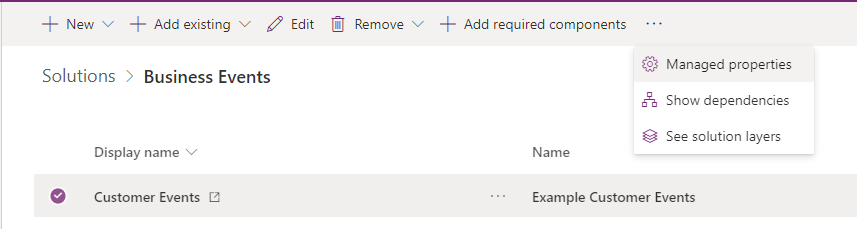
In the window that opens, deselect Allow customizations.
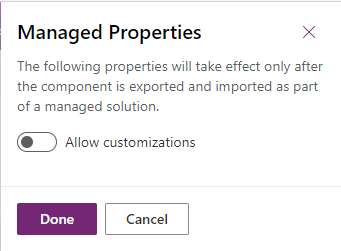
Click Done
Table Diagram
The following diagram shows the relationships between the Catalog and CatalogAssignment tables

The self-referential relationship using ParentCatalogId is what allows for creating the two-level hierarchy between one solution catalog and multiple catalogs that represent categories using catalog records.
Catalog table columns
All the available columns and relationships are available in Catalog table/entity reference.
The following table includes selected columns/attributes of a Catalog table/entity that you can set.
Display NameSchemaNameLogicalName |
Type | Description |
|---|---|---|
CatalogCatalogIdcatalogid |
Uniqueidentifier | Unique identifier for catalog instances. |
DescriptionDescriptiondescription |
String | Localized description for catalog instances. Required |
Display NameDisplayNamedisplayname |
String | Localized display name for catalog instances. Required |
Is CustomizableIsCustomizableiscustomizable |
ManagedProperty | Controls whether the Catalog can be customized or deleted. The default value is true. More information: Block customization of catalog items in your managed solution Required |
NameNamename |
String | The primary name of the catalog. Required |
Parent CatalogParentCatalogIdparentcatalogid |
Lookup | Unique identifier for the Parent Catalog. Cannot be changed after it is saved. |
Unique NameUniqueNameuniquename |
String | Unique name for the catalog. Required Must begin with a customization prefix. |
Note
When you associate a Catalog Assignment to a Catalog, you will not be able to delete the catalog until you remove the catalog assignment.
CatalogAssignment Table Columns
All the available columns and relationships are available in CatalogAssignment table/entity reference.
The following table includes selected columns/attributes of a CatalogAssignment table/entity that you can set.
Display NameSchemaNameLogicalName |
Type | Description |
|---|---|---|
Catalog AssignmentCatalogAssignmentIdcatalogassignmentid |
Uniqueidentifier | Unique identifier for catalog assignment instances. |
catalogCatalogIdcatalogid |
Lookup | Unique identifier for the catalog associated with the catalog assignment. Required |
Is CustomizableIsCustomizableiscustomizable |
ManagedProperty | Controls whether the CatalogAssignment can be customized or deleted. The default value is true. More information: Block customization of catalog items in your managed solution Required |
NameNamename |
String | The primary name of the catalog assignment. |
Catalog Assignment ObjectObjectobject |
Lookup | Unique identifier for the object associated with the catalog assignment. Required Cannot be changed after it is saved. This polymorphic lookup can be linked to the following tables: customapi entity workflow When using the Web API to associate this polymorphic relationship, you must use the single-valued navigation property names for each relationship. These names are: CustomAPIIdEntityIdWorkflowIdWhen associating to a table, custom api, or custom process action you will need to get the respectiveid value. See Get the Id for CatalogAssignment items for more information. |
Get the Id for CatalogAssignment items
You will need to get the id of entities, custom apis, and custom process actions when you associate them with a CatalogAssignment.
Get the Id of a table
The Entity table contains a row for each table. You can get the Id for a specific table, such as the Account table, using either of these queries using the Web API:
GET [Organization URI]/api/data/v9.2/EntityDefinitions(LogicalName='account')?$select=MetadataId
GET [Organization URI]/api/data/v9.2/entities?$select=entityid&$filter=name eq 'Account'
Get the Id of a custom API
This is most easily done using the Web API. The following example will return the customapiid of a custom api with the uniquename of your_CustomAPIName.
GET [Organization URI]/api/data/v9.2/customapis?$select=customapiid&$filter=uniquename eq 'your_CustomAPIName'
Get the Id of a Custom Process Action
This is most easily done using the Web API. The following example will return the workflowid of a custom process action with the uniquename of ExampleCustomProcessAction.
GET [Organization URI]/api/data/v9.2/workflows?$select=workflowid,uniquename&$filter=category eq 3 and type eq 1 and endswith(uniquename,'ExampleCustomProcessAction')
Note
The uniquename of the workflow doesn't include the customization prefix that is prepended to the name of the custom process action in the Web API. If the action you call from the Web API is named new_ExampleCustomProcessAction, the workflow uniquename will be ExampleCustomProcessAction.
Make sure you to access the row where Type is 1. This is the workflow definition.
Custom process action workflows have the Category value of 3.
Retrieve existing Catalog Assignments
You can use the following OData query to retrieve information about Catalog Assignments, the type of assignment, the catalog they are associated with, and the parent catalog.
GET [Organization URI]/api/data/v9.2/catalogassignments?$select=name
    &$expand=CatalogId($select=uniquename;$expand=ParentCatalogId($select=uniquename)),
    EntityId($select=entityid),
    CustomAPIId($select=uniquename),
    WorkflowId($select=uniquename)
    &$filter=name ne null
Create Catalogs and CatalogAssignments with code
You can create catalogs and catalog assignment records using either the Web API or the SDK for .NET.
Using the Web API
Note
At this time it is not possible to create catalog and catalog assignment records using 'deep-insert'.
You can create a hierarchy of catalog records using 'deep-insert', but you must create the catalog assignments individually.
The following series of Web API operations will create a catalog hierarchy and a CatalogAssignment in a solution with the UniqueName: ContosoCustomerManagement. Note the use of the MSCRM.SolutionUniqueName request header to set the association to the solution when the record is created.
See the Create a record using the Web API sections: Basic Create and Associate table rows on create for more information.
Create the root catalog
Request:
POST [Organization URI]/api/data/v9.2/catalogs HTTP/1.1
MSCRM.SolutionUniqueName: ContosoCustomerManagement
Content-Type: application/json; charset=utf-8
OData-MaxVersion: 4.0
OData-Version: 4.0
Accept: application/json
{
    "name": "Contoso Customer Management",
    "uniquename": "contoso_CustomerManagement",
    "displayname": "Contoso Customer Management",
    "description": "The root catalog for the Contoso Customer Management solution",
    "iscustomizable": {
        "Value": false
    }
}
Response:
HTTP/1.1 204 No Content
OData-EntityId: [Organization URI]/api/data/v9.2/catalogs(a0a0a0a0-bbbb-cccc-dddd-e1e1e1e1e1e1)
Create the Table Events Sub-catalog
Request:
POST [Organization URI]/api/data/v9.2/catalogs HTTP/1.1
MSCRM.SolutionUniqueName: ContosoCustomerManagement
Content-Type: application/json; charset=utf-8
OData-MaxVersion: 4.0
OData-Version: 4.0
Accept: application/json
{
    "name": "Contoso Customer Management Table Events",
    "uniquename": "contoso_TableEvents",
    "displayname": "Tables",
    "description": "Groups Table events for the Contoso Customer Management Solution",
    "iscustomizable": {
        "Value": false
    },
    "ParentCatalogId@odata.bind": "catalogs(a0a0a0a0-bbbb-cccc-dddd-e1e1e1e1e1e1)"
}
Response:
HTTP/1.1 204 No Content
OData-EntityId: [Organization URI]/api/data/v9.2/catalogassignments(b1b1b1b1-cccc-dddd-eeee-f2f2f2f2f2f2)
Create the Account Catalog Assignment on the Tables catalog
See Get the Id of a table for information about the id of a table.
Request:
POST [Organization URI]/api/data/v9.2/catalogassignments HTTP/1.1
MSCRM.SolutionUniqueName: ContosoCustomerManagement
Content-Type: application/json; charset=utf-8
OData-MaxVersion: 4.0
OData-Version: 4.0
Accept: application/json
{
    "name": "Account",
    "EntityId@odata.bind": "entities(70816501-edb9-4740-a16c-6a5efbc05d84)",
    "iscustomizable": {
        "Value": false
    },
    "CatalogId@odata.bind": "catalogs(b1b1b1b1-cccc-dddd-eeee-f2f2f2f2f2f2)"
}
Response:
HTTP/1.1 204 No Content
OData-EntityId: [Organization URI]/api/data/v9.2/catalogassignments(c2c2c2c2-dddd-eeee-ffff-a3a3a3a3a3a3)
Using the SDK for .NET
The following code shows creating a catalog hierarchy and a catalog assignment in a solution with the UniqueName: ContosoCustomerManagement.
Note
Use the SolutionUniqueName optional parameter with the CreateRequest Class to create the records in the context of that solution.
More information: Passing optional parameters with a request
string conn = $@"
Url = {url};
AuthType = OAuth;
UserName = {userName};
Password = {password};
AppId = 51f81489-12ee-4a9e-aaae-a2591f45987d;
RedirectUri = app://58145B91-0C36-4500-8554-080854F2AC97;
LoginPrompt=Auto;
RequireNewInstance = True";

var service = new CrmServiceClient(conn);
// var service = new ServiceClient(conn);

var solutionUniqueName = " ContosoCustomerManagement ";

//Create the root catalog
Catalog rootCatalog = new Catalog
{
    Name = "Contoso Customer Management",
    UniqueName = "contoso_CustomerManagement",
    DisplayName = "Contoso Customer Management",
    Description = "The root catalog for the Contoso Customer Management solution",
    IsCustomizable = new BooleanManagedProperty(false)
};

CreateRequest rootCatalogReq = new CreateRequest {
    Target = rootCatalog
};
rootCatalogReq["SolutionUniqueName"] = solutionUniqueName;

Guid rootCatalogId = ((CreateResponse)service.Execute(rootCatalogReq)).id;

//Create the Table Events Sub-catalog
Catalog tableEvents = new Catalog
{
    Name = "Contoso Customer Management Table Events",
    UniqueName = "contoso_TableEvents",
    DisplayName = "Tables",
    Description = "Groups Table events for the Contoso Customer Management Solution",
    IsCustomizable = new BooleanManagedProperty(false),
    ParentCatalogId = new EntityReference("catalog", rootCatalogId)
};

CreateRequest tableEventsReq = new CreateRequest
{
    Target = tableEvents
};
tableEventsReq["SolutionUniqueName"] = solutionUniqueName;

Guid tableEventsId = ((CreateResponse)service.Execute(tableEventsReq)).id;

//Create the Account Catalog Assignment on the Tables catalog
CatalogAssignment accountAssignment = new CatalogAssignment
{
    Name = "Account",
    IsCustomizable = new BooleanManagedProperty(false),
    Object = new EntityReference("entity",new Guid("70816501-edb9-4740-a16c-6a5efbc05d84")),
    CatalogId = new EntityReference("catalog", tableEventsId)

};

CreateRequest accountAssignmentReq = new CreateRequest
{
    Target = accountAssignment
};
accountAssignmentReq["SolutionUniqueName"] = solutionUniqueName;

Guid accountAssignmentId = ((CreateResponse)service.Execute(accountAssignmentReq)).id;
Create Catalog and Catalog Assignments by editing solution files
Within a solution file, you can edit the files to create catalogs and catalog assignments.
Use the SolutionPackager tool to extract a solution into files that can be managed in source control. You can then edit the files. You can then use SolutionPackager to pack the extracted files back into a solution. More information: Source control with solution files
Tip
Create some catalogs and catalog assignments in a solution, then export and extract the solution to see some examples.
Make sure you are using the latest version of the Microsoft.CrmSdk.CoreTools NuGet Package
Create a Catalog with solution files
Within a solution, all the catalogs will be within a catalogs folder. You can create, modify or remove catalogs by editing the folders and files in this folder and importing the solution after it has been packed using solution packager.
Each catalog will be included in a folder matching the uniquename of the catalog, such as contoso_CustomerManagement.
Within the folder is a catalog.xml file containing the definition of the catalog.
For example:
<catalog uniquename="contoso_CustomerManagement">
    <description default="The root catalog for the Contoso Customer Management solution">
        <label description="The root catalog for the Contoso Customer Management solution" languagecode="1033" />
    </description>
    <displayname default="Contoso Customer Management">
        <label description="Contoso Customer Management" languagecode="1033" />
    </displayname>
    <iscustomizable>0</iscustomizable>
    <name>Contoso Customer Management</name>
</catalog>
The catalog element uniquename attribute must match the name of the folder containing the file.
The catalog element includes these elements:
| Element | Description |
|---|---|
description |
Has a default attribute with the value of the default description.Contains one or more label element with attributes for description and languagecode when multiple languages are defined. |
displayname |
Has a default attribute with the value of the default display name.Contains one or more label element with attributes for description and languagecode when multiple languages are defined. |
iscustomizable |
Whether the catalog is customizable. 0 = false, 1 = true. |
name |
The name of the catalog. |
If the catalog represents a category, the relationship to the parent catalog is included using a parentcatalogid element that contains a uniquename element containing the unique name of the parent catalog.
For example:
<catalog uniquename="contoso_TableEvents">
    <description default="Groups Table events for the Contoso Customer Management Solution">
        <label description="Groups Table events for the Contoso Customer Management Solution" languagecode="1033" />
    </description>
    <displayname default="Tables">
        <label description="Tables" languagecode="1033" />
    </displayname>
    <iscustomizable>0</iscustomizable>
    <name>Contoso Customer Management Table Events</name>
    <parentcatalogid>
        <uniquename>contoso_CustomerManagement</uniquename>
    </parentcatalogid>
</catalog>
Create a CatalogAssignment with solution files
Within a solution, in the Assets folder, you will find a catalogassignments.xml file. All catalog assignments are included in the file. You can create or modify catalog assignments by editing this file and importing the solution after it has been packed using solution packager.
For example:
<catalogassignments>
    <catalogassignment object.logicalname="account" catalogid.uniquename="contoso_TableEvents" objectidtype="entity">
        <iscustomizable>0</iscustomizable>
        <name>Account</name>
    </catalogassignment>
    <catalogassignment catalogid.uniquename="contoso_CustomerEvents" object.uniquename="contoso_CustomerEnteredStore" objectidtype="customapi">
        <iscustomizable>0</iscustomizable>
        <name>Customer Entered Store</name>
  </catalogassignment>
</catalogassignments>
Each catalogassignment element has these attributes:
| Attribute | Description |
|---|---|
catalogid.uniquename |
Unique name of the sub-catalog that the catalog assignment is for. |
objecttypeid |
The type of object. Valid values are: entitycustomapiworkflow |
Depending on the objectypeid, each catalogassignment element must have one of these corresponding attributes:
| Attribute | Description |
|---|---|
object.uniquename |
The unique name of the custom api. |
object.logicalname |
The logical name of the entity. |
object.workflowid |
The unique id value of the custom process action. |
The catalogassignment element includes these elements:
| Element | Description |
|---|---|
iscustomizable |
Whether the catalog assignment is customizable. 0 = false, 1 = true. |
name |
The name of the catalog assignment |
See also
Microsoft Dataverse business events
Create an entity record using the Web API
Retrieve an entity record using the Web API
Create entities using the SDK for .NET
Retrieve an entity using the SDK for .NET