Note
Access to this page requires authorization. You can try signing in or changing directories.
Access to this page requires authorization. You can try changing directories.
A virtual table is a custom table in Microsoft Dataverse that has columns containing data from an external data source. Virtual tables appear in your app to users as regular table rows, but contain data that is sourced from an external database, such as an Azure SQL Database. Rows based on virtual tables are available in all clients including custom clients developed using the Dataverse web services.
In the past, to integrate the disparate data sources you would need to create a connector to move data or develop a custom plug-in, either client or server-side. However, with virtual tables you can connect directly with an external data source at runtime so that specific data from the external data source is available in an environment, without the need for data replication.
Virtual tables are made up of three main components, a data provider, a data source row, and a virtual table. The data provider consists of plug-ins and a data source table. The data source is a table row in Dataverse, which includes metadata that represents the schema of the connection parameters. Each virtual table references a data source in the table definition.
Dataverse includes an OData Data Provider that you can use to connect with an OData v4 web service that accesses the external data.
Alternatively, developers can build their own data providers. Data providers are installed in an environment as a solution. More Information: Developer Documentation: Get started with virtual tables
Virtual table benefits
- Developers can implement plugins to read, update or delete external data using the Dataverse web services and Plug-in Registration tool.
- System customizers use Power Apps solution explorer to configure the data source row and create virtual tables that are used to access external data without writing any code.
- End users work with the rows created by the virtual table to view the data in columns, grids, search results, and Fetch XML-based reports and dashboards.
Add a data source to use for virtual tables
Developers create a custom plug-in to use as the data provider for a virtual table. Alternatively, you can use the provided OData v4 Data Provider. More information: OData v4 Data Provider configuration, requirements, and best practices
Sign in to Power Apps, and then select Settings > Advanced settings.
Go to Settings > Administration > Virtual Entity Data Sources.
On the actions toolbar, select New.
On the Select Data Provider dialog box, select from the following data sources, and then select OK.
Data Provider Description Custom data provider If you've imported a data provider plug-in, the data provider will appear here. More Information Developer Documentation: Get started with virtual tables OData v4 Data Provider Dataverse includes an OData Data Provider that can be used with OData v4 web services. More Information OData v4 Data Provider configuration, requirements, and best practices
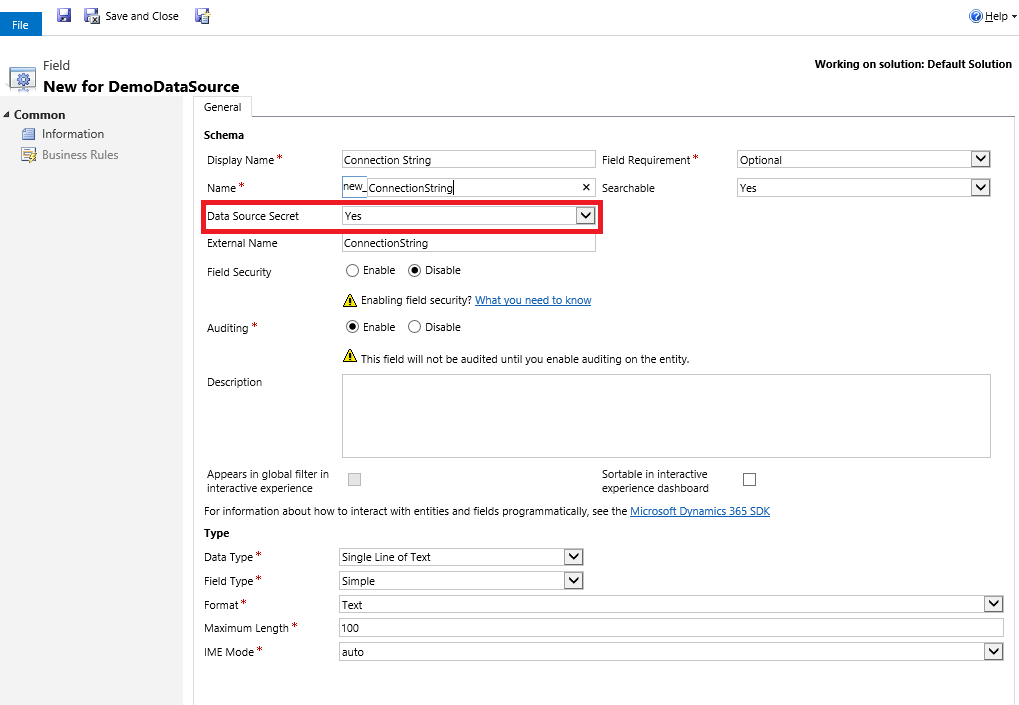
Add a secured column to a Data Source
You create columns for a Data Source in the same way as any other table. For data that is encrypted or sensitive, enable the Data Source Secret attribute on the custom column of the Data Source. For example, to secure a column that contains a database connection string.
Note
The Data Source Secret attribute is only available with columns added to a Data Source form.
Create a virtual table
You create a virtual table just like any other table in Dataverse with the addition of a few extra attributes described here. Virtual tables must be created using solution explorer.
Note
Although you can create a virtual table by selecting None as the data source, to acquire data a virtual table requires a data source. More Information Add a data source to use for virtual tables
Open solution explorer
Part of the name of any virtual table you create is the customization prefix. This is set based on the solution publisher for the solution you’re working in. If you care about the customization prefix, make sure that you are working in an unmanaged solution where the customization prefix is the one you want for this virtual table. More information: Change the solution publisher prefix
Open an unmanaged solution
From Power Apps select Solutions from the left navigation pane, and then on the toolbar, select Switch to classic. If the item isn’t in the side panel pane, select …More and then select the item you want.
In the All Solutions list open the unmanaged solution you want.
Create a virtual table
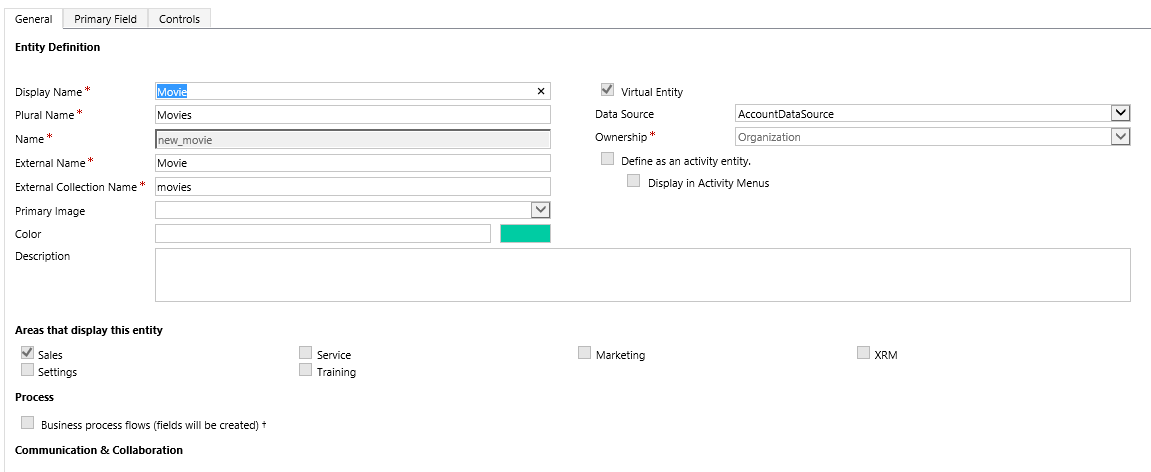
In solution explorer, create a new table. To do this, select Entities in the left navigation pane, and then select New.
On the General tab of the Entity Definition, select Virtual Entity, and then in the Data Source drop down list, select the data source that you want.
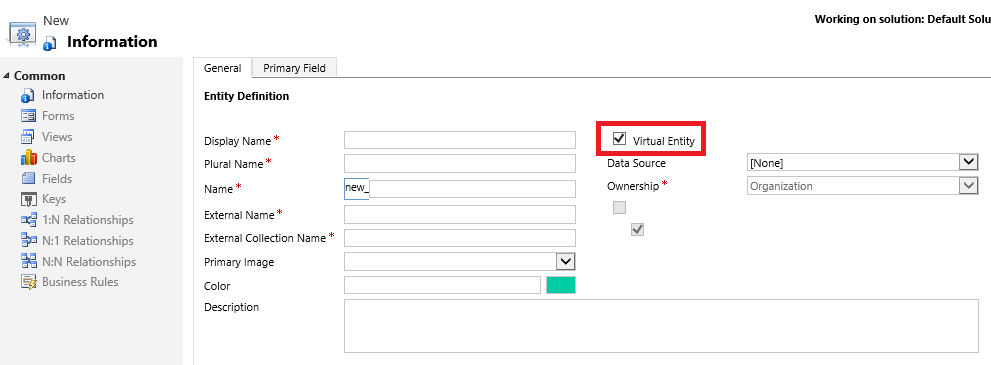
On the Entity Definition, complete the following required columns.
Field Description External Name Enter the name of the table in the external data source this table maps to. External Collection Name Enter the plural name of the table in the external data source this table maps to. Here's an example of a virtual table named Movie that uses a Azure Cosmos DB data provider to access document files.
Important
Several options, such as Access Teams, Queues, and Quick Create, aren't available with virtual tables. More Information Considerations when you use virtual tables
Complete the additional required and optional properties, such as display and plural names, as necessary. For more information about these properties, see Create and edit tables.
Create and add one or more columns for the virtual table. In addition to the standard column properties required to create a custom column, these optional properties are available for each custom column you create for a virtual table.
Field Description External Name This is typically the unique name to identify the data you want to display in the column. External Type Name If the column type you create is OptionSet: This property maps to the external name of the set of values in the external service for the choice . Typically, this can be an enum or name of a string value class. The External Type Name can be used when a fully qualified name is required. For example, as the Type Name with OData where parameters in a query need the fully qualified name, such as [Type Name].[Value]. External Value If the column type you create is OptionSet: This property maps to the corresponding value in the external data source for the choice item. This value entered is used to determine which choice item to display in the app. Complete the additional properties as necessary. For more information about these properties, see Create and edit columns.
Select Save and Close on the Column properties page.
On the solution explorer toolbar, select Save.
On the solution explorer toolbar, select Publish.
Close solution explorer.
Considerations when you use virtual tables
Virtual tables have these restrictions.
- Existing tables cannot be converted to virtual tables.
- By default, virtual tables contain only a Name and Id column. No other system managed columns, such as Status or Created On/Modified On are supported.
- Virtual tables don't support custom columns with the Currency, Image, or Customer data types.
- Virtual tables don't support auditing.
- Virtual table columns can't be used in rollups or calculated columns.
- A virtual table can't be an activity type of table.
- Dashboards and charts are not supported with virtual tables.
- Many features that affect table table rows cannot be enabled with virtual tables. Examples include queues, knowledge management, SLAs, duplicate detection, change tracking, mobile offline capability, column security, Dataverse search, and Power Pages solutions.
- Virtual tables are organization owned and don't support the row-level Dataverse security concepts. We recommend that you implement your own security model for the external data source.
- Column metadata properties that validate on update don’t apply to virtual tables. For example, a Whole Number column on a virtual table column may be set to have a minimum value of zero. However, since the value is coming from an external data source, a query will return values less than zero when retrieved from a virtual table. The minimum value property is not implied in the query. You would still need to filter the values to be greater than 0 if that’s what is desired.
- Virtual tables don't support change tracking and cannot be synchronized by using a Dataverse feature, such as the Data Export Service or Azure Synapse Link for Dataverse.
- Virtual tables that use the included OData v4 data provider are enabled on outbound port 443.
- Business process flows are not supported with virtual tables. More information: Unexpected error received when a user activates a business process flow
Unexpected error received when a user activates a business process flow
When a user attempts to activate a business process flow, they may receive an "unexpected error" message. Viewing the log file the following log entry is displayed.
ErrorCode: 0x80040216 Message: System.Web.HttpUnhandledException: Exception of type 'System.Web.HttpUnhandledException' was thrown. ---> Microsoft.Crm.CrmException: Business process flow cannot be enabled for Virtual Entity
This issue occurs because virtual tables don't support business process flows.
See also
OData v4 Data Provider requirements and best practices
Create and edit tables
Configure virtual tables in Power Pages