Use managed identities for Azure with your Azure data lake storage
Azure Data Lake Storage provides a layered security model. This model enables you to secure and control the level of access to your storage accounts that your applications and enterprise environments demand, based on the type and subset of networks or resources used. When network rules are configured, only applications requesting data over the specified set of networks or through the specified set of Azure resources can access a storage account. You can limit access to your storage account to requests originating from specified IP addresses, IP ranges, subnets in an Azure Virtual Network (VNet), or resource instances of some Azure services.
Managed identities for Azure, formerly know as Managed Service Identity (MSI), help with the management of secrets. Microsoft Dataverse customers using Azure capabilities create a managed identity (part of enterprise policy creation) that can be used for one or more Dataverse environments. This managed identity that will be provisioned in your tenant is then used by Dataverse to access your Azure data lake.
With managed identities, access to your storage account is restricted to requests originating from the Dataverse environment associated with your tenant. When Dataverse connects to storage on behalf of you, it includes additional context information to prove that the request originates from a secure, trusted environment. This allows storage to grant Dataverse access to your storage account. Managed identities are used to sign the context information in order to establish trust. This adds application-level security in addition to the network and infrastructure security provided by Azure for connections between Azure services.
Before you start
- Azure CLI is required on your local machine. Download and install
- You need these two PowerShell modules. If you don't have them, open PowerShell and run these commands:
- Azure Az PowerShell module:
Install-Module -Name Az - Power Platform admin PowerShell module:
Install-Module -Name Microsoft.PowerApps.Administration.PowerShell
- Azure Az PowerShell module:
- Go to this compressed folder file on GitHub. Then select Download to download it. Extract the compressed folder file to a computer in a location where you can run PowerShell commands. All files and folders extracted from a compressed folder should be preserved in their original location.
- We recommend that you create a new storage container under the same Azure resource group to onboard this feature.
Enable enterprise policy for the selected Azure subscription
Important
You must have Azure subscription Owner role access to complete this task. Obtain your Azure Subscription ID from the overview page for the Azure resource group.
- Open Azure CLI with run as administrator and sign into your Azure subscription using the command:
az loginMore information: Sign in with Azure CLI - (Optional) if you have multiple Azure subscriptions, make sure to run
Update-AzConfig -DefaultSubscriptionForLogin { Azure subscription id }to update your default subscription. - Expand the compressed folder you downloaded as part of the Before you start for this feature to a location where you can run PowerShell.
- To enable the enterprise policy for the selected Azure subscription, run the PowerShell script ./SetupSubscriptionForPowerPlatform.ps1.
- Provide the Azure subscription ID.
Create enterprise policy
Important
You must have Azure resource group Owner role access to complete this task. Obtain your Azure Subscription ID, Location, and Resource group name, from the overview page for the Azure resource group.
Create the enterprise policy. Run PowerShell script
./CreateIdentityEnterprisePolicy.ps1- Provide the Azure subscription ID.
- Provide the Azure resource group name.
- Provide preferred enterprise policy name.
- Provide the Azure resource group location.
Save the copy of the ResourceId after policy creation.
Note
The following are the valid location inputs supported for policy creation. Select the location that's most appropriate for you.
Locations available for enterprise policy
United States EUAP
United States
South Africa
UK
Australia
Korea
Japan
India
France
Europe
Asia
Norway
Germany
Switzerland
Canada
Brazil
UAE
Singapore
Grant reader access to the enterprise policy via Azure
Azure global admins, Dynamics 365 admins, and Power Platform admins can access the Power Platform admin center to assign environments to the enterprise policy. To access the enterprise policies, the global or Azure Key vault admin is required to grant the Reader role to the Dynamics 365 or Power Platform admin. Once the reader role is granted, the Dynamics 365 or Power Platform admins will see the enterprise policies on the Power Platform admin center.
Only the Dynamics 365 and Power Platform admins who were granted the reader role to the enterprise policy can ‘add environment’ to the policy. Other Dynamics 365 and PowerPlatform admins might be able to view the enterprise policy, but they'll get an error when they try to add environment.
Important
You must have - Microsoft.Authorization/roleAssignments/write permissions, such as User Access Administrator or Owner to complete this task.
- Sign into the Azure portal.
- Obtain the Dynamics 365 Power Platform admin user’s ObjectID.
- Go to the Users area.
- Open the Dynamics 365 or Power Platform admin user.
- Under the overview page for the user, copy the ObjectID.
- Obtain the enterprise policies ID:
- Go to the Azure Resource Graph Explorer.
- Run this query:
resources | where type == 'microsoft.powerplatform/enterprisepolicies'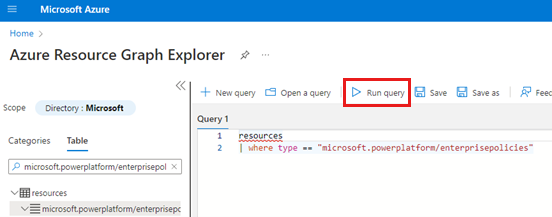
- Scroll to the right of the results page and select the See details link.
- On the Details page, copy the ID.
- Open Azure CLI and run the following command, replacing the
<objId>with the user’s ObjectID and the<EP Resource Id>with the enterprise policy ID.New-AzRoleAssignment -ObjectId <objId> -RoleDefinitionName Reader -Scope <EP Resource Id>
Connect enterprise policy to Dataverse environment
Important
You must have the Power Platform administrator or Dynamics 365 administrator role to complete this task. You must have the Reader role for the enterprise policy to complete this task.
- Obtain the Dataverse environment ID.
- Sign into the Power Platform admin center.
- Select Environments, and then open your environment.
- In the Details section, copy the Environment ID.
- To link to the Dataverse environment, run this PowerShell script:
./NewIdentity.ps1 - Provide the Dataverse environment ID.
- Provide the ResourceId.
StatusCode = 202 indicates the link was successfully created.
- Sign into the Power Platform admin center.
- Select Environments, and then open the environment you specified earlier.
- In the Recent operations area, select Full history to validate the connection of the new identity.
Configure network access to the Azure Data Lake Storage Gen2
Important
You must have an Azure Data Lake Storage Gen2 Owner role to complete this task.
Go to the Azure portal.
Open the storage account connected to your Azure Synapse Link for Dataverse profile.
On the left navigation pane, select Networking. Then, on the Firewalls and virtual networks tab select the following settings:
- Enabled from selected virtual networks and IP addresses.
- Under Resource instances, select Allow Azure services on the trusted services list to access this storage account
Select Save.
Configure network access to the Azure Synapse Workspace
Important
You must have an Azure Synapse administrator role to complete this task.
- Go to the Azure portal.
- Open the Azure Synapse workspace connected to your Azure Synapse Link for Dataverse profile.
- On the left navigation pane, select Networking.
- Select Allow Azure services and resources to access this workspace.
- If there are IP firewall rules created for all IP range, delete them to restrict public network access.
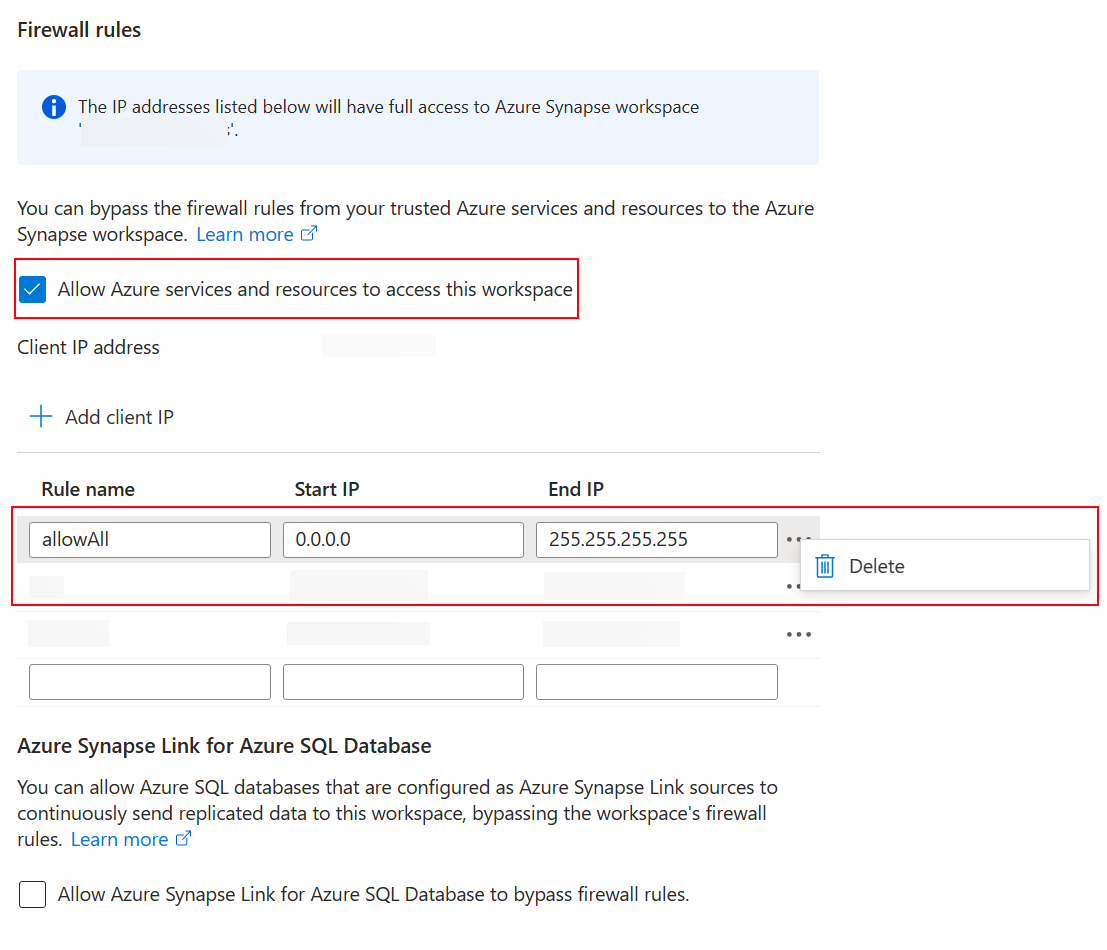
- Add a new IP firewall rule based on the client IP address.
- Select Save when done. More information: Azure Synapse Analytics IP firewall rules
Create a new Azure Synapse Link for Dataverse with managed identity
Important
Dataverse: You must have the Dataverse system administrator security role. Additionally, tables you want to export via Azure Synapse Link must have the Track changes property enabled. More information: Advanced options
Azure Data Lake Storage Gen2: You must have an Azure Data Lake Storage Gen2 account and Owner and Storage Blob Data Contributor role access. Your storage account must enable Hierarchical namespace for both initial setup and delta sync. Allow storage account key access is required only for the initial setup.
Synapse workspace: You must have a Synapse workspace and the Synapse Administrator role access within the Synapse Studio. The Synapse workspace must be in the same region as your Azure Data Lake Storage Gen2 account. The storage account must be added as a linked service within the Synapse Studio. To create a Synapse workspace, go to Creating a Synapse workspace.
When you create the link, Azure Synapse Link for Dataverse gets details about the currently linked enterprise policy under the Dataverse environment then caches the identity client secret URL to connect to Azure.
- Sign into Power Apps and select your environment.
- On the left navigation pane, select Azure Synapse Link, and then select + New link. If the item isn’t in the side panel pane, select …More and then select the item you want.
- Select Select Enterprise Policy with Managed Service Identity, and then select Next.
- Add the tables you want to export, and then select Save.
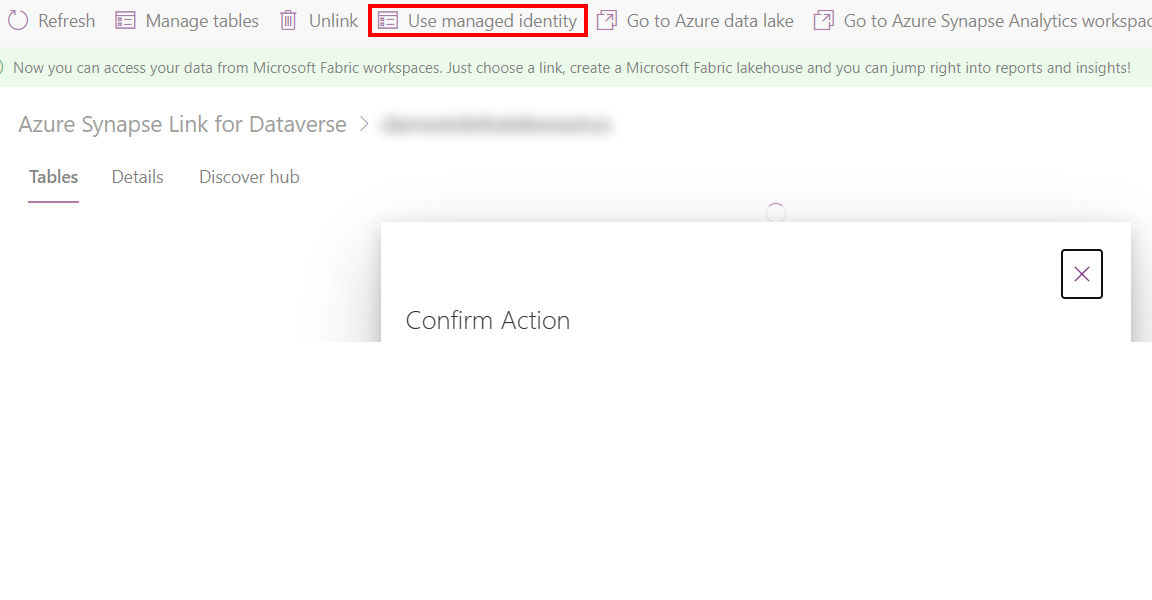
Enable managed identity for an existing Azure Synapse Link profile
Note
To make the Use managed identity command available in Power Apps, you need to finish the above setup to connect the enterprise policy to your Dataverse environment. More information: Connect enterprise policy to Dataverse environment
- Go to an existing Synapse Link profile from Power Apps (make.powerapps.com).
- Select Use managed identity, and then confirm.
Troubleshooting
If you receive 403 errors during the link creation:
- Managed identities take extra time to grant transient permission during initial sync. Give it some time and try the operation again later.
- Make sure the linked storage doesn't have the existing Dataverse container(dataverse-environmentName-organizationUniqueName) from the same environment.
- You can identify the linked enterprise policy and
policyArmIdby running the PowerShell script./GetIdentityEnterprisePolicyforEnvironment.ps1with the Azure Subscription ID and Resource group name. - You can unlink the enterprise policy by running the PowerShell script
./RevertIdentity.ps1with the Dataverse environment ID andpolicyArmId. - You can remove the enterprise policy by running the PowerShell script .\RemoveIdentityEnterprisePolicy.ps1 with policyArmId.
See also
Feedback
Coming soon: Throughout 2024 we will be phasing out GitHub Issues as the feedback mechanism for content and replacing it with a new feedback system. For more information see: https://aka.ms/ContentUserFeedback.
Submit and view feedback for