Note
Access to this page requires authorization. You can try signing in or changing directories.
Access to this page requires authorization. You can try changing directories.
This article describes how to use the classic site map designer. For information about how to create site mapping in the modern app designer, go to App navigation in model-driven apps.
Site maps define the manner by which users move between tables in a model-driven app. This is called navigation. App navigation is a fundamental aspect of the user experience when performing tasks within the app.
To understand site maps it helps to introduce some concepts, so that you can understand the relationship between the site map designer and the way users intend to use the app.
The screenshot below illustrates a number of features.
An Area. Model-driven apps can have multiple areas. Users toggle between these to access different groups.
A Group. Areas can have multiple groups. Essentially these allow you to group tables, custom pages, and other components, in a logical fashion.
A Table (or entity). This allows users to see views of the tables that have been selected in the app designer.
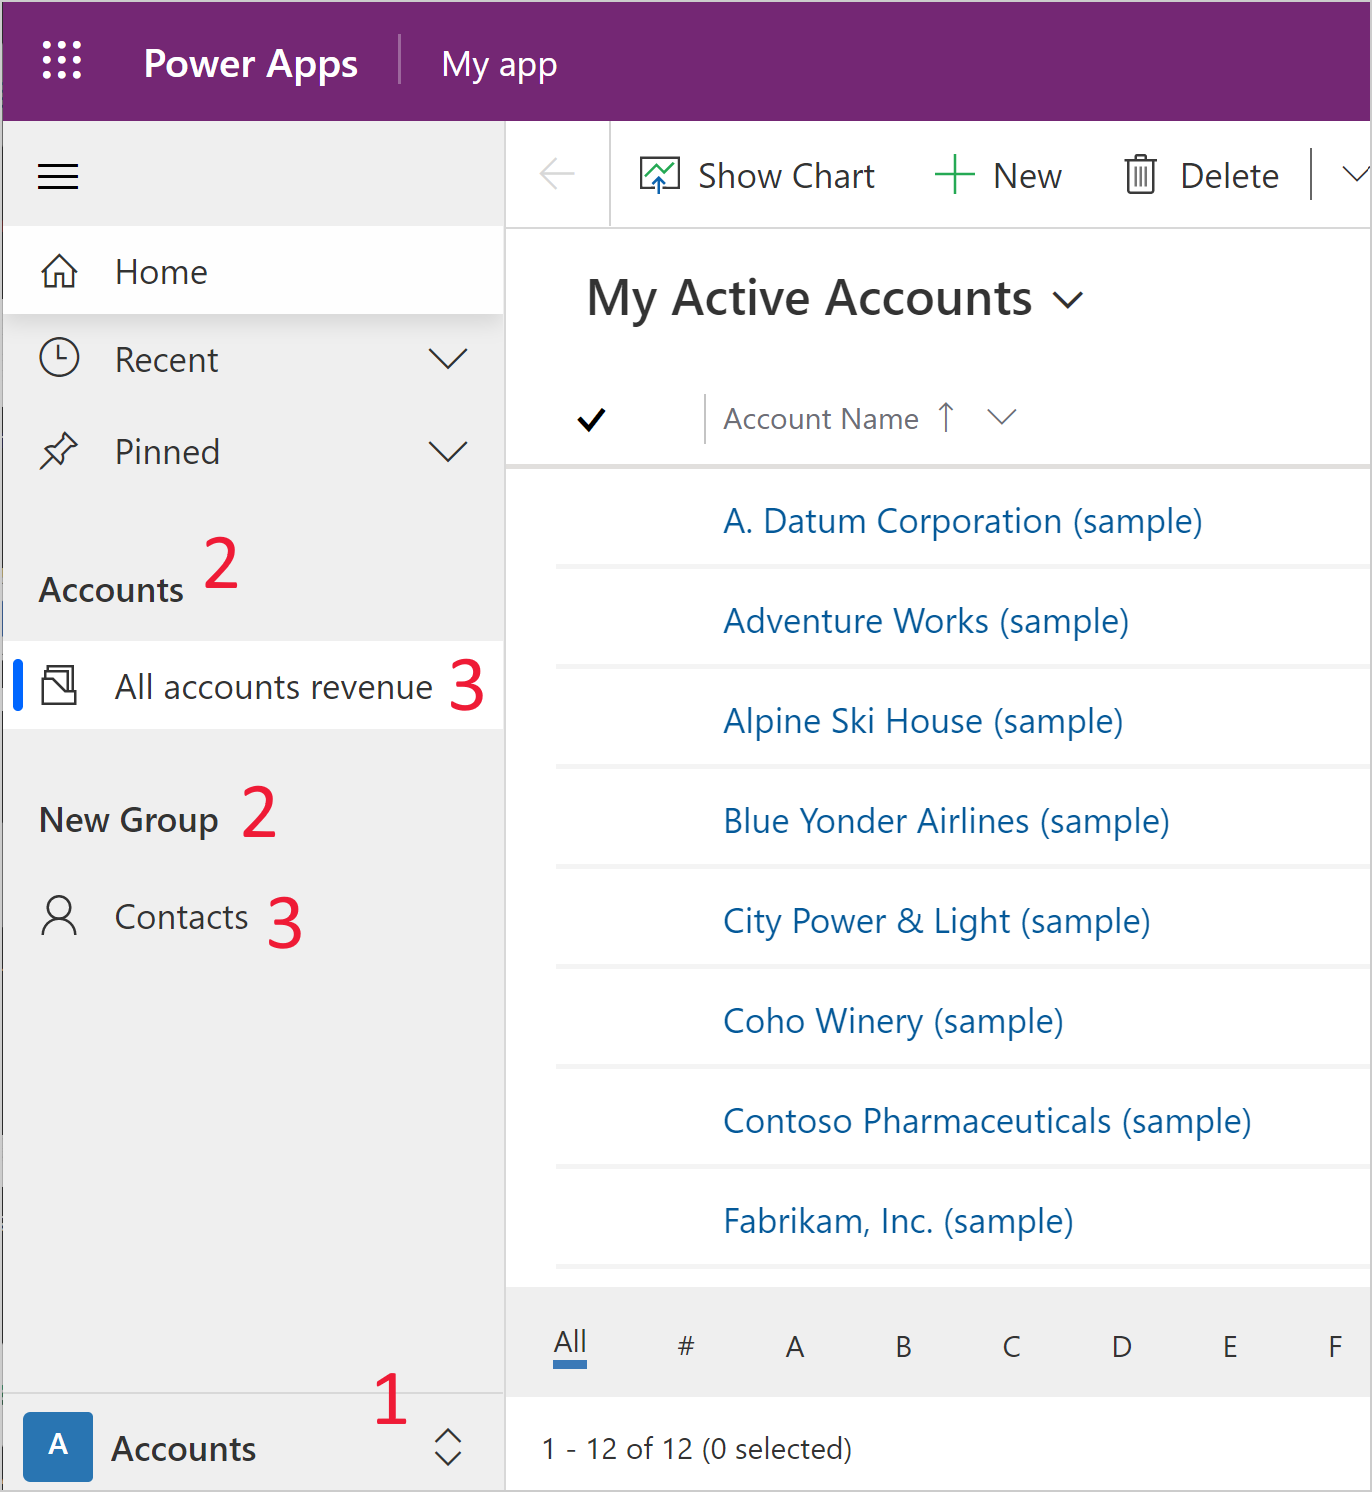
This hierarchical structure is important to enable a good user experience, and the terminology used allows better understanding of the app designer.
Viewing an app from within the app designer
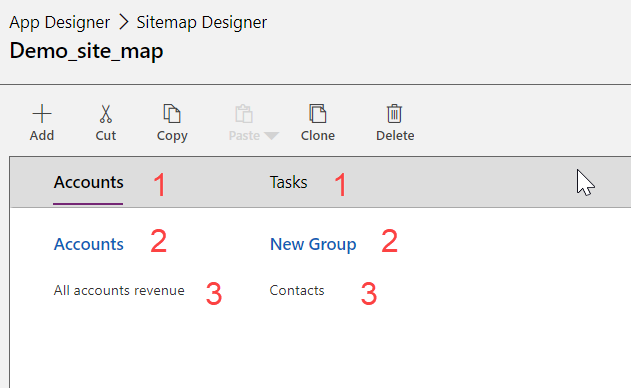
The same app viewed from within the site map designer shows the corresponding areas, groups, and tables. In this case you're viewing tables within the accounts Group and groups within the accounts Area. You can also notice there's another area called Tasks that also exists within the app designer.
Prerequisites for editing site maps
Users need to have the System Administrator or System Customizer security role or equivalent permissions. Specifically, any user with the following privileges can also create apps:
- Create, Read, and Write privileges for the App table.
- Read and Write privileges for the Customizations table.
- Read privileges for the Solution table.
These privileges can be viewed or set on the Customization tab of a security role.
How to build a site map
In this tutorial several site map tasks are carried out such as creating a new site map, and adding an area, group, and subarea.
The site map designer also lets an app designer define the area, subarea, or group titles in the languages supported by the environment.
A default site map is created automatically as part of the model-driven app creation process. This can be edited by using the site map designer.
Create a site map for an app
Sign in to Power Apps.
Select Solutions, open the solution you want.
Select New - App - Model-driven app.
From the two options available select Classic App Designer.
On the app designer canvas, in the Site Map area, select the pencil icon
 next to Site Map to Open the Site Map Designer .
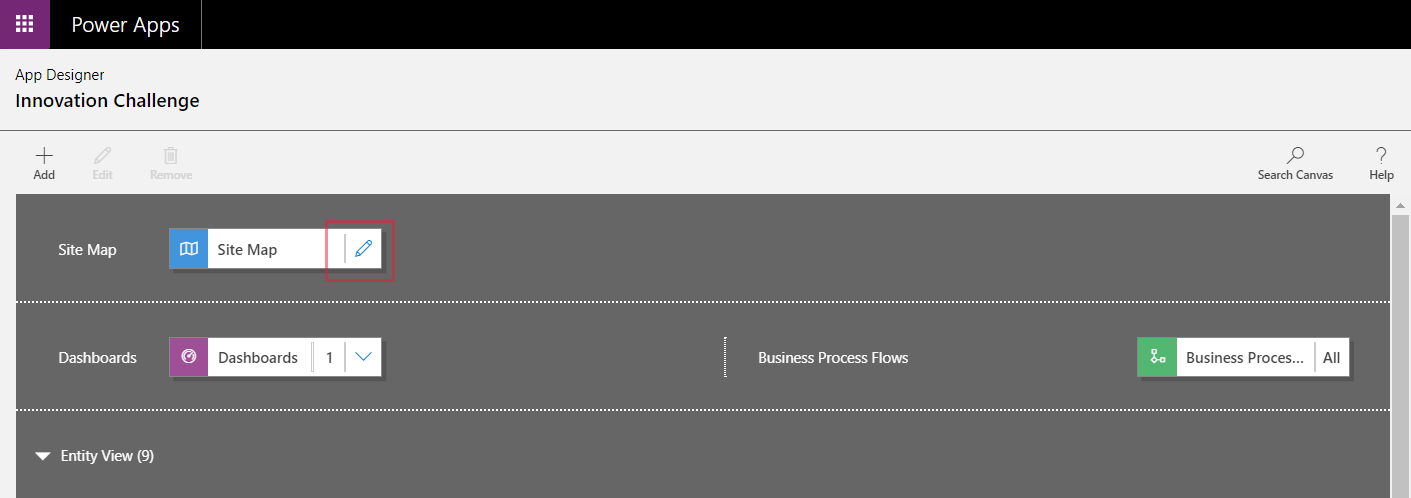
The site map designer opens a canvas that is prepopulated with one area, one group, and one subarea. Select the area, group, or subarea tile to change its properties.
Note
Selecting Open the Site Map Designer
 from the app designer canvas automatically creates a new site map (if there's no existing site map), and gives the new site map the same name as the app name and the same unique name as the app unique name.
Select Save.
Note
The new site map is associated with the app when returning to the app designer and select Save. When a site map is configured, Configured appears on the site map tile; otherwise Not Configured appears on the tile. If you open the site map designer from the app designer and configure a new site map, but close the browser before associating the site map with the app, the site map will be automatically associated with the app the next time the app designer is opened, based on the app unique name.
Select Publish.
Review the model-driven app
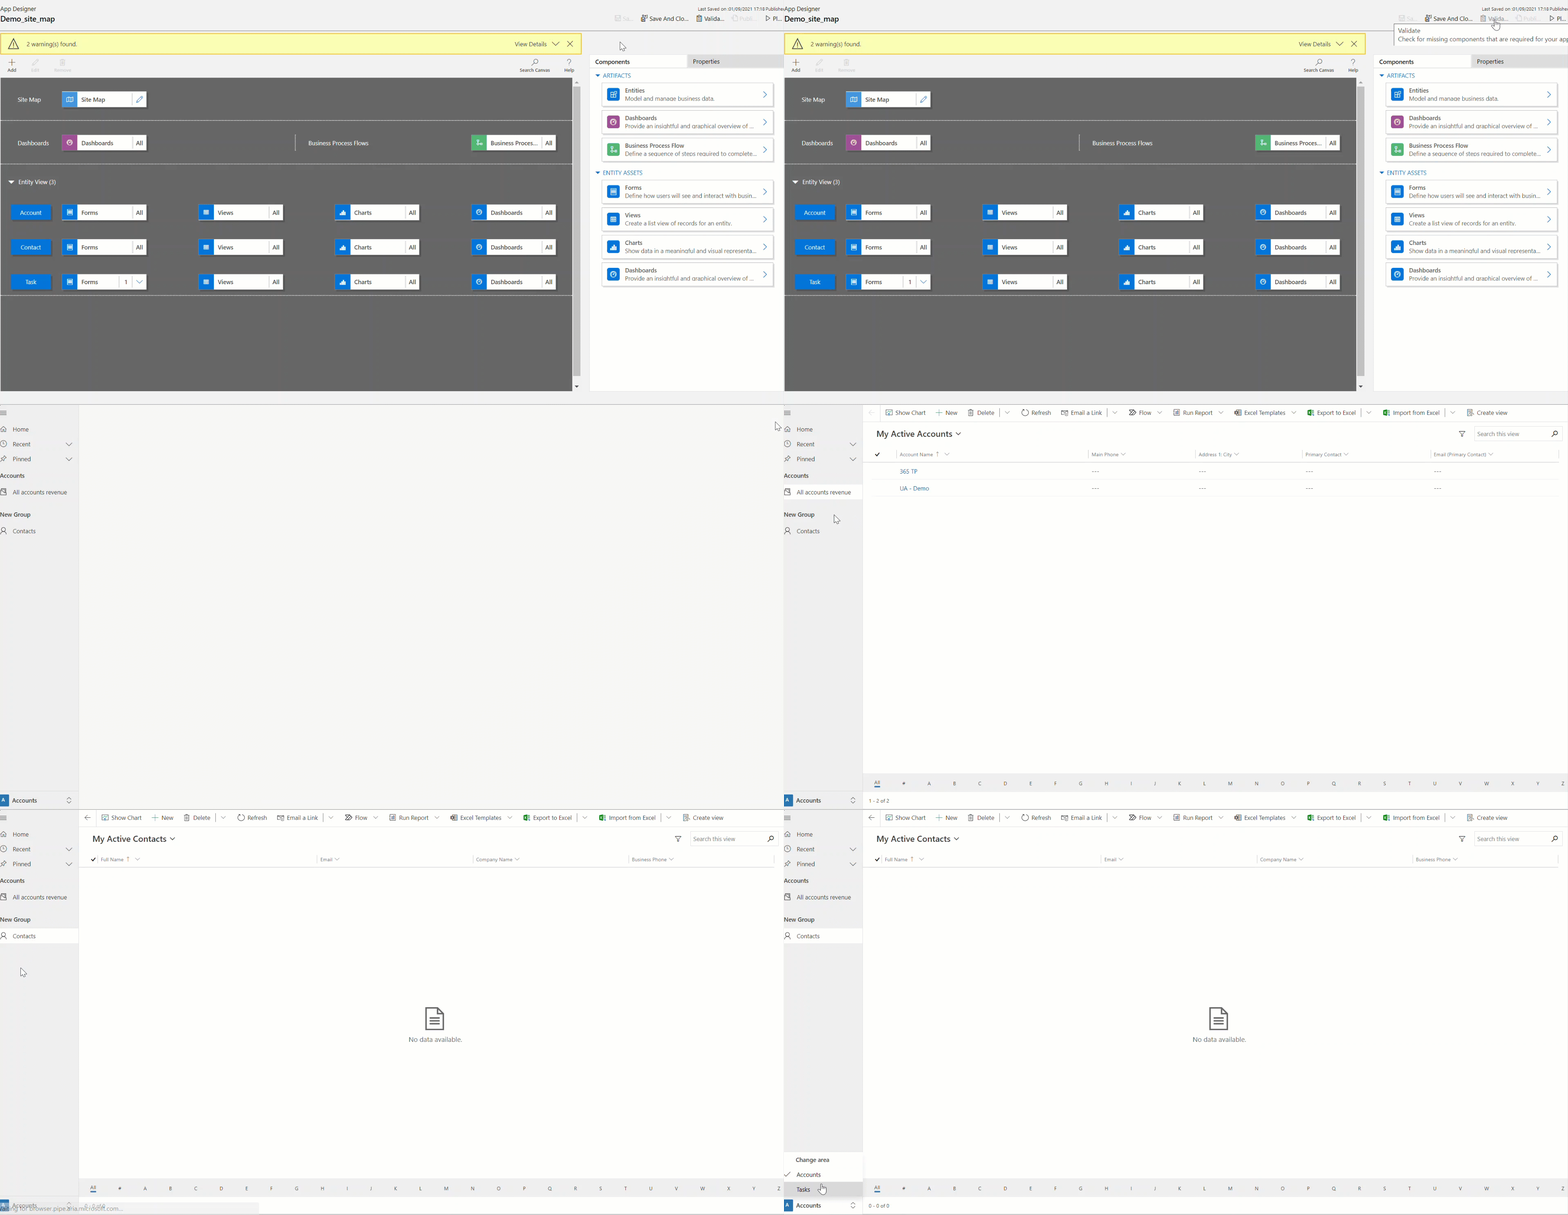
From that app designer select Save > Validate > Play. This runs the app with the latest changes and is an important part of the app building process.
Add an area to the site map
Select Add
 on the site map designer canvas, and then select Area.
or
From the Components tab, drag the Area tile to the empty box on the canvas. An empty box is visible you move the tile the correct place on the canvas.
Select the area that has been added. The Properties tab highlighted in the pane to the right of the canvas.
Add or edit the area properties.
Under General, do the following:
Title: Enter the title for the area in the base language of the organization.
Icon: A default application icon is selected. Select a different icon for the area from the list of web resources available in the solution. The icon only applies to the deprecated web client site map and not the modern model-driven app site map.
ID: A unique ID is automatically generated, but different one can be entered if necessary. It's best practice to use the provided ID because if the ID entered isn't unique, users might get an error when they're using the app, or app designers might get an error when importing a solution that contains this site map.
Show Groups: Select this check box to show groups of subareas in the navigation pane.
Under Advanced, do the following:
More Titles: If your organization uses multiple languages, select a language (Locale) for the title, enter the title, and then select Add
 . Titles can be created, edited, or deleted for as many languages as your organization uses. However, it's only possible to have one title per language.
More Description: If an organization uses multiple languages, select a language for the description, enter the description, and then select Add
 . Descriptions can be created, edited, or deleted for as many languages as your organization uses. However, it's only possible to have one description per language.
URL: Enter the URL to render for the Dynamics 365 for Outlook folder that represents the area.
Creating and editing Groups, Subareas and Areas
The following sections provide instructions describing how to work with Groups, Subareas, and Areas in addition to reviewing their properties.
Add a group to the site map
On the site map designer canvas, select the area you want to add the group to.
Select Add
 , and then select Group.
or
From the Components tab, drag the Group tile to an empty box under the Area in the canvas. An empty box is visible when you move the tile to the correct place in the canvas.
Select the group just added.
On the Properties tab, add or edit the group properties:
Under General, do the following:
Title: Enter the title for the group in the base language of the organization.
ID: A unique ID is automatically generated. Enter a different one if necessary. We recommend using the automatic ID because if the ID entered isn't unique, there might be an error when importing a solution containing this site map.
Under Advanced, do the following:
More Titles: If your organization uses multiple languages, select a language (Locale) for the title, enter the title for the group, and then select Add
 . Titles can be created, edited, or deleted for as many languages as your organization uses. However, it's only possible to have one title per language.
More Descriptions: If your organization uses multiple languages, select a language for the description, enter the description for the group, and then select Add
 . Descriptions can be created, edited, or deleted for as many languages as your organization uses. However, it's only possible to have one description per language.
URL: Enter the URL to render for the Dynamics 365 for Outlook folder that represents the group.
Set as Profile: Select this check box to indicate whether this group represents a user-selectable profile for the workplace. The group set as a user-selectable profile is made available as options in your personal options. This only applies for groups within the Workplace area.
Add a subarea to a group in the site map
Select Add
 on the site map designer canvas, and then select Subarea.
or
From the Components tab, drag the Subarea tile to an empty box under the Group section in the canvas. An empty box is visible the tile is moved to the correct place in the canvas.
Select the subarea that has been added.
On the Properties tab, add or edit the subarea properties:
Under General, do the following:
Type: Select whether the subarea being adding is a dashboard, table, web resource, or URL.
Entity: Select the table that the subarea is for. This column is disabled if the subarea type is other than Entity in the Type drop-down list.
URL: Specify a URL to a web page. The URL text displays from this subarea and, when selected, a new browser window opens that displays the page. This column is disabled if Entity in the Type is selected in the drop-down list.
Important
Site map subarea URLs that link to an .aspx page aren’t supported.
Default Dashboard: Select the default dashboard to be displayed for this subarea. This column is disabled if Dashboard hasn't been selected in the Type drop-down list.
Title: Enter the title for the subarea in the base language of the organization.
Icon: A default application icon is selected. Select a different icon for the subarea from the list of web resources available in the solution.
ID. A unique ID is automatically generated. Enter a different unique ID if necessary.
Parameter Passing. Select this check box to pass information about the organization and language context to the URL. This check box is checked only when the subarea type is a web resource or a URL-based subarea.
Under Advanced, do the following:
Privileges: This defines whether a subarea is displayed based on privileges available in any security roles that are assigned to the user. Select the name of the table to check privileges for, and then select the check boxes to assign privileges.
More Titles: If your organization uses multiple languages, select a language for the title, enter the title for the subarea, and then select Add. Titles can be created, edited, or deleted for as many languages as your organization uses. However, it's only possible to have one title per language.
More Descriptions: If your organization uses multiple languages, select a language for the description, enter the description for the subarea, and then select Add. Descriptions can be created, edited, or deleted for as many languages as your organization uses. However, it's only possible to have one description per language.
SKUs: Select the versions of Dynamics 365 that display this subarea.
Client: Select the type of client that displays this subarea.
Outlook Shortcut: Select the icon to display in Dynamics 365 for Outlook.
Offline Availability: Select this check box to make this subarea available to users when they're offline in Dynamics 365 for Outlook.
Organize areas, groups, and subareas
Organize areas, groups, and subareas by dragging them to new positions. A container box appears where you can drop the tiles. Here are some options:
Move a subarea to a new position within the same group or a different group under the same area.
Move a subarea to a new position within a group under a different area.
Move a group to a new position within the same area.
Move a group to a new position in a different area.
Move an area to a new position.
Edit the default site map
Each environment comes with a default site map and this can be edited.
Open solution explorer.
In the solution window, under Components, select Client Extensions.
On the component toolbar, select Add Existing > Site Map.
In the list of solution components, select the site map named Site Map, and then select OK.
Double-click to select the site map added that has the display name Site Map and is in a Managed state. The site map can be selected, and then on the toolbar, select Edit.
The site map opens in the site map designer.
Select Save.
Select Publish.
Select Save and Close.
Clone a component in a site map
To make a copy of an existing component, select the component, and then on the toolbar, select Clone. All details of the cloned component are same as the base component except the ID and title. The ID is generated randomly.
When an area is cloned, the cloned area is added to the right of the currently selected area. When a group is cloned, the cloned group is added to the right of the currently selected group. When a subarea is cloned, the cloned subarea is added below the currently selected subarea.
Delete an area, group, or subarea from a site map
To delete a site map component, select the component tile, and then on the toolbar, select Delete. When an area is deleted, all groups and subareas in the area are also deleted. Similarly, when a group is deleted, the group and subareas in it are deleted.
Clients supported
The following table explains the clients supported for different site maps.
| Site maps | Supported clients |
|---|---|
| New apps | Unified Interface |
| Site map for the Dynamics 365 - custom app | Legacy web app and Dynamics 365 for Outlook |
| Model-driven apps (Sales, Sales Hub, Customer Service, Customer Service Hub, Field Service, Project Service Automation) | Legacy web app and Unified Interface |
Replace the legacy app with a model-driven app
During the transition from web client to Unified Interface, a legacy app was provided which uses the web client site map. With the web client removed, we're deprecating the legacy app. Subsequently, makers might want to provide a replacement model-driven app for users. In a future release, the legacy app will be removed.
By default, the legacy app name is "Dynamics 365 - custom," but could have been renamed within the environment.
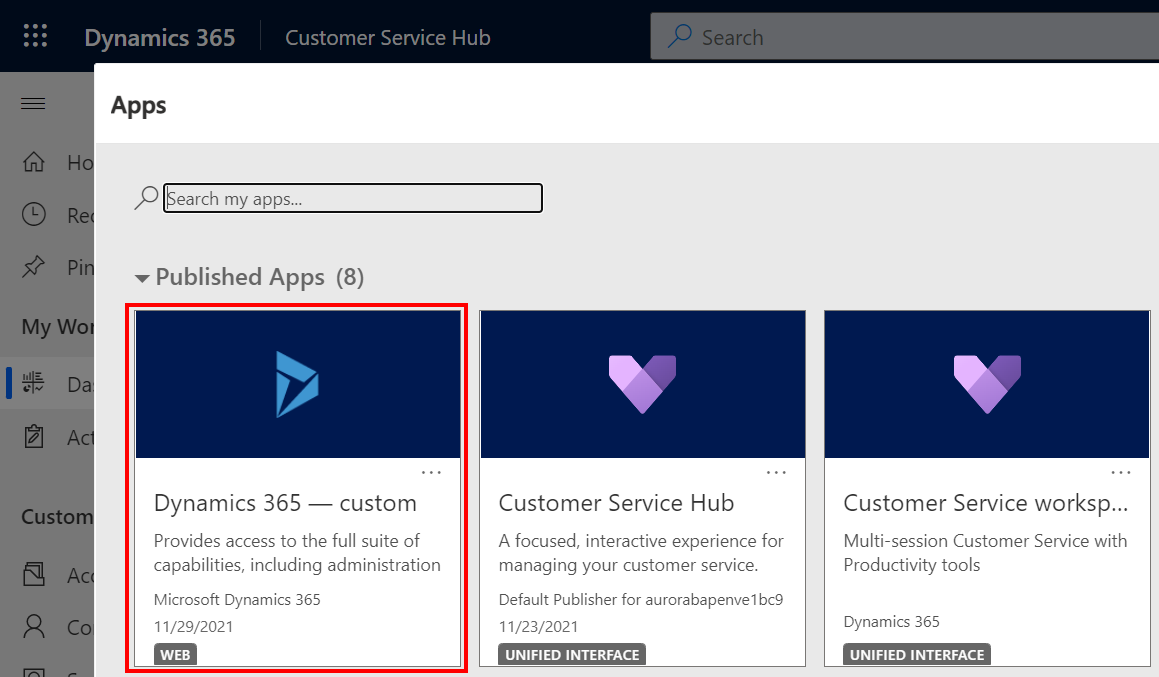
When the legacy app is run, a warning message is shown indicating that not all app features are supported.

To create a model-driven app with the same site map items as the legacy app, the classic app designer can reuse the existing site map within a new app.
Open make.powerapps.com
On the left navigation pane, select Solutions. If the item isn’t in the side panel pane, select …More and then select the item you want.
Open or create a new solution.
Select ... on the top navigation bar, and then select Switch to classic, which opens the classic solution explorer.

From the left pane, select Model-driven Apps > New .
In the Create a New App dialog:
Enter the app name. The unique name and description can also be provided but aren't required.
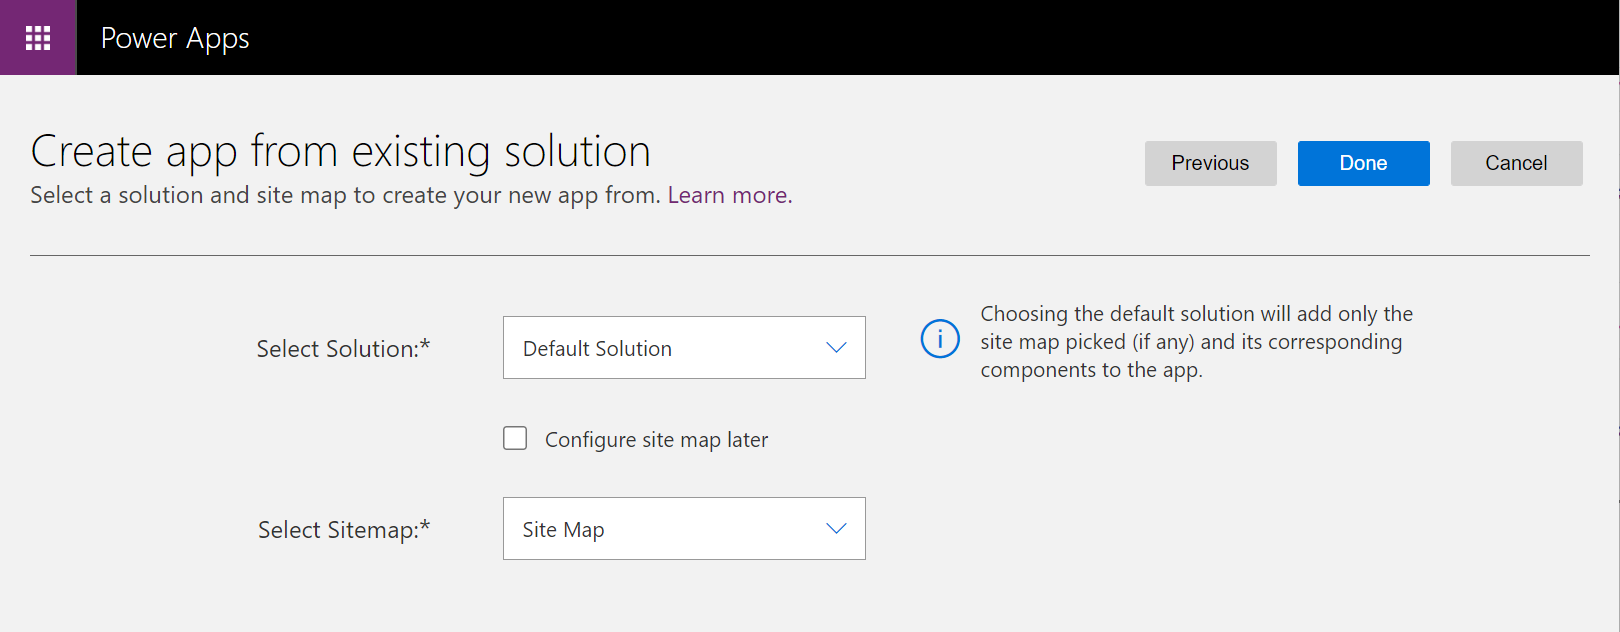
Select Use existing solution to create the App, and then select Next.
Under Select Solution select Default Solution.
Under Select Sitemap select Site Map, and then select Done.
Select Publish.
Close the classic app designer and open the solution containing the new model-driven app.
Select the new model-driven app, and then select Share.
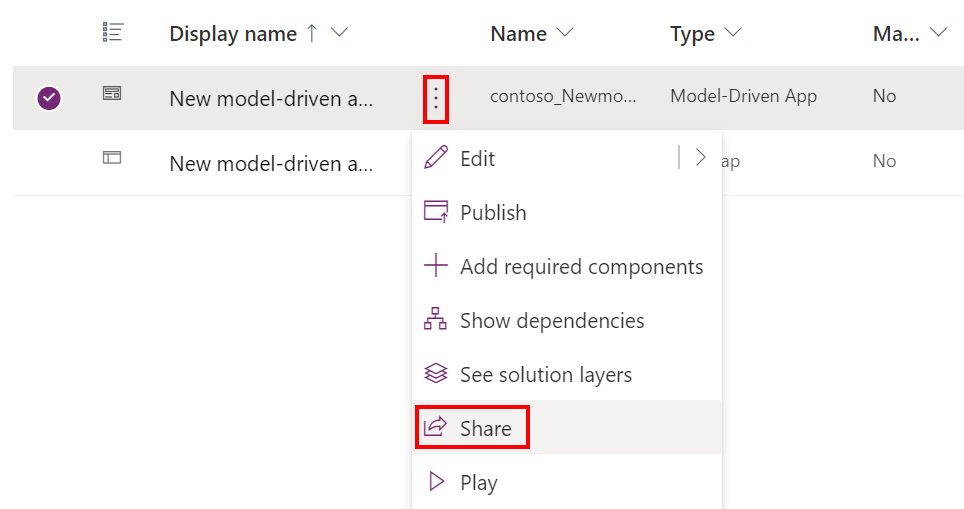
Add people and assign security roles to allow them to use the app.
After the new model-driven app is available, the "Dynamics 365 - custom" app should be hidden for nonadmins in all environments.
Open Power Platform admin center and open the environment to hide the legacy app.
Select Settings > Product > Behavior.
Set Show legacy app to everyone, not just admins to Off.
Scroll to the bottom of the page and select Save.