Manage knowledge articles by using content access levels
Content access levels give another level of control separate from web roles to control access to knowledge articles in a Power Pages site. Content access levels make a well-designed knowledge base more capable of providing the right content to the right audience. This allows for more structured learning paths that keep irrelevant content from surfacing.
By default, three content access levels are available: Default, Registered Users, and Premium Users. The Default content access level is associated with the Anonymous Users and Authenticated Users web roles. You can create additional content access levels and associate each of them with account, contact, or web role.
When you create a new knowledge article, the Default content access level is applied to it by default. When you translate or version your knowledge articles, the associated products and content access levels are copied to the new version or translation, thereby simplifying the authoring experience. You can validate the content access levels and products associated with an article before publishing it.
Website navigation and search results consider the content access level(s) associated to the logged-in user. If the user does not have the necessary content access level permission to view a knowledge article, or if the user attempts to open an article under faceted search conditions, the Article Unavailable message is displayed.
To enable content access level based filtering of knowledge articles on your website, set the value of the KnowledgeManagement/ContentAccessLevel/Enabled site setting to true. By default, the value of the site setting is set to false.
Create content access levels
- Sign in to Power Pages and go to Security > Content Access Levels.
- In the ribbon, select New.
- Fill in the Name and Description.
- Change Default Access Level from No to Yes if it should be the default.
- In the ribbon, select Save.
Assign content access levels to knowledge articles
Customer Service Hub app
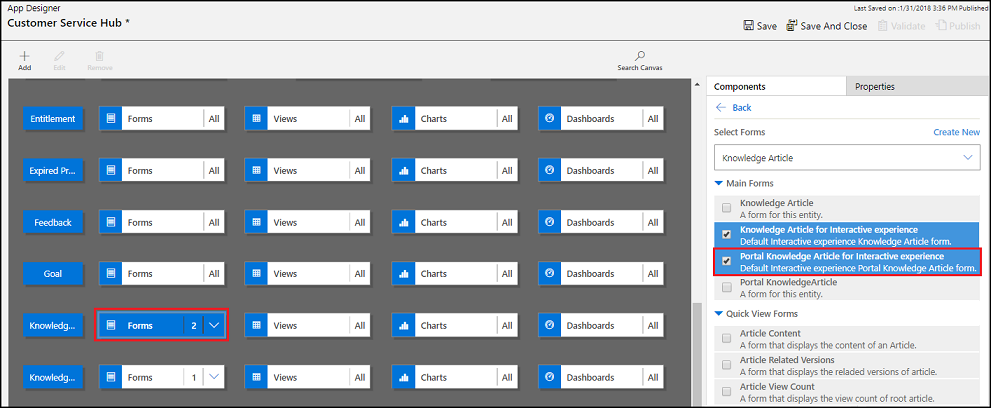
If you want to add content access level in a knowledge article from the Customer Service Hub app, you must add the Portal Knowledge Article for Interactive experience form to the Knowledge Article entity.
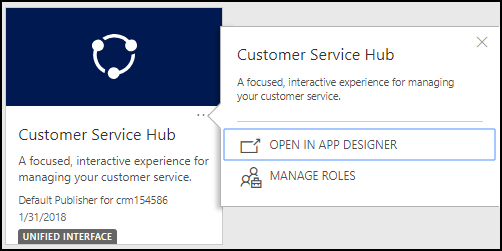
Open the Customer Service Hub app in App designer.

Under Table View, select the Forms tile for the Knowledge Article entity.
In the Components pane, select Portal Knowledge Article for Interactive experience.

Save and publish the changes.
Open Customer Service Hub.
Navigate to the knowledge article you want to assign content access level.
From the Knowledge Article box, select Portal Knowledge Article for Interactive experience.

On the Summary tab, under Related information, select Content Access Levels (lock icon) from the toolbar to add content access level.
From More Commands, select Add Existing Content Access Level.
In the Lookup Records pane, browse and select the content access level.
Select Add.
Power Pages
In Power Pages, you can access a knowledge article and add content access level to it by going to Portals > Knowledge Article.
Open the Power Pages app.
Go to Portals > Knowledge Article and open the knowledge article you want to assign content access level.
On the Summary tab, under Related information, select Content Access Levels (lock icon) from the toolbar to add content access level.
From More Commands, select Add Existing Content Access Level.
In the Lookup Records pane, browse and select the content access level.
Select Add.
Interactive Service Hub
Open the Interactive Service Hub.
Select the knowledge article you want to edit, or create a new article.
Select Summary just above the progress bar.
Under Related Information (third column), select the symbol that looks like a lock.
Select + to add a new Content Access Level or the Trash Can symbol next to a Content Access Level to remove it.
Assign content access levels to users
- Sign in to Power Pages and go to Portals > Security > Contacts
- Select the Contact you wish to edit.
- Under the Details tab, find the Content Access Levels section.
- Press + to add a new content access level or the Trash Can symbol next to a content access level to remove it.
Note
A user can also inherit a content access level if it is assigned to a Web Role, Parent Contact, or Account that the user is connected to. This inheritance avoids the need to reassign or update content access levels at an individual level. You can assign Web Roles to a content access level by navigating to Portals > Security > Web Roles and then following the same steps. You can assign accounts to a content access level by navigating to Sales > Accounts and then selecting the account to edit. After the account is selected, find the Content Access Levels section on the rightmost side of the screen and use the + and Trash Can buttons to add or remove a content access level.