Note
Access to this page requires authorization. You can try signing in or changing directories.
Access to this page requires authorization. You can try changing directories.
By deploying Azure "burst" nodes (both Windows and Linux) in your HPC Pack cluster or creating your HPC Pack cluster in Azure, you can automatically grow or shrink the cluster's resources such as nodes or cores according to the workload on the cluster. Scaling the cluster resources in this way allows you to use your Azure resources more efficiently.
With HPC Pack 2016 or later version you can automatically grow and shrink HPC Pack compute nodes that are running in Azure, including Windows PaaS nodes, Azure IaaS VM nodes, Azure Batch pool nodes, and Azure VM Scale Set nodes. Configuration for each option is summarized below:
| Node Type | how to enable | prerequisite | how to monitor |
|---|---|---|---|
| Azure PaaS nodes | PowerShell cmdlet Set-HpcClusterProperty -EnableGrowShrink 1 |
1. Node template for Azure PaaS Nodes 2. Nodes added in the cluster |
"Auto grow shrink report" under ClusterManager --> Resource management --> Operations --> AzureOperations |
| Azure IaaS nodes | PowerShell cmdlet Set-HpcClusterProperty -EnableGrowShrink 1 |
1. Azure Service Principal or Managed Identity configured 2. Nodes added in the cluster |
"Auto grow shrink report" under ClusterManager --> Resource management --> Operations --> AzureOperations |
| Azure VM Scale Set nodes | PowerShell cmdlet Set-HpcClusterProperty -EnableGrowShrink 1 |
1. Azure Service Principal or Managed Identity configured 2. Nodes added in the cluster |
"Auto grow shrink report" under ClusterManager --> Resource management --> Operations --> AzureOperations |
| Azure Batch pool | Azure Batch pool node template | Azure Batch pool needs to be started | azure portal or azure batch explorer |
Note
This feature just automatically grows or shrinks the Azure resources by starting or stopping the existing HPC compute nodes in Azure; it will not automatically create new HPC compute nodes or delete existing nodes.
The auto scaling of Azure VM scale set nodes is supported from HPC Pack 2016 Update 2 onwards.
Auto scaling of Azure IaaS VM nodes or Azure VM scale set nodes
To automatically grow or shrink the Azure IaaS VM nodes or Azure VM scale set nodes in an HPC Pack cluster, you need to grant the head node(s) permission to manage your Azure resources by either of the following two options:
Enable Azure Managed Identity on the head node(s), if you are running HPC Pack 2019 and the head node(s) are Azure VM.
Configure an Azure Service Principal with certificate
After the Azure Service Principal or Azure managed identity is configured, you can enable auto grow shrink using HPC Pack AutoGrowShrink Cmdlet.
Option 1: Enable Azure Managed Identity to manage Azure resources
Note
It is supported from HPC Pack 2019 onwards.
If you have deployed the HPC Pack cluster with one of the official ARM deployment templates in Github, Azure managed identity will have already been enabled on the head node(s).
If you have manually installed HPC Pack 2019 on an Azure virtual machine, you can refer to this guidance to enable the Azure managed identity on the head node(s), refer to Access control for Azure resources in HPC Pack cluster to manually re-configure the access permissions for the Azure Service Principal according to your user scenario and then run the following PowerShell command to configure the HPC cluster:
cd $env:CCP_HOME\bin
.\ConfigARMClusterVNetInfo.ps1
Set-HpcClusterRegistry -PropertyName UseManagedIdentity -PropertyValue 1
Option 2: Configure Azure Service Principal to manage Azure resources
You can use the Cluster Manager GUI or PowerShell command line to configure the Azure Service Principal.
Note
By default, the Azure Service Principal created by HPC Pack is granted the Contributor role at the Subscription level, you can refer to Access control for Azure resources in HPC Pack cluster to manually re-configure the access permissions for the Azure Service Principal according to your user scenario.
Configure Azure Service Principal with Cluster Manager GUI
Open HPC Pack Cluster Manager on one head node.
Goto Configuration --> Deployment To-do List page.
Click Set Azure Deployment Configuration.
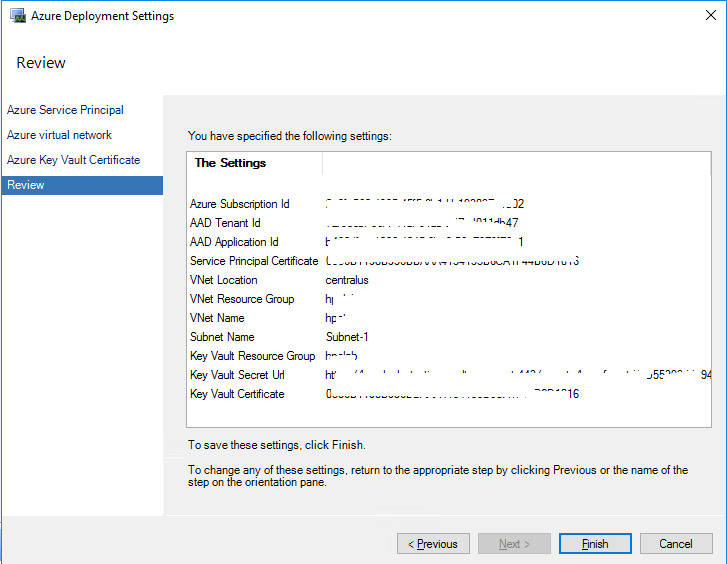
Going through this wizard, it will help you configure Azure Service Principal, the Azure Resource Group and VNet where your azure VM will be provisioned as well as a certificate to be used for cluster communication. The wizard will run as below:
Configure Azure Service Principal with powershell
After cluster deployment, connect by Remote Desktop to one head node.
Upload the certificate (PFX format with private key) to each head node and install to Cert:\LocalMachine\My. This certificate is used to create azure service principal. If you don't have a cert, you can create a self-signed one first.
Start Azure PowerShell as an administrator and run the following commands on one head node:
cd $env:CCP_HOME\bin

Connect-AzAccount
If your account is in more than one Azure Active Directory tenant or Azure subscription, you can run the following command to select the correct tenant and subscription:
Connect-AzAccount -TenantId <TenantId> -SubscriptionId <subscriptionId>Run the following script
.\ConfigARMAutoGrowShrinkCert.ps1 -DisplayName "YourServicePrincipalName" -CertificateThumbprint "XXXXXXXXXXXXXXXXXXXXXXXXXXXXXXX" -TenantId xxxxxxxx-xxxxx-xxxxx-xxxxx-xxxxxxxxxxxxwhere
DisplayName - The display name of the Azure Service Principal to be created, it is created in Azure Active Directory.
CertificateThumbprint - Thumbprint of the certificate you installed on the head node in Step 2.
TenantId - Tenant ID of your Azure Active Directory. You can get the Tenant ID from the Azure Active Directory portal Properties page.
For more details about ConfigARMAutoGrowShrinkCert.ps1, run
Get-Help .\ConfigARMAutoGrowShrinkCert.ps1 -Detailed.After configuration, you could check the registry key setting (including ApplicationId, TenantId, Thumbprint) through HPC Powershell command
Get-HpcClusterRegistry
Validating the configuration
After you successfully configured the azure Service Principal, you will be able to start and stop Azure IaaS VM nodes through HPC Pack.
If you are running HPC Pack 2016 Update 2 or later version, Azure IaaS VM nodes or Azure VM scale set nodes should be already in AzureIaaSNodes node group, you can perform Start or Stop action against them from the HPC Cluster Manager GUI. When the action is performed, you will see Dispatch Stop Azure VM Operation or Starting Azure Virtual Machines operation under the Operations --> AzureOperations view.
If you have VMs that are manually installed with HPC Pack Update 1 or earlier version on the Azure, by default, they are not in the AzureIaaSNodes node group as they are being treated as on-premises node. In this case, you need to perform Stop action against them which will make the service to put them into AzureIaaSNodes node group and then the service is able to grow and shrink them.
If you don't have any Azure IaaS VM nodes yet, you can follow Adding IaaS nodes to create an Azure IaaS node template and add IaaS VM nodes into the cluster.
Auto scaling of Azure PaaS nodes
Before you enable auto grow shrink Azure Windows PaaS nodes by HPC Pack Cluster, you should check your azure node template making sure that the azure PaaS nodes are configured to start and stop manually instead of time schedule based.
HPC Pack auto grow shrink service will not add new resources to the cluster. Thus, in any case after you create the azure PaaS node template, you need to add the nodes into the cluster first by:
- Launch HPC Cluster Manager, go to Resource management Pane
- Click Add Node... action from the action pane, from the wizard, choose "Add Windows Azure nodes"
- Going through the wizard, Click Finish, a number of nodes will be added into the cluster in Not-Deployed state
- Enable auto grow shrink using HPC Pack AutoGrowShrink cmdlet
Note
When HPC Pack grow resource for queued jobs, it will at most grow the number of nodes you added in step 3. It will not add more resources to the cluster. Thus, you can check your subscription capacity and add appropriate number of nodes into the cluster.
Auto scaling of Azure Batch pool
By default when you creating an Azure Batch pool template in HPC Pack we have a default auto scale formula defined for the pool. But you can also refer to this doc to define your own scale formula and the update in your batch node template.
HPC PowerShell commands to set cluster auto grow and shrink property
Following are sample HPC PowerShell commands to set AutoGrowShrink and to tune its behavior with additional parameters. See AutoGrowShrink parameters later in this article for the complete list of settings.
To run these commands, start HPC PowerShell on the cluster head node as an administrator.
To view the AutoGrowShrink current setting
Get-HpcClusterProperty –AutoGrowShrink
To enable the AutoGrowShrink property
Set-HpcClusterProperty –EnableGrowShrink 1
To disable the AutoGrowShrink property
Set-HpcClusterProperty –EnableGrowShrink 0
To change the grow interval in minutes
Set-HpcClusterProperty –GrowInterval <interval>
To change the shrink interval in minutes
Set-HpcClusterProperty –ShrinkInterval <interval>
To view the current configuration of AutoGrowShrink
Get-HpcClusterProperty –AutoGrowShrink
To exclude node groups from AutoGrowShrink
Set-HpcClusterProperty –ExcludeNodeGroups <group1,group2,group3>
Note
This parameter is supported starting in HPC Pack 2016
To grow only when the job is fully satisfied
Set-HpcClusterProperty –GrowOnlyFullySatisfied <$true|$false>
Note
This parameter is supported starting in HPC Pack 2019 Update 1
To keep a number of nodes in the idle node pool
Set-HpcClusterProperty -IdleNodePool <int>
Note
This parameter is supported starting in HPC Pack 2019 Update 1
AutoGrowShrink parameters
The following are AutoGrowShrink parameters that you can modify by using the Set-HpcClusterProperty command.
EnableGrowShrink - Switch to enable or disable the AutoGrowShrink property.
TasksPerResourceUnit - Number of tasks to grow one resource unit (based on job's resource unit type). The default is to grow one resource unit per task.
GrowThreshold - Threshold of jobs which have queued tasks to trigger automatic growth. The default is 1, which means that if there is 1 or more jobs which have queued tasks, automatically grow nodes.
GrowInterval - Interval in minutes to trigger automatic growth. The default interval is 5 minutes.
ShrinkInterval - Interval in minutes to trigger automatic shrinking. The default interval is 5 minutes.|
ShrinkIdleTimes - Number of continuous checks to shrink to indicate the nodes are idle. The default is 3 times. For example, if the ShrinkInterval is 5 minutes, HPC Pack checks whether the node is idle every 5 minutes. If the nodes are in the idle state for all the 3 continuous checks (15 minutes), then HPC Pack decides to shrink that node.
ExtraNodesGrowRatio - Additional percentage of nodes to grow for Message Passing Interface (MPI) jobs. The default value is 1, which means that HPC Pack grows nodes 1% for MPI jobs.
GrowByMin - Switch to indicate whether the autogrow policy is based on the minimum resources required for the job. The default is false, which means that HPC Pack grows nodes for jobs based on the maximum resources required for the jobs.
SoaJobGrowThreshold - Threshold of incoming SOA requests to trigger the automatic grow process. The default value is 50000.
Note
This parameter is supported starting in HPC Pack 2012 R2 Update 3.
SoaRequestsPerCore -Number of incoming SOA requests to grow one core. The default value is 20000.
Note
This parameter is supported starting in HPC Pack 2012 R2 Update 3.
ExcludeNodeGroups – Nodes in the specified node groups do not automatically grow and shrink.
Note
This parameter is supported starting in HPC Pack 2016.
GrowOnlyFullySatisfied – To grow only when the job is fully satisfied.
Note
This parameter is supported starting in HPC Pack 2019 Update 1.
IdleNodePool – To keep a number of nodes in the idle node pool.
Note
This parameter is supported starting in HPC Pack 2019 Update 1.
MPI example
By default HPC Pack grows 1% extra nodes for MPI jobs (ExtraNodesGrowRatio is set to 1). The reason is that MPI may require multiple nodes, and the job can only run when all nodes are ready. When Azure starts nodes, occasionally one node might need more time to start than others, causing other nodes to be idle while waiting for that node to get ready. By growing extra nodes, HPC Pack reduces this resource waiting time, and potentially saves costs. To increase the percentage of extra nodes for MPI jobs (for example, to 10%), run a command similar to
Set-HpcClusterProperty -ExtraNodesGrowRatio 10
SOA example
By default, SoaJobGrowThreshold is set to 50000 and SoaRequestsPerCore is set to 20000. If you submit one SOA job with 70000 requests, there is one queued task and incoming requests are 70000. In this case HPC Pack grows 1 core for the queued task, and for incoming requests, grows (70000 - 50000)/20000 = 1 core, so in total grows 2 cores for this SOA job.