Note
Access to this page requires authorization. You can try signing in or changing directories.
Access to this page requires authorization. You can try changing directories.
Important
Retirement of Azure Percept DK:
Update 22 February 2023: A firmware update for the Percept DK Vision and Audio accessory components (also known as Vision and Audio SOM) is now available here, and will enable the accessory components to continue functioning beyond the retirement date.
The Azure Percept public preview will be evolving to support new edge device platforms and developer experiences. As part of this evolution the Azure Percept DK and Audio Accessory and associated supporting Azure services for the Percept DK will be retired March 30th, 2023.
Effective March 30th, 2023, the Azure Percept DK and Audio Accessory will no longer be supported by any Azure services including Azure Percept Studio, OS updates, containers updates, view web stream, and Custom Vision integration. Microsoft will no longer provide customer success support and any associated supporting services. For more information, please visit the Retirement Notice Blog Post.
This guide will show you how to successfully update your dev kit's operating system and firmware over a USB connection. Here's an overview of what you will be doing during this procedure.
- Download the update package to a host computer
- Run the command that transfers the update package to the dev kit
- Set the dev kit into USB mode using SSH or DIP switches
- Connect the dev kit to the host computer via a USB-C cable
- Wait for the update to complete
Warning
Updating your dev kit over USB will delete all existing data on the device, including AI models and containers.
Follow all instructions in order. Skipping steps could put your dev kit in an unusable state.
Prerequisites
- An Azure Percept DK
- A Windows or Linux-based host computer with Wi-Fi capability and an available USB-C or USB-A port
- A USB-C to USB-A cable (optional, sold separately)
- An SSH login account, created during the Azure Percept DK setup experience
- A hex wrench, shipped with the dev kit, to remove the screws on the back of the dev kit (if using the DIP switch method)
Note
Mac users - Updating the Azure Percept DK over a USB connection will not work using a Mac as the host computer.
Download software tools and update files
NXP UUU tool. Download the Latest Release uuu.exe file (for Windows) or the uuu file (for Linux) under the Assets tab. UUU is a tool created by NXP used to update NXP dev boards.
Download the update files. They're all contained in a zip file that you'll extract in the next section.
Ensure all three build artifacts are present:
- Azure-Percept-DK-<version number>.raw
- fast-hab-fw.raw
- emmc_full.txt
Set up your environment
Create a folder/directory on the host computer in a location that is easy to access via command line.
Copy the UUU tool (uuu.exe or uuu) to the new folder.
Extract the previously downloaded update files to the new folder that contains the UUU tool.
Run the command that transfers the update package to the dev kit
Open a Windows command prompt (Start > cmd) or a Linux terminal and navigate to the folder where the update files and UUU tool are stored.
Enter the following command in the command prompt or terminal.
Windows:
uuu -b emmc_full.txt fast-hab-fw.raw Azure-Percept-DK-<version number>.rawLinux:
sudo ./uuu -b emmc_full.txt fast-hab-fw.raw Azure-Percept-DK-<version number>.raw
The command prompt window will display a message that says Waiting for Known USB Device to Appear... The UUU tool is now waiting for the dev kit to be detected by the host computer. Proceed to the next steps and put the dev kit into USB mode.
Set the dev kit into USB mode
There are two ways to set the dev kit into "USB mode," via SSH or by changing the DIP switches on the dev kit. Choose the method that works best for your situation.
Using SSH
SSH is the safest and preferred method for setting the dev kit into USB mode. However, it does require you can connect to the dev kit's wi-fi access point. If you're unable to connect to the dev kit's wi-fi access point, then you'll need to use the DIP switch method.
Connect the supplied USB-C cable to the dev kit's USB-C port and to the host computer's USB-C port. If your computer only has a USB-A port, connect a USB-C to USB-A cable (sold separately) to the dev kit and host computer.
Connect to your dev kit via SSH. If you need help to SSH, follow these instructions.
In the SSH terminal, enter the following commands:
Set the device to USB update mode:
sudo flagutil -wBfRequestUsbFlash -v1Reboot the device. The update installation will begin.
sudo reboot -f
Using the DIP switch method
Use the DIP switch method when you can't SSH into to the device.
Unplug the dev board if it's plugged into the power cable.
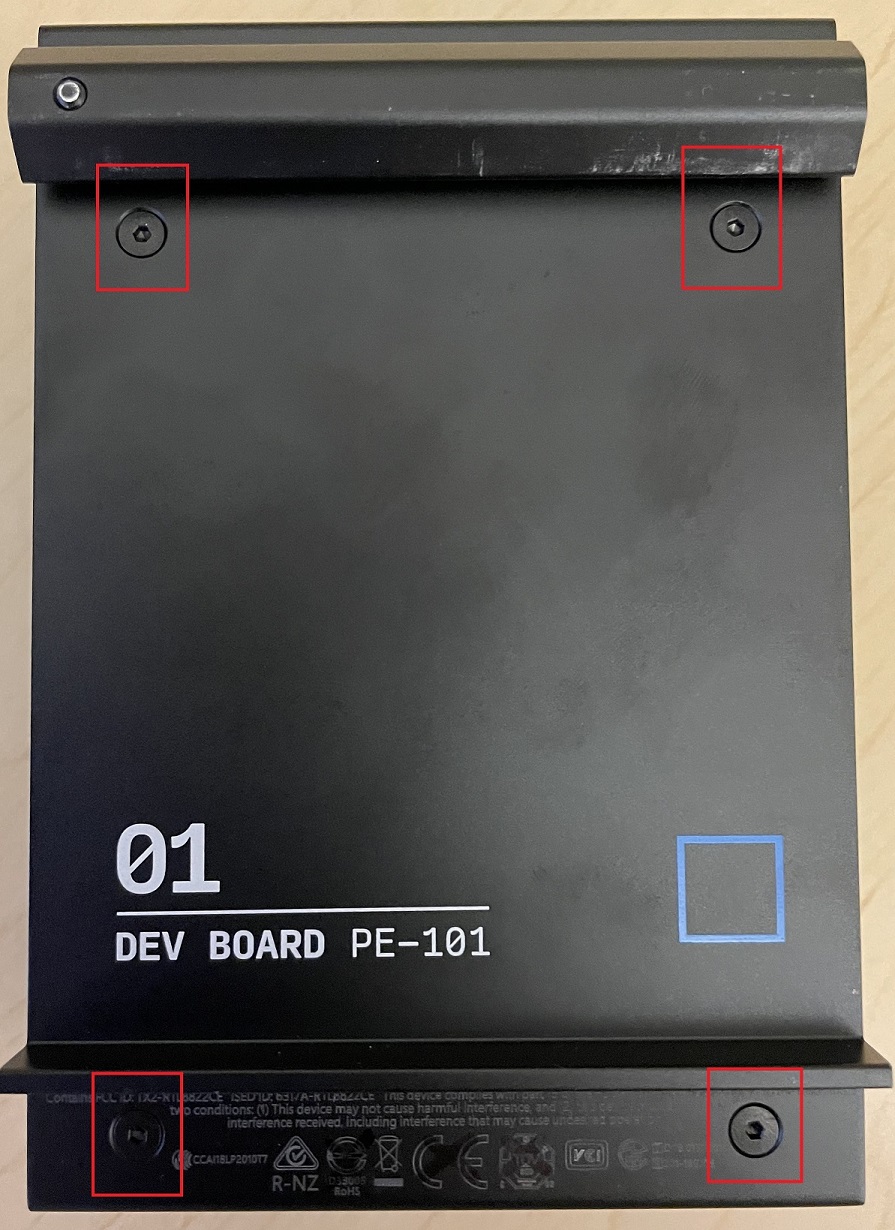
Remove the four screws on the back of the dev board using the hex wrench that was shipped with the dev kit.
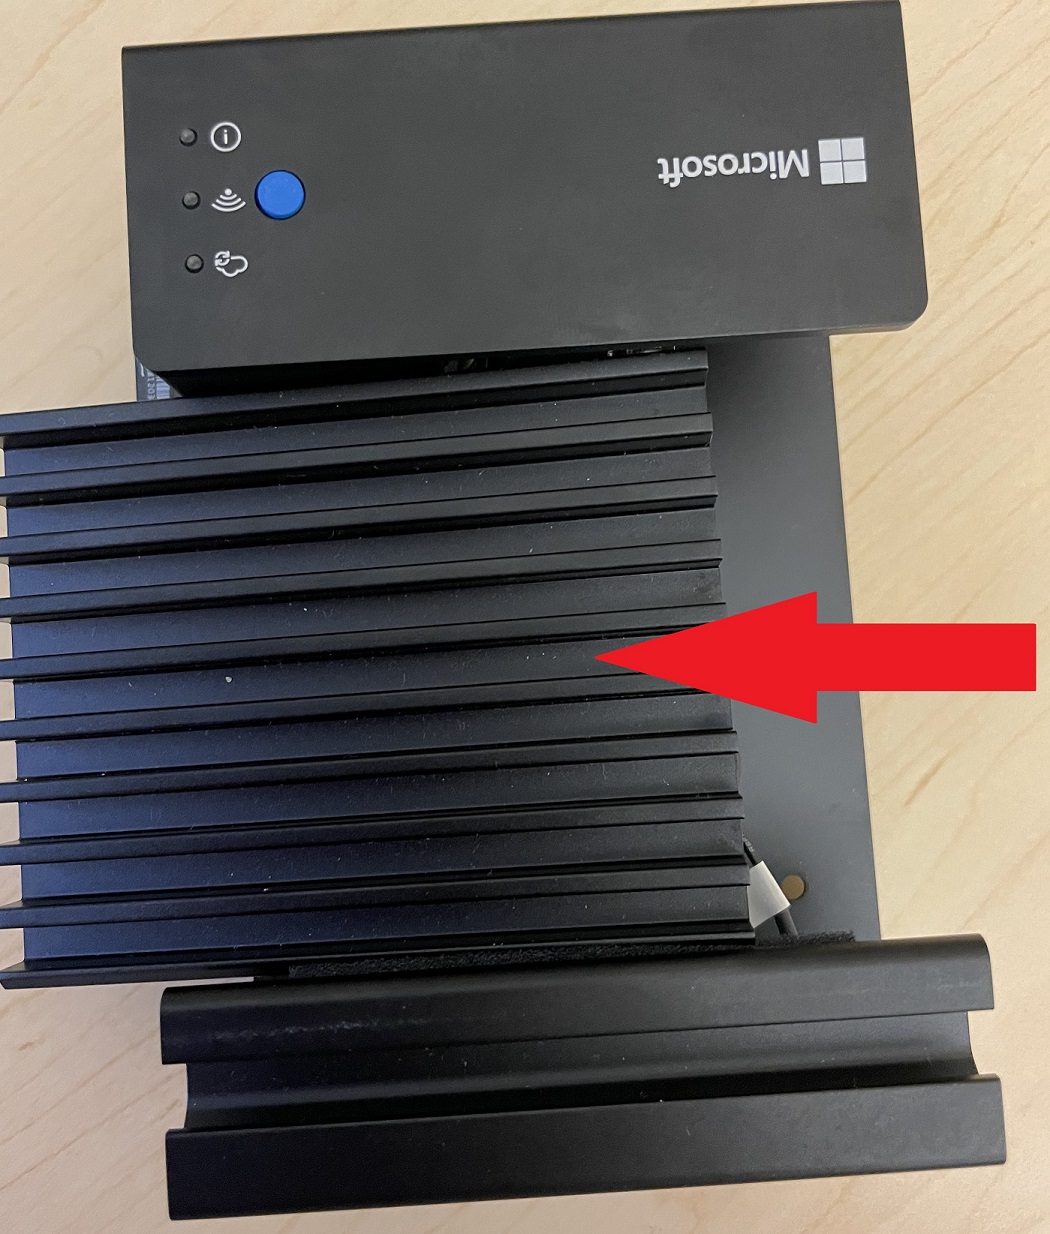
Gently slide the dev board in the direction of the LEDs. The heat sink will stay attached to the top of the dev board. Only slide the dev board 2 - 3 centimeters to avoid disconnecting any cables.
The DIP switches can be found on the corner of the board. There are four switches that each have two positions, up (1) or down (0). The default positions of the switches are up-down-down-up (1001). Using a paperclip or other fine-pointed instrument, change the positions of the switches to down-up-down-up (0101).

The dev kit is now in USB mode and you can continue with the next steps. Once the update is completed, change the DIP switches back to the default position of up-down-down-up (1001). Then slide the dev board back into position and reapply the four screws on the back.
Connect the dev kit to the host computer via a USB-C cable
This procedure uses the dev kit's single USB-C port for updating. If your computer has a USB-C port, you can use the USB-C to USB-C cable that came with the dev kit. If your computer only has a USB-A port, you'll need to use a USB-C to USB-A cable (sold separately).
- Connect the dev kit to the host computer using the appropriate USB-C cable.
- The host computer should now detect the dev kit as a USB device. If you successfully ran the command that transfers the update package to the dev kit and your command prompt says Waiting for Known USB Device to Appear...,** then the update should automatically start in about 10 seconds.
Wait for the update to complete
Navigate back to the other command prompt or terminal. When the update is finished, you'll see a message with
Success 1 Failure 0:Note
After updating, your device will be reset to factory settings and you will lose your Wi-Fi connection and SSH login.
Once the update is complete, power off the dev kit. Unplug the USB cable from the PC.
If you used the DIP switch method to put the dev kit into USB mode, be sure to put the DIP switches back to the default positions. Then slide the dev board back into position and reapply the four screws on the back.
Next steps
Work through the Azure Percept DK setup experience to reconfigure your device.