Connect a bot to Cortana
APPLIES TO: SDK v3
Important
The Cortana channel has been retired for third-party developers on September 7, 2020.
The Cortana skills kit for Consumer has been retired and it stopped accepting new bots on September 7, 2020. The Cortana skills kit for Enterprise is currently still available for TAP customers only. Learn more.
Cortana is a speech-enabled channel that can send and receive voice messages in addition to textual conversation. A bot intended to connect to Cortana should be designed for speech as well as text. A Cortana skill is a bot that can be invoked using a Cortana client. Publishing a bot adds the bot to the list of available skills.
To add the Cortana channel, open the bot in the Azure Portal, click the Channels blade, and then click Cortana.
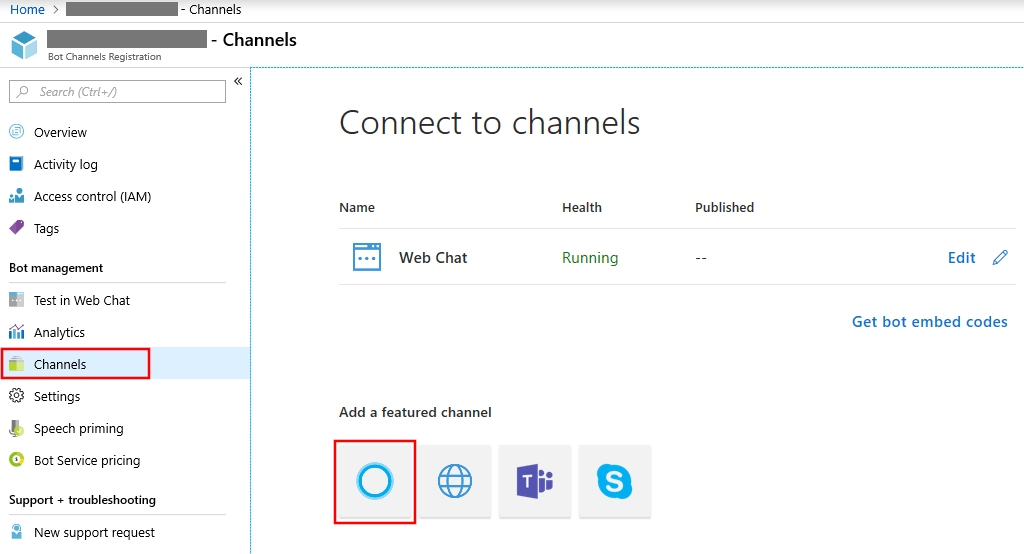
Configure Cortana
When connecting your bot with the Cortana channel, some basic information about your bot will be pre-filled into the registration form. Review this information carefully. This form consists of the following fields.
| Field | Description |
|---|---|
| Skill icon | An icon that is displayed in the Cortana canvas when your skill is invoked. This is also used where skills are discoverable (like the Microsoft store). (32KB max, PNG only). |
| Display name | The name of your Cortana skill is displayed to the user at the top of the visual UI. (30 character limit) |
| Invocation name | This is the name users say when invoking a skill. It should be no more than three words and easy to pronounce. See the Invocation Name Guidelines for more information on how to choose this name. |
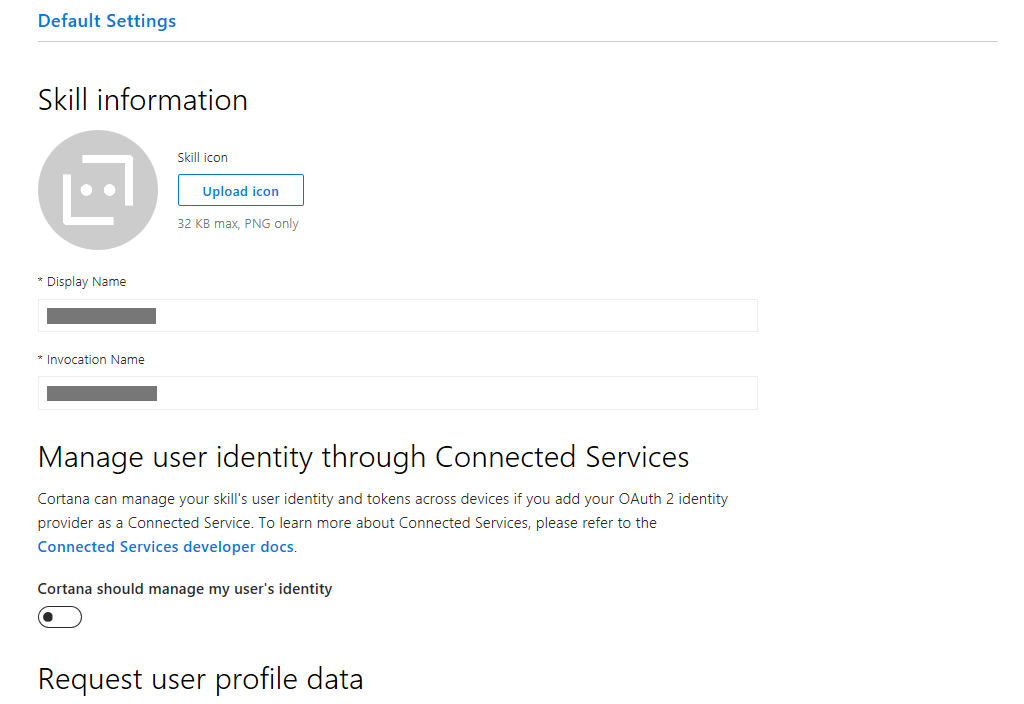
!NOTE: Cortana does not currently support the use of Azure Active Directory (AAD) Account authentication. You will need to use a Microsoft Account (MSA) to successfully publish your bot to Cortana.
General bot information
Under the Manage user identity through connected services section press the option to enable it. Fill in the form.
All fields marked with an asterisk (*) are required. A Bot must be published to Azure before it can be connected to Cortana.
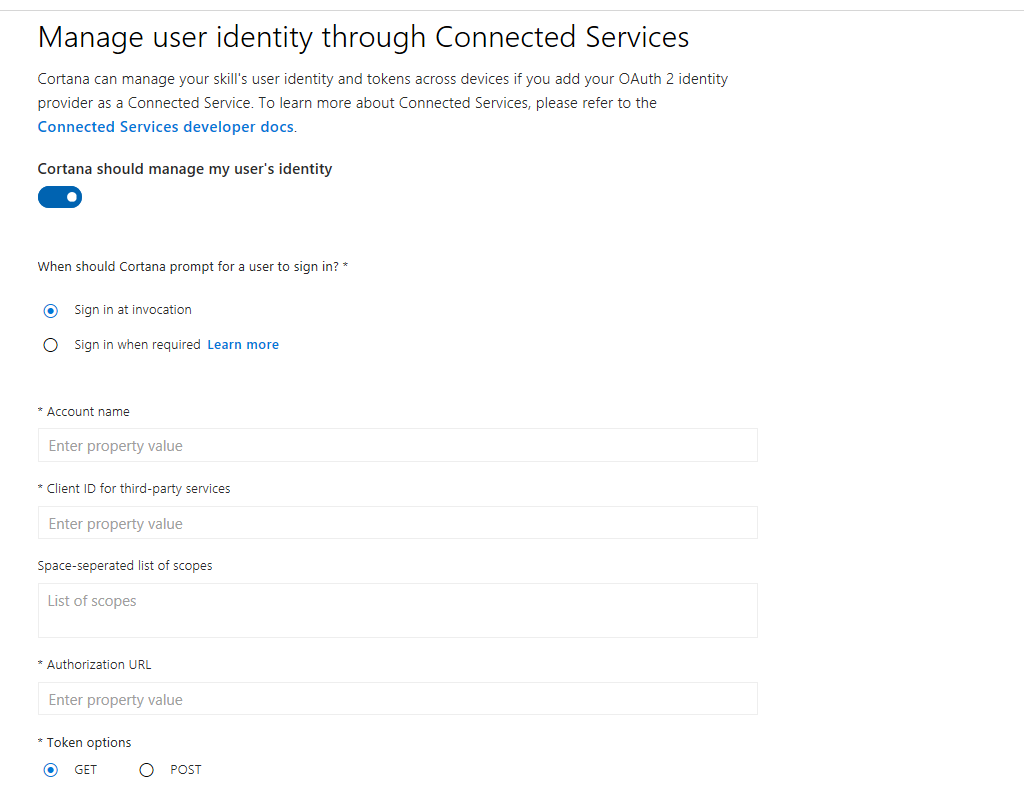

When should Cortana prompt for a user to sign in
Select Sign in at invocation if you want Cortana to sign in the user at the time they invoke your skill.
Select Sign in when required if you use a Bot Service sign-in card to sign in the user. Typically, you use this option if you want to sign in the user only if they will use a feature that requires authentication. When your skill sends a message that includes the sign-in card as an attachment, Cortana ignores the sign-in card and performs the authorization flow using the Connect Account settings.
Account name
The name of your skill that you want displayed when the user signs in to your skill.
Client ID for third-party services
Your bot's application ID. You received the ID when you registered your bot.
Space-separated list of scopes
Specify the scopes that the service requires (see the service's documentation).
Authorization URL
Set to https://login.microsoftonline.com/common/oauth2/v2.0/authorize.
Token options
Select POST.
Grant type
Select Authorization code to use the code grant flow, or select Implicit to use the implicit flow.
Token URL
For the Authorization code grant type, set to https://login.microsoftonline.com/common/oauth2/v2.0/token.
Client secret/password for third party services
The bot's password. You received the password when you registered your bot.
Client authentication scheme
Select HTTP Basic.
Internet access required to authenticate users
Leave this unchecked.
Request user profile data (optional)
Cortana provides access to several different types of user profile information, that you can use to customize the bot for the user. For example, if a skill has access to the user's name and location then the skill can have custom response such as "Hello Kamran, I hope you are having a pleasant day in Bellevue, Washington."
Click Add a user profile request, then select the user profile information you want from the drop-down list. Add a friendly name to use to access this information from your bot's code.
Deploy on Cortana
When you are done filling out the registration form for your Cortana skill, click Deploy on Cortana to complete the connection. This brings you back to your bot's Channels blade and you should see that it is now connected to Cortana.
At this point your bot is deployed as a Cortana skill to your account.
Next, you need to enable and authorize the Bot skill to connect to your account. In your Cortana app, say or type "ask Invocation Name" where the "Invocation Name" is what you configured in the Cortana Channel in the Azure portal. Cortana will then prompt you to allow your Bot Skill to connect. If you choose "Yes" to allow this, the skill will now work and show up in Cortana's skill list.