Note
Access to this page requires authorization. You can try signing in or changing directories.
Access to this page requires authorization. You can try changing directories.
APPLIES TO:  Azure Data Factory
  Azure Synapse Analytics
Tip
Try out Data Factory in Microsoft Fabric, an all-in-one analytics solution for enterprises. Microsoft Fabric covers everything from data movement to data science, real-time analytics, business intelligence, and reporting. Learn how to start a new trial for free!
Important
On January 1, 2026 you'll no longer be able to create new Airflow instances using ADF's Workflow Orchestration Manager. We recommend that you migrate all Workflow Orchestration Manager (Apache Airflow in Azure Data Factory) workloads to Apache Airflow jobs in Microsoft Fabric before December 31, 2025.
For more information or for support during your migration to Apache Airflow in Microsoft Fabric, contact Microsoft Support.
A python package is a way to organize related Python modules into a single directory hierarchy. A package is typically represented as a directory that contains a special file called __init__.py. Inside a package directory, you can have multiple Python module files (.py files) that define functions, classes, and variables. In the context of Workflow Orchestration Manager, you can create packages to add your custom code.
For illustration purpose, I create a simple custom operator as python package that can be imported as a module inside dags file.
Step 1: Develop a custom operator and a file to test it.
- Create a file
sample_operator.py
from airflow.models.baseoperator import BaseOperator


class SampleOperator(BaseOperator):
    def __init__(self, name: str, **kwargs) -> None:
        super().__init__(**kwargs)
        self.name = name

    def execute(self, context):
        message = f"Hello {self.name}"
        return message
To create Python package for this file, Refer to the guide: Creating a package in python
Create a dag file,
sample_dag.pyto test your operator defined in Step 1.
from datetime import datetime
from airflow import DAG

from airflow_operator.sample_operator import SampleOperator


with DAG(
   "test-custom-package",
   tags=["example"]
   description="A simple tutorial DAG",
   schedule_interval=None,
   start_date=datetime(2021, 1, 1),
) as dag:
    task = SampleOperator(task_id="sample-task", name="foo_bar")

    task
Step 2: Create a storage container.
Use the steps described in Manage blob containers using the Azure portal to create a storage account to upload dag and your package file.
Step 3: Upload the private package into your storage account.
- Navigate to the designated container where you intend to store your Airflow DAGs and Plugins files.
- Upload your private package file to the container. Common file formats include
zip,.whl, ortar.gz. Place the file within either the 'Dags' or 'Plugins' folder, as appropriate.
Step 4: Add your private package as a requirement.
Add your private package as a requirement in the requirements.txt file. Add this file if it doesn't already exist. For the Git-sync, you need to add all the requirements in the UI itself.
Blob Storage - Be sure to prepend the prefix "/opt/airflow/" to the package path. For instance, if your private package resides at "/dags/test/private.whl", your requirements.txt file should feature the requirement "/opt/airflow/dags/test/private.whl".
Git Sync - For all the Git services, prepend the "/opt/airflow/git/
<repoName>.git/" to the package path. For example, if your private package is in "/dags/test/private.whl" in a GitHub repo, then you should add the requirement "/opt/airflow/git/<repoName>.git/dags/test/private.whl" to the Airflow environment.ADO - For the ADO, prepend the "/opt/airflow/git/
<repoName>/" to the package path.
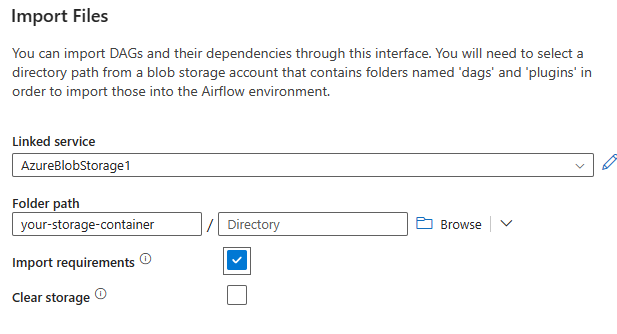
Step 5: Import your folder to an Airflow integrated runtime (IR) environment.
When performing the import of your folder into an Airflow IR environment, ensure that you check the import requirements checkbox to load your requirements inside your airflow env.