Note
Access to this page requires authorization. You can try signing in or changing directories.
Access to this page requires authorization. You can try changing directories.
This example is archived and out of support. It explained how to create a web API custom skill using Python and Visual Studio Code. The example used an Azure Function that implements the custom skill interface.
Prerequisites
Review the custom skill interface to review the inputs and outputs that a custom skill should implement.
Set up your environment. We followed Quickstart: Create a function in Azure with Python using Visual Studio Code to set up serverless Azure Function using Visual Studio Code and Python extensions. The quickstart leads you through installation of the following tools and components:
Create an Azure Function
This example uses an Azure Function to demonstrate the concept of hosting a web API, but other approaches are possible. As long as you meet the interface requirements for a cognitive skill, the approach you take is immaterial. Azure Functions, however, make it easy to create a custom skill.
Create a project for the function
The Azure Functions project template in Visual Studio Code creates a local project that can be published to a function app in Azure. A function app lets you group functions as a logical unit for management, deployment, and sharing of resources.
- In Visual Studio Code, press F1 to open the command palette. In the command palette, search for and select
Azure Functions: Create new project.... - Choose a directory location for your project workspace and choose Select. Don't use a project folder that is already part of another workspace.
- Select a language for your function app project. For this tutorial, select Python.
- Select the Python version (version 3.7.5 is supported by Azure Functions).
- Select a template for your project's first function. Select HTTP trigger to create an HTTP triggered function in the new function app.
- Provide a function name. In this case, let's use Concatenator
- Select Function as the Authorization level. You'll use a function access key to call the function's HTTP endpoint.
- Specify how you would like to open your project. For this step, select Add to workspace to create the function app in the current workspace.
Visual Studio Code creates the function app project in a new workspace. This project contains the host.json and local.settings.jsonconfiguration files, plus any language-specific project files.
A new HTTP triggered function is also created in the Concatenator folder of the function app project. Inside it there will be a file called "__init__.py", with this content:
import logging

import azure.functions as func


def main(req: func.HttpRequest) -> func.HttpResponse:
    logging.info('Python HTTP trigger function processed a request.')

    name = req.params.get('name')
    if not name:
        try:
            req_body = req.get_json()
        except ValueError:
            pass
        else:
            name = req_body.get('name')

    if name:
        return func.HttpResponse(f"Hello {name}!")
    else:
        return func.HttpResponse(
             "Please pass a name on the query string or in the request body",
             status_code=400
        )
Now let's modify that code to follow the custom skill interface. Replace the default code with the following content:
import logging
import azure.functions as func
import json

def main(req: func.HttpRequest) -> func.HttpResponse:
    logging.info('Python HTTP trigger function processed a request.')

    try:
        body = json.dumps(req.get_json())
    except ValueError:
        return func.HttpResponse(
             "Invalid body",
             status_code=400
        )

    if body:
        result = compose_response(body)
        return func.HttpResponse(result, mimetype="application/json")
    else:
        return func.HttpResponse(
             "Invalid body",
             status_code=400
        )


def compose_response(json_data):
    values = json.loads(json_data)['values']

    # Prepare the Output before the loop
    results = {}
    results["values"] = []

    for value in values:
        output_record = transform_value(value)
        if output_record != None:
            results["values"].append(output_record)
    return json.dumps(results, ensure_ascii=False)

## Perform an operation on a record
def transform_value(value):
    try:
        recordId = value['recordId']
    except AssertionError  as error:
        return None

    # Validate the inputs
    try:
        assert ('data' in value), "'data' field is required."
        data = value['data']
        assert ('text1' in data), "'text1' field is required in 'data' object."
        assert ('text2' in data), "'text2' field is required in 'data' object."
    except AssertionError  as error:
        return (
            {
            "recordId": recordId,
            "errors": [ { "message": "Error:" + error.args[0] }   ]
            })

    try:
        concatenated_string = value['data']['text1'] + " " + value['data']['text2']
        # Here you could do something more interesting with the inputs

    except:
        return (
            {
            "recordId": recordId,
            "errors": [ { "message": "Could not complete operation for record." }   ]
            })

    return ({
            "recordId": recordId,
            "data": {
                "text": concatenated_string
                    }
            })
The transform_value method performs an operation on a single record. You can modify the method to meet your specific needs. Remember to do any necessary input validation and to return any errors and warnings if the operation can't be completed.
Debug your code locally
Visual Studio Code makes it easy to debug the code. Press 'F5' or go to the Debug menu and select Start Debugging.
You can set any breakpoints on the code by hitting 'F9' on the line of interest.
Once you started debugging, your function will run locally. You can use a tool like Postman or Fiddler to issue the request to localhost. Note the location of your local endpoint on the Terminal window.
Create a function app in Azure
When you're satisfied with the function behavior, you can publish it. So far you've been working locally. In this section, you'll create a function app in Azure and then deploy the local project to the app you created.
Create the app from Visual Studio Code
In Visual Studio Code, press F1 to open the command palette. In the command palette, search for and select Create Function App in Azure.
If you have multiple active subscriptions, select the subscription for this app.
Enter a globally unique name for the function app. Type a name that is valid for a URL.
Select a runtime stack and choose the language version on which you've been running locally.
Select a location for your app. If possible, choose the same region that also hosts your search service.
It takes a few minutes to create the app. When it's ready, you'll see the new app under Resources and Function App of the active subscription.
Deploy to Azure
Still in Visual Studio Code, press F1 to open the command palette. In the command palette, search for and select Deploy to Function App....
Select the function app you created.
Confirm that you want to continue, and then select Deploy. You can monitor the deployment status in the output window.
Switch to the Azure portal, navigate to All Resources. Search for the function app you deployed using the globally unique name you provided in a previous step.
Tip
You can also right-click the function app in Visual Studio Code and select Open in Portal.
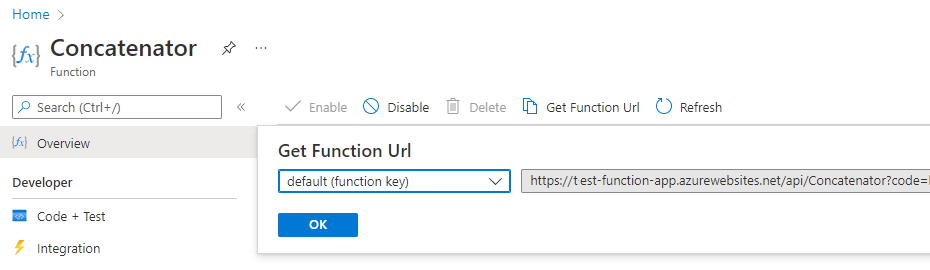
In the portal, on the left, select Functions, and then select the function you created.
In the function's overview page, select Get Function URL in the command bar the top. This will allow you to copy the URL to call the function.
Test the function in Azure
Using the default host key and URL that you copied, test your function from within Azure portal.
On the left, under Developer, select Code + Test.
Select Test/Run in the command bar.
For input, use Post, the default key, and then paste in the request body:
{
    "values": [
        {
            "recordId": "e1",
            "data":
            {
                "text1":  "Hello",
                "text2":  "World"
            }
        },
        {
            "recordId": "e2",
            "data": "This is an invalid input"
        }
    ]
}
Select Run.
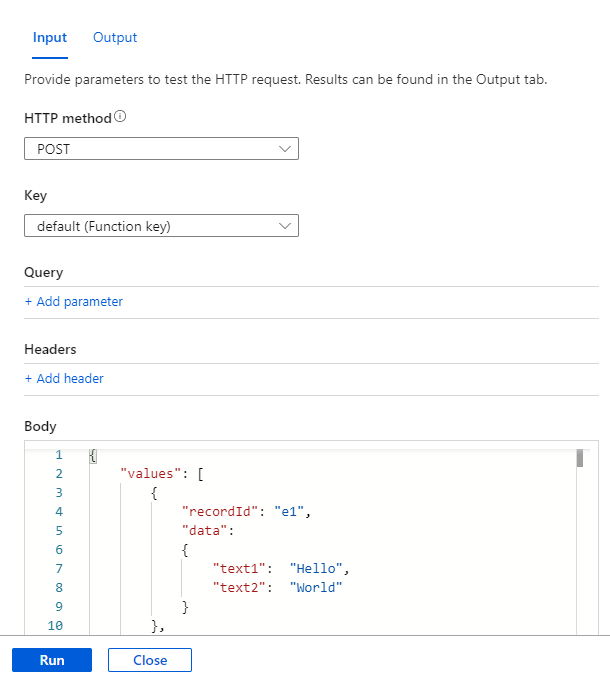
This example should produce the same result you saw previously when running the function in the local environment.
Add to a skillset
Now that you have a new custom skill, you can add it to your skillset. The example below shows you how to call the skill to concatenate the Title and the Author of the document into a single field, which we call merged_title_author.
Replace [your-function-url-here] with the URL of your new Azure Function.
{
    "skills": [
      "[... other existing skills in the skillset are here]",
      {
        "@odata.type": "#Microsoft.Skills.Custom.WebApiSkill",
        "description": "Our new search custom skill",
        "uri": "https://[your-function-url-here]",
          "context": "/document/merged_content/organizations/*",
          "inputs": [
            {
              "name": "text1",
              "source": "/document/metadata_title"
            },
            {
              "name": "text2",
              "source": "/document/metadata_author"
            },
          ],
          "outputs": [
            {
              "name": "text",
              "targetName": "merged_title_author"
            }
          ]
      }
  ]
}
Remember to add an "outputFieldMapping" in the indexer definition to send "merged_title_author" to a "fullname" field in the search index.
"outputFieldMappings": [
    {
        "sourceFieldName": "/document/content/merged_title_author",
        "targetFieldName": "fullname"
    }
]