How to configure an availability set for Windows virtual machines in the classic deployment model
Important
Classic VMs will be retired on March 1, 2023.
If you use IaaS resources from ASM, please complete your migration by March 1, 2023. We encourage you to make the switch sooner to take advantage of the many feature enhancements in Azure Resource Manager.
For more information, see Migrate your IaaS resources to Azure Resource Manager by March 1, 2023.
Note
Azure has two different deployment models for creating and working with resources: Resource Manager and Classic. This article covers using the Classic deployment model. Microsoft recommends that most new deployments use the Resource Manager model. You can also configure availability sets in Resource Manager deployments.
Starting November 15, 2017, virtual machines will be available only in the Azure portal.
An availability set helps keep your virtual machines available during downtime, such as during maintenance. Placing two or more similarly configured virtual machines in an availability set creates the redundancy needed to maintain availability of the applications or services that your virtual machine runs. For details about how this works, see Manage the availability of virtual machines.
It's a best practice to use both availability sets and load-balancing endpoints to help ensure that your application is always available and running efficiently. For details about load-balanced endpoints, see Load balancing for Azure infrastructure services.
You can add classic virtual machines into an availability set by using one of two options:
- Option 1: Create a virtual machine and an availability set at the same time. Then, add new virtual machines to the set when you create those virtual machines.
- Option 2: Add an existing virtual machine to an availability set.
Note
In the classic model, virtual machines that you want to put in the same availability set must belong to the same cloud service.
You can use either the Azure portal or Azure PowerShell commands to do this.
To use the Azure portal:
If you haven't already done so, sign in to the Azure portal.
Click Create a resource > Compute.
Select the Marketplace virtual machine image you wish to use. You can choose to create a Linux or Windows virtual machine.
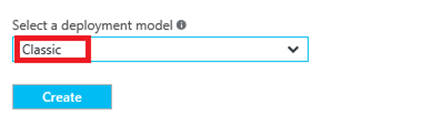
For the selected virtual machine, verify that the deployment model is set to Classic and then click Create
Enter a virtual machine name, user name and password (for Windows machines) or SSH public key (for Linux machines).
Choose the VM size and then click Select to continue.
Choose Optional Configuration > Availability set, and select the availability set you wish to add the virtual machine to.

Review your configuration settings. When you're done, click Create.
While Azure creates your virtual machine, you can track the progress under Virtual Machines in the hub menu.
To use Azure PowerShell commands to create an Azure virtual machine and add it to a new or existing availability set, see Use Azure PowerShell to create and preconfigure Windows-based virtual machines
In the Azure portal, you can add existing classic virtual machines to an existing availability set or create a new one for them. (Keep in mind that the virtual machines in the same availability set must belong to the same cloud service.) The steps are almost the same. With Azure PowerShell, you can add the virtual machine to an existing availability set.
If you have not already done so, sign in to the Azure portal.
On the left menu, click Virtual Machines (classic).
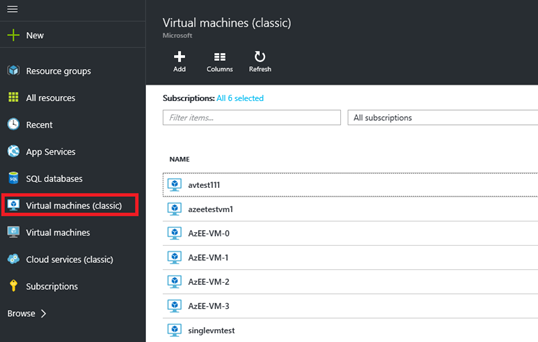
From the list of virtual machines, select the name of the virtual machine that you want to add to the set.
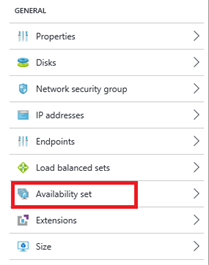
Choose Availability set from the virtual machine Settings.
Select the availability set you wish to add the virtual machine to. The virtual machine must belong to the same cloud service as the availability set.
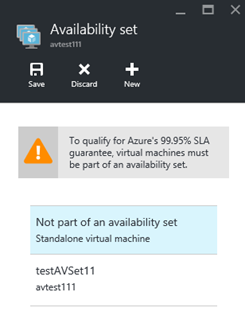
Click Save.
To use Azure PowerShell commands, open an administrator-level Azure PowerShell session and run the following command. For the placeholders (such as <VmCloudServiceName>), replace everything within the quotes, including the < and > characters, with the correct names.
Get-AzureVM -ServiceName "<VmCloudServiceName>" -Name "<VmName>" | Set-AzureAvailabilitySet -AvailabilitySetName "<AvSetName>" | Update-AzureVM
Note
The virtual machine might have to be restarted to finish adding it to the availability set.