Configure an external listener for availability Groups on Azure SQL Server VMs
This topic shows you how to configure a listener for an Always On Availability Group that is externally accessible on the internet. This is made possible by associating the cloud service's public Virtual IP (VIP) address with the listener.
Important
Azure has two different deployment models for creating and working with resources: Resource Manager and Classic. This article covers using the Classic deployment model. Microsoft recommends that most new deployments use the Resource Manager model.
Your Availability Group can contain replicas that are on-premises only, Azure only, or span both on-premises and Azure for hybrid configurations. Azure replicas can reside within the same region or across multiple regions using multiple virtual networks (VNets). The steps below assume you have already configured an availability group but have not configured a listener.
Guidelines and limitations for external listeners
Note the following guidelines about the availability group listener in Azure when you are deploying using the cloud service public VIP address:
- The availability group listener is supported on Windows Server 2008 R2, Windows Server 2012, and Windows Server 2012 R2.
- The client application must reside on a different cloud service than the one that contains your availability group VMs. Azure does not support direct server return with client and server in the same cloud service.
- By default, the steps in this article show how to configure one listener to use the cloud service Virtual IP (VIP) address. However, it is possible to reserve and create multiple VIP addresses for your cloud service. This enables you to use the steps in this article to create multiple listeners that are each associated with a different VIP. For information on how to create multiple VIP addresses, see Multiple VIPs per cloud service.
- If you are creating a listener for a hybrid environment, the on-premises network must have connectivity to the public Internet in addition to the site-to-site VPN with the Azure virtual network. When in the Azure subnet, the availability group listener is reachable only by the public IP address of the respective cloud service.
- It is not supported to create an external listener in the same cloud service where you also have an internal listener using the Internal Load Balancer (ILB).
Determine the accessibility of the listener
It is important to realize that there are two ways to configure an availability group listener in Azure. The ways differ in the type of Azure load balancer you use when you create the listener. The following table describes the differences:
| Load balancer type | Implementation | Use when: |
|---|---|---|
| External | Uses the public virtual IP address of the cloud service that hosts the virtual machines (VMs). | You need to access the listener from outside the virtual network, including from the Internet. |
| Internal | Uses an internal load balancer with a private address for the listener. | You can access the listener only from within the same virtual network. This access includes site-to-site VPN in hybrid scenarios. |
Important
For a listener that uses the cloud service's public VIP (external load balancer), as long as the client, listener, and databases are in the same Azure region, you will not incur egress charges. Otherwise, any data returned through the listener is considered egress, and it is charged at normal data-transfer rates.
An ILB can be configured only on virtual networks with a regional scope. Existing virtual networks that have been configured for an affinity group cannot use an ILB. For more information, see Internal load balancer overview.
This article focuses on creating a listener that uses external load balancing. If you want a listener that is private to your virtual network, see the version of this article that provides steps for setting up an listener with ILB
Create load-balanced VM endpoints with direct server return
External load balancing uses the virtual the public Virtual IP address of the cloud service that hosts your VMs. So you do not need to create or configure the load balancer in this case.
You must create a load-balanced endpoint for each VM hosting an Azure replica. If you have replicas in multiple regions, each replica for that region must be in the same cloud service in the same VNet. Creating Availability Group replicas that span multiple Azure regions requires configuring multiple VNets. For more information on configuring cross VNet connectivity, see Configure VNet to VNet Connectivity.
In the Azure portal, navigate to each VM hosting a replica and view the details.
Click the Endpoints tab for each of the VMs.
Verify that the Name and Public Port of the listener endpoint you want to use is not already in use. In the example below, the name is “MyEndpoint” and the port is “1433”.
On your local client, download and install the latest PowerShell module.
Launch Azure PowerShell. A new PowerShell session is opened with the Azure administrative modules loaded.
Run Get-AzurePublishSettingsFile. This cmdlet directs you to a browser to download a publish settings file to a local directory. You may be prompted for your log-in credentials for your Azure subscription.
Run the Import-AzurePublishSettingsFile command with the path of the publish settings file that you downloaded:
Import-AzurePublishSettingsFile -PublishSettingsFile <PublishSettingsFilePath>Once the publish settings file is imported, you can manage your Azure subscription in the PowerShell session.
Copy the PowerShell script below into a text editor and set the variable values to suit your environment (defaults have been provided for some parameters). Note that if your availability group spans Azure regions, you must run the script once in each datacenter for the cloud service and nodes that reside in that datacenter.
# Define variables
$ServiceName = "<MyCloudService>" # the name of the cloud service that contains the availability group nodes
$AGNodes = "<VM1>","<VM2>","<VM3>" # all availability group nodes containing replicas in the same cloud service, separated by commas

# Configure a load balanced endpoint for each node in $AGNodes, with direct server return enabled
ForEach ($node in $AGNodes)
{
    Get-AzureVM -ServiceName $ServiceName -Name $node | Add-AzureEndpoint -Name "ListenerEndpoint" -Protocol "TCP" -PublicPort 1433 -LocalPort 1433 -LBSetName "ListenerEndpointLB" -ProbePort 59999 -ProbeProtocol "TCP" -DirectServerReturn $true | Update-AzureVM
}
Once you have set the variables, copy the script from the text editor into your Azure PowerShell session to run it. If the prompt still shows >>, type ENTER again to make sure the script starts running.
Verify that KB2854082 is installed if necessary
Next, if any servers on the cluster are running Windows Server 2008 R2 or Windows Server 2012, you must verify that the hotfix KB2854082 is installed on each of the on-premises servers or Azure VMs that are part of the cluster. Any server or VM that is in the cluster, but not in the availability group, should also have this hotfix installed.
In the remote desktop session for each of the cluster nodes, download KB2854082 to a local directory. Then, install the hotfix on each cluster node sequentially. If the cluster service is currently running on the cluster node, the server is restarted at the end of the hotfix installation.
Warning
Stopping the cluster service or restarting the server affects the quorum health of your cluster and the availability group, and it might cause your cluster to go offline. To maintain the high availability of your cluster during installation, make sure that:
- The cluster is in optimal quorum health.
- Before you install the hotfix on any node, all cluster nodes are online.
- Before you install the hotfix on any other node in the cluster, allow the hotfix installation to run to completion on one node, including fully restarting the server.
Open the firewall ports in availability group nodes
In this step, you create a firewall rule to open the probe port for the load-balanced endpoint (59999, as specified earlier) and another rule to open the availability group listener port. Because you created the load-balanced endpoint on the VMs that contain availability group replicas, you need to open the probe port and the listener port on the respective VMs.
On VMs that host replicas, start Windows Firewall with Advanced Security.
Right-click Inbound Rules, and then click New Rule.
On the Rule Type page, select Port, and then click Next.
On the Protocol and Ports page, select TCP, type 59999 in the Specific local ports box, and then click Next.
On the Action page, keep Allow the connection selected, and then click Next.
On the Profile page, accept the default settings, and then click Next.
On the Name page, in the Name text box, specify a rule name, such as Always On Listener Probe Port, and then click Finish.
Repeat the preceding steps for the availability group listener port (as specified earlier in the $EndpointPort parameter of the script), and then specify an appropriate rule name, such as Always On Listener Port.
Create the availability group listener
Create the availability group listener in two steps. First, create the client access point cluster resource and configure dependencies. Second, configure the cluster resources with PowerShell.
Create the client access point and configure the cluster dependencies
In this step, you manually create the availability group listener in Failover Cluster Manager and SQL Server Management Studio.
Open Failover Cluster Manager from the node that hosts the primary replica.
Select the Networks node, and then note the cluster network name. This name is used in the $ClusterNetworkName variable in the PowerShell script.
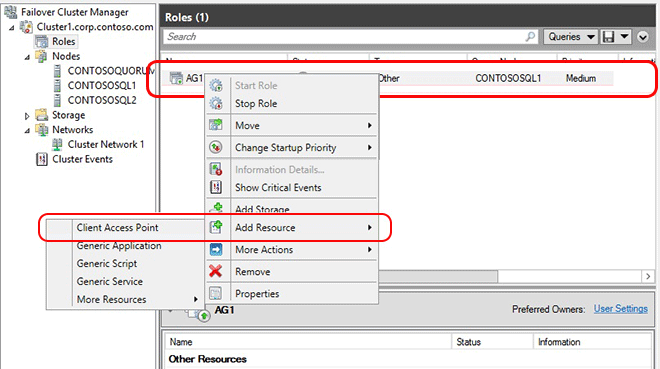
Expand the cluster name, and then click Roles.
In the Roles pane, right-click the availability group name, and then select Add Resource > Client Access Point.

In the Name box, create a name for this new listener, click Next twice, and then click Finish.
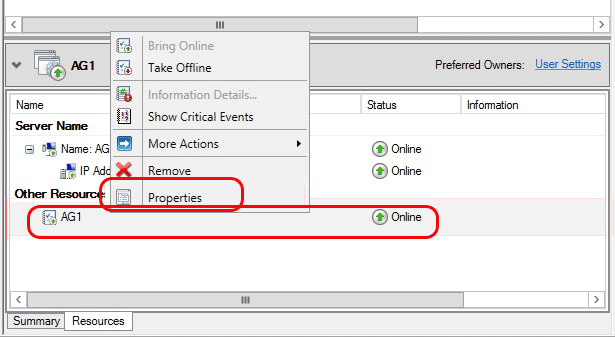
Do not bring the listener or resource online at this point.Click the Resources tab, and then expand the client access point you just created. The IP address resource for each cluster network in your cluster is displayed. If this is an Azure-only solution, only one IP address resource is displayed.
Do either of the following:
To configure a hybrid solution:
a. Right-click the IP address resource that corresponds to your on-premises subnet, and then select Properties. Note the IP address name and network name.
b. Select Static IP Address, assign an unused IP address, and then click OK.
To configure an Azure-only solution:
a. Right-click the IP address resource that corresponds to your Azure subnet, and then select Properties.
Note
If the listener later fails to come online because of a conflicting IP address selected by DHCP, you can configure a valid static IP address in this properties window.
b. In the same IP Address properties window, change the IP Address Name.
This name is used in the $IPResourceName variable of the PowerShell script. If your solution spans multiple Azure virtual networks, repeat this step for each IP resource.
Configure the cluster resources in PowerShell
For external load balancing, you must obtain the public virtual IP address of the cloud service that contains your replicas. Log into the Azure portal. Navigate to the cloud service that contains your availability group VM. Open the Dashboard view.
Note the address shown under Public Virtual IP (VIP) Address. If your solution spans VNets, repeat this step for each cloud service that contains a VM that hosts a replica.
On one of the VMs, copy the PowerShell script below into a text editor and set the variables to the values you noted earlier.
# Define variables
$ClusterNetworkName = "<ClusterNetworkName>" # the cluster network name (Use Get-ClusterNetwork on Windows Server 2012 of higher to find the name)
$IPResourceName = "<IPResourceName>" # the IP Address resource name
$CloudServiceIP = "<X.X.X.X>" # Public Virtual IP (VIP) address of your cloud service

Import-Module FailoverClusters

# If you are using Windows Server 2012 or higher, use the Get-Cluster Resource command. If you are using Windows Server 2008 R2, use the cluster res command. Both commands are commented out. Choose the one applicable to your environment and remove the # at the beginning of the line to convert the comment to an executable line of code.

# Get-ClusterResource $IPResourceName | Set-ClusterParameter -Multiple @{"Address"="$CloudServiceIP";"ProbePort"="59999";"SubnetMask"="255.255.255.255";"Network"="$ClusterNetworkName";"OverrideAddressMatch"=1;"EnableDhcp"=0}
# cluster res $IPResourceName /priv enabledhcp=0 overrideaddressmatch=1 address=$CloudServiceIP probeport=59999  subnetmask=255.255.255.255
Once you have set the variables, open an elevated Windows PowerShell window, then copy the script from the text editor and paste into your Azure PowerShell session to run it. If the prompt still shows >>, type ENTER again to make sure the script starts running.
Repeat this on each VM. This script configures the IP Address resource with the IP address of the cloud service and sets other parameters like the probe port. When the IP Address resource is brought online, it can then respond to the polling on the probe port from the load-balanced endpoint created earlier in this tutorial.
Bring the listener online
In Failover Cluster Manager, expand Roles, and then highlight your availability group.
On the Resources tab, right-click the listener name, and then click Properties.
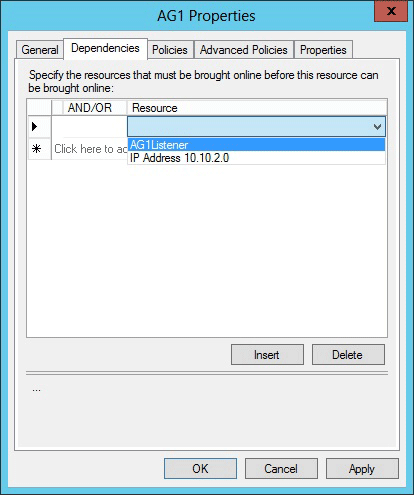
Click the Dependencies tab. If multiple resources are listed, verify that the IP addresses have OR, not AND, dependencies.
Click OK.
Right-click the listener name, and then click Bring Online.
After the listener is online, on the Resources tab, right-click the availability group, and then click Properties.

Create a dependency on the listener name resource (not the IP address resources name), and then click OK.

Start SQL Server Management Studio, and then connect to the primary replica.
Go to AlwaysOn High Availability > Availability Groups > <AvailabilityGroupName> > Availability Group Listeners.
The listener name that you created in Failover Cluster Manager should be displayed.Right-click the listener name, and then click Properties.
In the Port box, specify the port number for the availability group listener by using the $EndpointPort that you used earlier (in this tutorial, 1433 was the default), and then click OK.
Follow-up items
After you create the availability group listener, it might be necessary to adjust the RegisterAllProvidersIP and HostRecordTTL cluster parameters for the listener resource. These parameters can reduce reconnection time after a failover, which might prevent connection timeouts. For more information about these parameters, as well as sample code, see Create or configure an availability group listener.
Test the availability group listener (within the same VNet)
In this step, you test the availability group listener by using a client application that's running on the same network.
Client connectivity has the following requirements:
- Client connections to the listener must come from machines that reside in a different cloud service than the one that hosts the Always On availability replicas.
- If the Always On replicas are in different subnets, clients must specify MultisubnetFailover=True in the connection string. This condition results in parallel connection attempts to replicas in the various subnets. This scenario includes a cross-region Always On availability group deployment.
One example is to connect to the listener from one of the VMs in the same Azure virtual network (but not one that hosts a replica). An easy way to complete this test is to try to connect SQL Server Management Studio to the availability group listener. Another simple method is to run SQLCMD.exe, as follows:
sqlcmd -S "<ListenerName>,<EndpointPort>" -d "<DatabaseName>" -Q "select @@servername, db_name()" -l 15
Note
If the EndpointPort value is 1433, you are not required to specify it in the call. The previous call also assumes that the client machine is joined to the same domain and that the caller has been granted permissions on the database by using Windows authentication.
When you test the listener, be sure to fail over the availability group to make sure that clients can connect to the listener across failovers.
Test the availability group listener (over the internet)
In order to access the listener from outside the virtual network, you must be using external/public load balancing (described in this topic) rather than ILB, which is only accessible within the same VNet. In the connection string, you specify the cloud service name. For example, if you had a cloud service with the name mycloudservice, the sqlcmd statement would be as follows:
sqlcmd -S "mycloudservice.cloudapp.net,<EndpointPort>" -d "<DatabaseName>" -U "<LoginId>" -P "<Password>" -Q "select @@servername, db_name()" -l 15
Unlike the previous example, SQL authentication must be used, because the caller cannot use windows authentication over the internet. For more information, see Always On Availability Group in Azure VM: Client Connectivity Scenarios. When using SQL authentication, make sure that you create the same login on both replicas. For more information about troubleshooting logins with Availability Groups, see How to map logins or use contained SQL database user to connect to other replicas and map to availability databases.
If the Always On replicas are in different subnets, clients must specify MultisubnetFailover=True in the connection string. This results in parallel connection attempts to replicas in the different subnets. Note that this scenario includes a cross-region Always On Availability Group deployment.
Next steps
In addition to automatically connecting clients to the primary replica, a listener can be used to redirect read-only workloads to the secondaries. This use can improve the performance and scalability of your overall solution. For more information, see Use ReadIntent Routing with Azure Always On availability group listener.
Note
For troubleshooting tips on Azure listeners, see Troubleshooting availability group listener in Azure in the AlwaysOn Support Team blog.
For more information about using SQL Server in Azure, see SQL Server on Azure virtual machines.