Windows Workflow Foundation integration with Windows Communication Foundation
Jon Flanders, Pluralsight
May 2008
Windows Workflow Foundation (WF) is a programming model, set of tools, and runtime environment which allows you to write declarative and reactive programs on the Windows platform. WF is part of the .NET Runtime, and first appeared in .NET 3.0.
Windows Communication Foundation (WCF) is also a programming model, set of tools, and a runtime that first appeared in .NET 3.0. It is a framework for building applications that can communicate with each other over varied network protocols. It centers on the idea of building services as loosely coupled endpoints to add functionality and value to your applications.
Although WCF and WF both shipped in .NET 3.0, in their initial releases there wasn’t an out-of-the-box way to integrate the two technologies. There weren’t any built-in Activities in WF to communicate using WCF, and there weren’t any facilities built into either WCF or WF to allow WF workflows to easily implement WCF services. With the release of .NET 3.5 and Visual Studio 2008 however, the runtimes have been melded together to allow easy integration, including allowing WF instances to use WCF to communicate to remote endpoints, as well as to allowing WF instances to become the service implementation for WCF endpoints. This is accomplished by two new Activities: ReceiveActivity and SendActivity, as well as a new hosting infrastructure for service endpoints. In this article I’ll look at both sides of this integration to give you an overview of how to use it in your WF/WCF applications.
Communicating using WCF
The new .NET 3.5 SendActivity enables a workflow instance to easily communicate with a service endpoint using WCF. It basically puts the workflow instance in the role of being a WCF client.
The way to use the SendActivity is similar to the way WCF is used from any .NET application. The first step is to use the “Add Service Reference” functionality built into Visual Studio 2008 to generate a client proxy and configuration (this could also be done with the WCF svcutil.exe utility). Once the proxy and configuration are added to the workflow project, the SendActivity may be configured to use the particular endpoint, and at runtime, the SendActivity will use WCF to communicate with the endpoint.
In Visual Studio 2008, when in a workflow project (for this example I created a new “Sequential Workflow Console Application,” but any project type may be used), right click on the project node, and select “Add Service Reference”. See Figure 1.
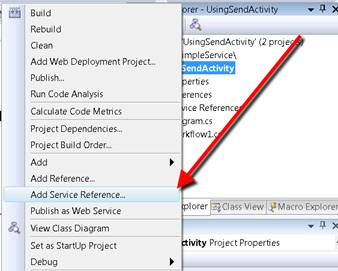
Figure 1: Add Service Reference context menu
This will cause the “Add Service Reference” dialog to appear. In this dialog, I put in the address of the service metadata I want to use to generate my proxy and configuration. See Figure 2.

Figure 2: Add Service Reference dialog
In this case, I’m adding a reference to a service that implements a contract named IService, which has one operation – Add, a simple calculator service (using a calculator as an example of a service is required by the Web Service Developers Union).
Once I press OK, the “Add Service Reference” functionality in Visual Studio will add a code-generated proxy class and it adds to (or creates) the app.config file with the appropriate endpoint configuration. Again, this functionality is the exact same functionality as when we use “Add Service Reference” in any other project type inside of Visual Studio 2008.
Next, from the workflow designer view of my workflow, I’m going to drag and drop the SendActivity from the toolbox onto my design surface. The SendActivity is under the “Windows Workflow v3.5” tab group in the toolbox. See Figure 3.
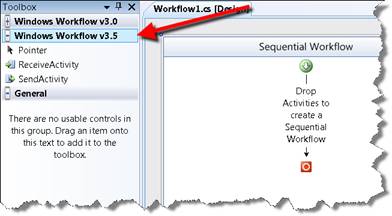
Figure 3: SendActivity in the toolbox.
Once I drop the SendActivity onto my design surface, I have to configure it. I can do this by double-clicking on the SendActivity itself in the designer, which will bring up the “Choose Operation” dialog. The first thing I need to do here is to click the Import button, which will show me the list of Service Contract types that are available in my project.
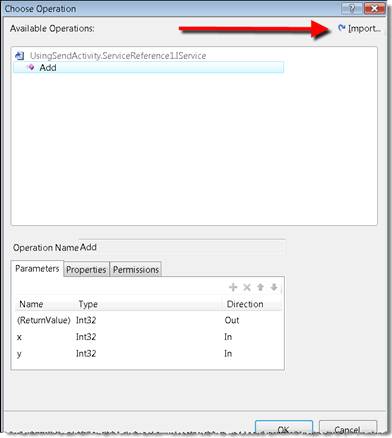
Figure 4: The Choose Operation dialog
Once I’ve associated an operation with my SendActivity, I need to do at least two additional things to configure it properly to use WCF to communicate with the remote endpoint: Bind the parameters, and configure the Channel.
Binding parameters to the SendActivity is just like Activity data-binding in general, there isn’t anything new or different for the SendActivity. In this particular case, I’ve bound the three parameters (the two input parameters and the one output parameter) to fields on my workflow instance using the Activity bind dialog. You can see the final property configuration in Figure 5.
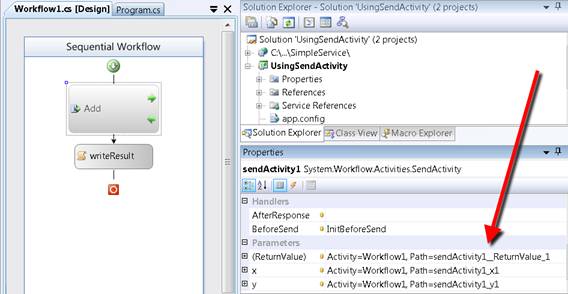
Figure 5: Finished Activity binding
Next, I am going to configure the ChannelToken property of the SendActivity. The ChannelToken property (which is also the name of the property’s Type) is a new type for .NET 3.5 that represents all the information that the SendActivity needs in order to use the WCF infrastructure to send a message. You can see my configuration in Figure 6.
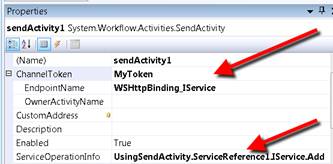
Figure 6: SendActivity configuration
The first thing I set is the Name property of the ChannelToken, which I did by typing the string “MyToken” in the first property grid box (the one to the right of the ChannelToken entry in the property list). This is an arbitrary string which is used to identify the channel. If the OwnerActivityName property is also set (it is optional), it is also used to identify and scope the channel. This is useful in looping Activity scenarios like using the ReplicatorActivity, so that every one of its iterations causes a new channel to be created.
More than one SendActivity can use the same ChannelToken by using the same values for Name and OwnerActivityName. This enables the scenario wherein you want more than one SendActivity instance to use the same channel, rather than each instance to create and open and close its own channel. Which you choose will depend on the service you are communicating with and its requirements, as well as how you want the workflow to manage things like sessions. For example, in a scenario where you were using an endpoint that supported WS-ReliableMessaging, you could use the same ChannelToken for multiple SendActivity components, which would allow the messages sent by all the activities to be part of the same session. In code terms, you can think of the ChannelToken as representing a particular object reference (a reference to the channel object, to be precise). When you are using code to call services, sometimes you want to use the same channel object, and sometimes you want to use a new channel object per call (note that in most projects using WCF, the channel object is wrapped by the client proxy object, so you can use the same analogy with the client proxy object).
The last piece of configuration the ChannelToken needs is the name of the endpoint. This is again used to identify the channel, but this also sets the default way for the SendActivity to determine the address and binding for the channel it will use to communicate with the remote service.
The SendActivity will ask the .NET configuration system for a configured endpoint with that particular name. This can easily be retrieved by looking at the app.config file generated (or modified) when I executed “Add Service Reference”. In this case, the name of the client endpoint in my configuration file is “WSHttpBinding_IService,” which is the common default used by WCF for endpoint names, the name of the binding combined with the name of the contract. You can change this of course, but if you do, remember to change your SendActivity configuration.
At this point, I have everything set up to work except the actual sending of values to the service and doing something with the return. For this simple example, I added an EventHandler for the BeforeSend event of the SendActivity and added some code to fill in some values for the input parameters. Then I added a CodeActivity, and in its EventHandler, I’m writing the value returned from the service to the console. You can see the code in Figure 7, and the output in Figure 8.
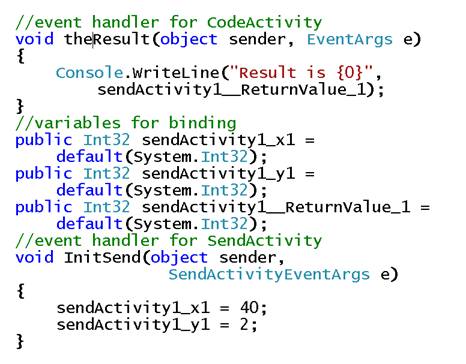
Figure 7: Workflow code-behind
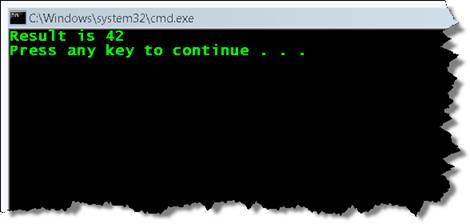
Figure 8: Execution results
We’ve now covered the basics of configuring and using the SendActivity. The nice thing about it is that it follows the same programming model as WCF, but brings that model into WF in a very explicit and visible way.
ChannelManagerService
Many WCF applications use configuration files to configure their endpoints, and both client and service endpoints can be configured this way. As I stated before, the SendActivity finds its configuration by asking the .NET configuration system for a named client endpoint. However, sometimes the configuration file system is too limited for the task at hand, or may not even be accessible (depending on where your workflow is being hosted).
One simple thing you can do with the SendActivity is override the endpoint address found in the configuration file. The CustomAddress property on SendActivity allows you to change the address from the current configured address.
But what if you want to use code to create your client endpoints and not rely on the configuration system? This may be necessary if your workflow can’t access the configuration file (or easily change it), or when you have endpoints that you can’t easily configure, or if you just want to use code to avoid configuration file changes from breaking your application. This is where the ChannelManagerService can be used.
The ChannelManagerService is a WorkflowRuntime-level service that will be used by SendActivity instances to retrieve channels. Since the ChannelManagerService is used only if configured, if a ChannelManagerService isn’t registered with the WorkflowRuntime, SendActivity will continue to execute without errors. You can rest assured that the SendActivity infrastructure still caches channels regardless.
The purpose of the ChannelManagerService is to allow the code in the WF host application (the code that creates the WorkflowRuntime object) to pre-cache endpoints which can then be used by the SendActivity when it executes, instead of the SendActivity having to go to the configuration file to get the endpoint information.
Back to my example, I can add a ChannelManagerService to my WorkflowRuntime (in the program.cs file in this particular project), and pre-configure the endpoints I want to use. You can see this code in Figure 9.
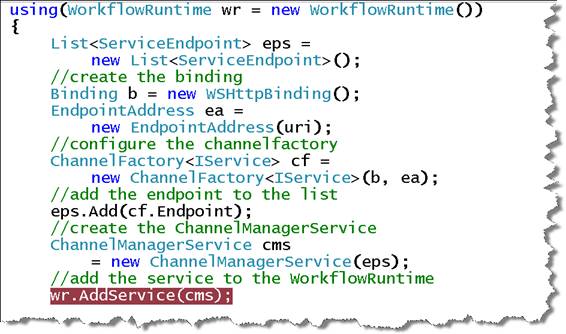
Figure 9: ChannelManagerService code
I can re-run my workflow, and I get the same result, even if I remove the client endpoint configuration from the app.config file. I found it pretty interesting the first time I did this and I didn’t change the SendActivity configuration – the EndpointName was still “WSHttpBinding_IService” and that still magically worked. Turns out the ServiceEndpoint object also chooses the convention of “{BindingName}_{ContractName}” as the value of the name property, which is why this works without any changes to the workflow.
I could set the name of the ServiceEndpoint explicitly in the ChannelManagerService code, in which case I’d also have to configure my SendActivity with the new name. This is probably a good practice to avoid any potential name conflicts that could occur.
Implementing a WCF service using WF
The other Activity added in .NET 3.5 is the ReceiveActivity. Where SendActivity is essentially a WCF client, ReceiveActivity is the equivalent of a WCF service, or at least part of a service.
The basic idea is that ReceiveActivity enables you to use a workflow instance as the implementation of a service. Let’s take a step back from WF and think about how WCF works on the service-side.
WCF is many things, but one of the things WCF does is allow developers on the .NET platform to implement services. The dispatching layer on the WCF service-side allows WCF to listen for incoming messages using some network protocol (TCP, Named Pipes, HTTP, etc.) and route those messages to .NET objects and methods on those .NET objects.
The typical way we do this with WCF is to start with an interface marked with a special attribute that becomes the definition of our service. For example, to build the service I was calling in the first part of this article, I created an interface for the IService service. You can see this in Figure 10.
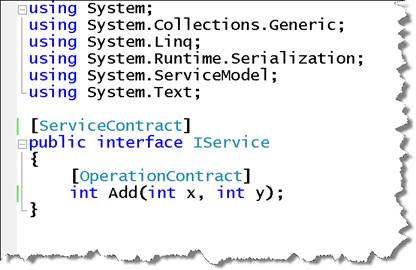
Figure 10: Contract definition
I can then implement this interface using a concrete class. After the implementation, I need to hook the class up to the WCF infrastructure, and there are a couple of ways to do that. In the sample code associated with this article, I’m using the hosting infrastructure for WCF that integrates with Internet Information Service (IIS), which uses .svc files as the way of linking a particular endpoint address with a particular class and contract. In Figure 11, you can see the class that I created to implement the Add functionality and the method that gets called every time a client calls the Add operation on the service.
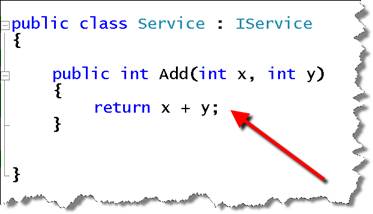
Figure 11: Add method
This is a pretty high-level overview of how WCF dispatches messages; refer to the WCF documentation for more detail. The main point to understand is that the WCF dispatching layer I’m describing is totally extensible. The basic functionality built into WCF in .NET 3.0 was to be able to route incoming messages to methods on .NET classes. In .NET 3.5, the ReceiveActivity makes it possible to easily route incoming messages to workflow instances. Workflows become our service implementations.
To start with, I’m going to implement the IService contract using WF and the ReceiveActivity, and then I’ll progress into a more natural application of workflow as a service, where the workflow is a long-running process (not a short-lived process like adding two numbers).
For this workflow-as-a-service implementation, I’m going to pick the SequentialWorkflow model as the composite Activity to implement my service. To create my service, I’m going to drag the ReceiveActivity onto the design surface of the SequentialWorkflow, and then configure it. I’ll configure the ReceiveActivity’s ServiceOperationInfo the same way as I configured the SendActivity: I’ll just double click on the ReceiveActivity and pick the contract/operation I want this Activity to represent, which in this case is IService.Add.
I can then bind both the input and return parameters to variables. In this case, I’ve created a simple custom Activity named AddActivity to actually perform the logic of my operation. The last important property left for me to set on the ReceiveActivity is the CanCreateInstance property. This property is set to false by default, but in my case I want to set it to true, so that whenever a new message comes into the WCF messaging layer for the Add operation, the new WCF/WF 3.5 hosting infrastructure will create a new workflow instance and pass the incoming message data into the workflow. You can see my configured workflow in Figure 12.
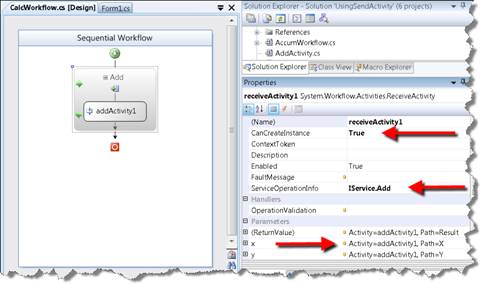
Figure 12: ReceiveActivity configured.
Now I can take the assembly that contains this workflow and deploy it as a service. WCF has a very flexible hosting model; in this case, I’m deploying to a Web Application using the file-based Web Project in Visual Studio 2008, and for production, this would get deployed to IIS.
For IIS deployment, I need two things (besides having my assembly in the bin directory): a svc file with the right information, and a configuration entry for my service. When a service is implemented by a .NET type, this svc file and configuration look like the entries in Figure 13.
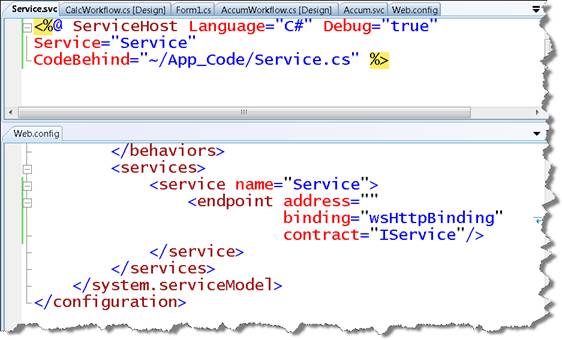
Figure 13: .NET type-based svc and configuration
The WCF hosting infrastructure inside of IIS makes a connection between the value of the Service attribute in the svc file and the name attribute in the service element inside of the System.ServiceModel configuration element, and uses the setting found there to host the endpoint (the address is blank because the address is already set by the host/virtual directory and svc file).
To create the hosting infrastructure necessary for hosting my workflow as a service, I need to modify the svc file in an interesting way. The value of the Service attribute is still linked to a type name, but in this case the type refers to the workflow type, and I need to add a new attribute: Factory. The Factory attribute must point to a type that derives from ServiceHostFactoryBase. In the .NET hosting case, the default ServiceHostFactory type is used implicitly, and it creates a ServiceHost which actually hosts the service. For the workflow hosting case, I need to specify the WorkflowServiceHostFactory. This is the key to allow workflows to implement services. Instead of the typical ServiceHost, the WorkflowServiceHostFactory creates a WorkflowServiceHost, which takes the messages coming in from the WCF channel layer and either creates a workflow instance (when the ReceiveActivity.CanCreateInstance is true) or sends the data to an existing workflow instance (more on this later). You can see the svc and configuration for my workflow service in Figure 14.

Figure 14: Workflow as a service svc and configuration files.
I can now invoke this service using my workflow that uses the SendActivity by changing its CustomAddress property (this works because the contract is exactly the same between the two services).
Sessions and Context
To get my simple workflow service to work, I actually had to make a change to my service contract definition. I waited until now to discuss it so I could give it the full discussion it deserves. In Figure 15, you can see both the IService service contract and the IAccumService service contract – the new interface I am adding to build a long-running workflow service.
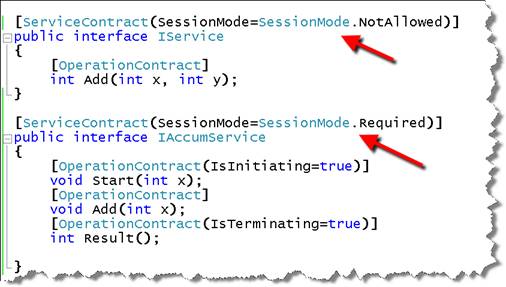
Figure 15: IService and IAccumService service contracts
The arrows are pointing to the ServiceContract attribute, specifically the SessionMode property. If I don’t set this value to SessionMode.NotAllowed on the IService definition, the endpoint throws an exception when loaded. You can see this in Figure 16.
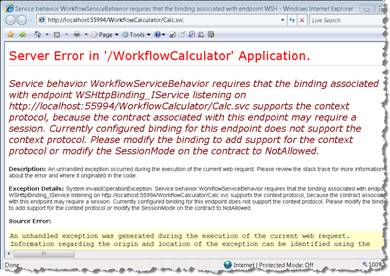
Figure 16: Session error with workflow services
The error is referencing two related concepts: Session and context. In this case, I do want to set the SessionMode to NotAllowed, because I am not trying to create a long-running session-full service. The reason that this error is happening at all is because the SessionMode default is SessionMode.Allowed, which means there may be a session associated with this endpoint when run. Because the binding (WsHttpBinding) doesn’t support the concept known as “Context”, if the runtime allowed this to happen, the execution result would be incorrect.
You can think about “Context” as providing “Session” capabilities for workflow services. The concept of “Session” is a way to associate a particular client with a particular piece of shared state on the server. In this case the piece of shared data is the workflow instance.
Think about a simple abstract example where we want the first message from a client to start a workflow, and the next message from that same client to be routed to the same workflow instance. Abstractly, this concept is known as correlation. We need to correlate the second message to the workflow instance. With workflow services, this is the concept of “Context”.
The way workflow services solve this problem is by sending “context” data back to the client on the first message, which is the GUID that uniquely represents the workflow instance. When the client makes a call back to the service, it presents this “context” data, enabling the workflow services infrastructure to route the incoming message to the right workflow instance. Although there isn’t explicit mechanism built into workflow services for multi-user workflows, the GUID can be passed out-of-band to a different client, and the workflow services infrastructure will be fine. Out-of-the box .NET 3.5 includes three new bindings that support context by including the new context channel as part of the binding configuration. The list of these bindings is in Table 1.
Binding |
Description |
WsHttpContextBinding |
A binding that supports the WS-* protocols as well as context. Context can be sent via custom Soap Headers (the default) or HttpCookies. |
BasicHttpContextBinding |
A binding that supports the base WS-I web services profile. Context sent via HttpCookies. |
NetTcpContextBinding |
A binding that supports the NetTcp protocol. Context is sent via custom Soap Headers. |
Table 1: Context bindings
For my particular scenario, I picked the WsHttpContextBinding to configure my workflow endpoint. See Figure 17.

Figure 17: Context binding configuration
The workflow I modeled is using a StateMachineWorkflow. The possible execution path of this service is that the client will first call the Start operation with the initial value to accumulate. It can then call the Add operation n times, and then finally call the Result operation to get the accumulated value. To model this interaction, I created three states, each one with an EventDrivenActivity that allows my workflow to listen for a particular operation. I also used the concept of recursive states, so that I can listen for the Result operation while the workflow also listens for the Add operation. See Figure 18.
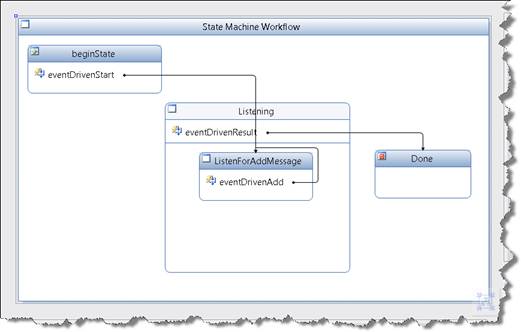
Figure 18: AccumWorkflow – StateMachineWorkflow
Inside of each EventDrivenActivity is a ReceiveActivity, configured for the particular operation. See Figure 19 for the Start operation (which has the ReceiveActivity with the CanCreateInstance set to true).

Figure 19: Start operation EventDrivenActivity
For the client, I also use the WsHttpContextBinding and, using the same proxy object, the channel layer in the client takes care of receiving, storing, and passing the context information back to the service on each call. Again, the point of using the context is to allow the same workflow instance to receive multiple messages after the first message activated the workflow instance.
Conversation Context
Another piece of functionality supported in .NET 3.5 is the concept of conversations. You can think of conversations as extending the concept of instance context to the next level. It allows you to create “conversations” with other endpoints, which will enable you to correlate multiple messages that use the same operation to the same workflow instance. See the conversations sample in the SDK for more information.
Summary
WF provides a programming model, set of tools, and runtime environment which allows you to easily write declarative and reactive programs. WCF provides a programming model, set of tools, and runtime environment which allows you to write programs that communicate with each other over various network and application protocols.
.NET 3.5 includes a layer known as workflow services, which integrates these two frameworks to allow easy access to the WCF framework from within WF. This layer allows you to use the SendActivity to call endpoints from within a workflow. The ReceiveActivity enables you to take a workflow, and stand it up as a Service, callable by any service client.
About the author
Jon Flanders is an independent consultant, speaker, and trainer for Pluralsight. He specializes in BizTalk Server, Windows Workflow Foundation, and Windows Communication Foundation. You can read his blog at http://www.masteringbiztalk.com/.