System Center
Real Control with Virtual Machine Manager 2007
Edwin Yuen
At a Glance:
- Major features of System Center Virtual Machine Manager 2007
- How to install VMM
- Converting physical or virtual machines to VMs
System Center Virtual Machine Manager 2007 is a new solution that provides a consolidated interface for managing your entire virtual infrastructure. Virtual Machine Manager (VMM)
can manage existing Microsoft® Virtual Server 2005 installations, and it can also install Virtual Server 2005 R2 SP1 on new virtual machine (VM) hosts. With VMM, the traditional Virtual Server 2005 administrative tasks can now be performed far more efficiently through a centralized interface, with management access across multiple Virtual Server installations.
In addition, VMM brings new capabilities to Virtual Server, including Physical-to-Virtual (P2V) conversions, Virtual-to-Virtual (V2V) conversion of VMware Virtual Machine Disk Format (VMDK) disks to Virtual Server Virtual Hard Disks (VHDs), and rapid VM deployments from templates and pre-configured VHDs via a centralized library of virtual infrastructure objects.
In the following pages, I'll explore VMM and the powerful set of features it provides to IT administrators. I will then look at the requirements and steps for creating a VMM installation. Finally, I'll take a deeper dive into a handful of the more exciting features of VMM and leave you with some helpful tips on getting started.
Introducing Virtual Machine Manager 2007
System Center Virtual Machine Manager 2007 is a standalone application that provides centralized, enterprise-class management of virtual machines running under Microsoft Virtual Server 2005. As part of the System Center family, Virtual Machine Manager integrates with the other System Center products to provide end-to-end physical and virtual infrastructure management. Figure 1 shows the various components of Virtual Machine Manager and how VMM relates to a Virtual Server host.
The left-side box represents the VMM server and the right side represents a virtual machine host. The VMM components can also be installed on separate servers, if you prefer, to improve performance and scalability. For this article, we will use the model in Figure 1, where the core VMM components are all installed on one computer. At the heart of the VMM product is the Virtual Machine Manager service, in the center on the left. Above it are the three different interfaces into the service: the Windows PowerShellTM interface, the Administrator Console, and the Self-Service Portal with Delegated Provision management. Supporting VMM is a Microsoft SQL Server® 2005 database (you can use either a full installation of SQL Server or SQL Server 2005 Express Edition), and the centralized library, which is a file share for virtual infrastructure components.
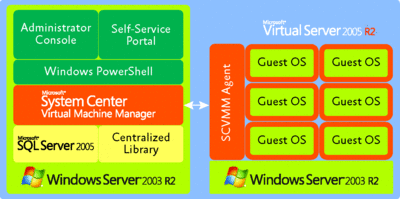
Figure 1** System Center Virtual Machine Manager 2007 architecture **(Click the image for a larger view)
The right side of Figure 1 represents a Virtual Server 2005 R2 virtual machine host that VMM is managing. At the bottom is the host operating system—in this case, Windows Server® 2003 R2. VMM will install an agent on the virtual machine host that facilitates the communication between VMM and Virtual Server 2005 R2. This is a single installation on the physical host, with no installation in the VMs or guest OS. If Virtual Server is not installed on the host machine, VMM can automatically perform the installation when the host is added to the list of managed servers.
As part of the System Center family of products, Virtual Machine Manager uses the new System Center (or Outlook®-style) interface for Administrator Console (as opposed to the traditional MMC snap-in). The VMM Administrator Console (see Figure 2) is built using the Microsoft .NET Framework 2.0 and is built on top of Windows PowerShell 1.0. In fact, any action performed in the Administrator Console actually calls the associated Windows PowerShell command. As a result, any command or function called in the Administrator Console can also be invoked directly through the command line in Windows PowerShell.
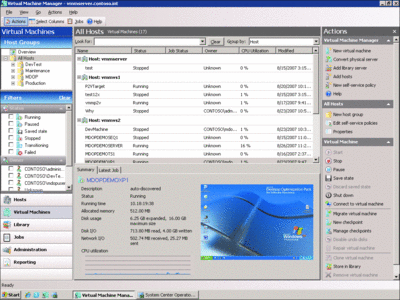
Figure 2** VMM Admin UI showing managed Virtual Machines **(Click the image for a larger view)
Each wizard in the Administrator Console also has a View Script button that will show the associated Windows PowerShell script for the command about to be run, which provides a great starting point for learning Windows PowerShell as it relates to VMM. Once you get used to using Windows PowerShell with VMM, you will be able to script bulk actions through VMM.
Virtual Machine Manager is designed to provide three key benefits for IT administrators: it allows you to maximize resources, achieve better agility, and leverage existing skills. VMM supplies these benefits through several features and functions. First, VMM helps maximize your resources by providing a method to convert your physical servers to virtual machines, a process known as P2V conversion that lets you consolidate your existing physical machines into virtual machines without having to reinstall those machines. This is especially significant when converting machines that have low utilization for their hardware because you can place several such machines together on a single piece of physical hardware. This can be particularly useful for, say, machines with legacy software that's rarely used but needs to be maintained because it runs once a year (regulatory accounting software, for example). When used in conjunction with System Center Operations Manager 2007, VMM can help produce a Server Consolidation Candidates report to review which machines in the physical infrastructure are likely candidates for P2V.
If you already have virtual machines in VMware's VMDK format, VMM provides the capability to perform a V2V conversion to translate your existing VMDKs into the VHD format. This quickly gets your Virtual Server 2005 environment up and running.
As part of any deployment, whether new or started through conversion, VMM uses a process called Intelligent Placement to deploy the VMs to the virtual machine hosts. Using Intelligent Placement, VMM queries all the virtual machine hosts that it manages, retrieves several parameters about the resource availability of these hosts, and then returns a weighted list of recommended hosts to deploy the VM to. As you can see in Figure 3, the administrator can then choose to accept the recommendation, adjust the algorithm to fit particular needs, or simply deploy the VM to the server of his choice. With its consolidated view of the virtual infrastructure and its host recommendations, Intelligent Placement greatly reduces the burdens related to VM deployment.
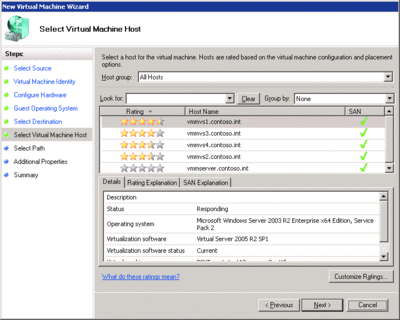
Figure 3** Intelligent Placement provides recommendations for the best Virtual Server host **(Click the image for a larger view)
Other features of VMM that yield great benefits include a centralized library and a self-service portal for delegated provisioning. The library, shown in Figure 4, provides a central store for all components needed to build a virtual infrastructure, including pre-created and deployment-ready VHDs, templates with OS and hardware configurations, ISO files, scripts, and profiles. New VMs can be created and deployed from these components, and the use of templates and profiles can standardize both hardware and software configurations across the VMs. VMM also supports distributed libraries, allowing the components to be stored in remote locations and keeping large file transfers within the remote location while continuing to manage the components centrally.
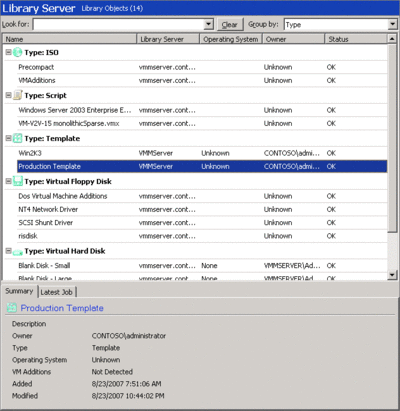
Figure 4** VMM's library contains all the building blocks for a virtual infrastructure **(Click the image for a larger view)
The self-service portal is a Web site that integrates with the VMM service and an IIS installation. The portal grants access for Active Directory® authorized users and groups to VMs, with the available functions depending on the policy created for that user or group. These functions range from the ability to view and access the VMs, to running and shutting down the VMs, to creating new VMs based on specific delegated resources.
The administrator creates a self-service policy that grants particular functions to Active Directory users and groups, to specific virtual machine hosts or host groups, and to specific VMs and templates. The self-service portal gives the administrator the ability to safely delegate functions to end users. Without this function, the administrator would either need to grant end users access to the Administrator Console to manage their VMs or have the end users put requests in for each function, resulting in burdensome e-mails and phones calls just to perform actions such as VM starts and resets.
Virtual Machine Manager Installation
VMM currently manages Virtual Server 2005 (and later) installations on Window Server 2003 SP1 (and above) within an Active Directory domain (or trusted domain), as well as non-domain hosts using VMM's perimeter network support. Virtual Server installations on desktop operating systems like Windows® XP are not supported. P2V operations are only available for physical machines located in the same domain (or trusted domain) as the VMM server.
While I'd recommend that each VMM component be installed on separate servers in a production environment, the instructions here will cover a single-server installation. The recommended hardware for a VMM server installation is an x86-or x64-based server running at 2.8GHz or above with at least 2GB of RAM. Since this is a single server installation with a local SQL Server database, 7GB of hard disk space is required. If a remote database is used instead, only 1GB is required for the VMM installation. An additional 80GB of disk space is recommended for the local library installation.
Additionally, VMM requires that WinRM 1.1 be installed on the VMM server, all virtual machine hosts, and any library servers that will be managed by VMM. WinRM is the Microsoft implementation of the Web services for Management (WS-Management) protocol. WinRM is a SOAP-based, firewall-friendly protocol that lets hardware and software from different vendors interoperate and manage one another. VMM uses WinRM to perform actions between the VMM server, the virtual machine hosts, and the library servers. You can download WinRM 1.1 from go.microsoft.com/fwlink/?LinkId=103610.
Other prerequisites for the installation include the .NET Framework 2.0 and 3.0, Windows PowerShell 1.0, and IIS for the self-service portal. All of the additional software requirements are checked for during the VMM software installation and links to the proper installers are provided. If any of these requirements are not met, the installation will not proceed.
When you start the VMM installation, you are offered three choices in the main menu: the Virtual Machine Manager Server, the Administrator Console, and the Self-Service Portal. We will install all three on the single machine, starting with the Server. Once the setup process starts, the first screens will check for the system prerequisites; you must ensure they are all met in order to allow the installation to proceed.
After the prerequisites are cleared, you should review the installation options, especially those related to the SQL Server database. With VMM, you can either choose a SQL Server 2005 Express Edition install or use an existing SQL Server 2005 database. For this example, we'll use SQL Server 2005 Express Edition.
In the next step of the VMM installation wizard, you identify the location for the centralized library. This location can either be a local directory on the VMM server (and a share will be created for that directory), or an existing file share can be used. The default location is C:\Documents and Settings\All Users\Shared Documents\Virtual Machine Manager Library Files.
Port assignments are the next step. Here you configure the ports used for the Administrator Console's connection to the core VMM server service (port 8100), the port used by WinRM to perform the management functions (port 80, the standard HTTP port), and the port used by the Background Intelligent Transfer Service (BITS) to move the files to the virtual machine hosts (port 443, the standard HTTPS port). Once all this information is gathered, a summary screen is presented and the server installation can finish.
Now let's install the Administrator Console. The system prerequisites are similar to the VMM server, requiring .NET Framework 2.0 and 3.0, as well as Windows PowerShell 1.0. The only configuration option is to confirm the communications port used to connect to the core VMM server service. This port should be 8100, as configured in the VMM server installation. At the end of the installation, you are given the option to create a desktop shortcut for the Administrator Console and to open the console when you close the setup. I suggest selecting both. The first time you open the Administrator Console, you will be prompted for the server connection information. With a single server installation, you connect to localhost on port 8100 and hit Enter to start the console.
Finally, let's install the self-service portal on this server. The prerequisites for this are IIS, the .NET Framework 2.0 and 3.0, and Windows PowerShell 1.0. During the installation, the only configuration options are those that deal with the ports used by the self-service portal. The first is the port to connect to the core VMM service, port 8100, which is the same as the Administrator Console. The second is the port to run the portal on. The default is port 80, but, in many configurations, that port may already be in use. If necessary, change the port to another open one such as 81.
The installer will create a Web site called Microsoft System Center Virtual Machine Manager 2007 Self-Service Portal, and the configuration can be changed in IIS Manager. Here's a tip to ease installation: go into IIS Manager and select the Microsoft System Center Virtual Machine Manager 2007 Self-Service Portal properties. Review the ASP.NET configuration for the Web site and confirm that the ASP.NET version is set to 2.0. The self-service portal will not work with ASP.NET set to version 1.1, and depending on the installation order of IIS and the .NET Framework versions, these settings can vary.
Once the IIS installation is complete, you can open the Web site by browsing to https://localhost:81 in Internet Explorer®. If you get prompted for authentication when opening the Web site, this is due to Internet Explorer security settings. The self-service portal should run in the intranet context in Internet Explorer; you may need to add the VMM server to the list of intranet sites in your local configuration. Once those changes are complete, you will be ready to create and use self-service policies in VMM.
Virtual Machine Manager Features
While there are many exciting features in VMM, the two that have arguably generated the most interest are the Physical-to-Virtual and Virtual-to-Virtual capabilities. Both functions are supported from within the Administrator Console. Since the VMM Administrator Console is built on top of Windows PowerShell, all the commands can also be run through Windows PowerShell itself. For our purposes, we'll explore the P2V process using the Administrator Console and the V2V process through Windows PowerShell.
Physical-to-Virtual Conversion
To perform the P2V conversion, we use the VMM Administrator Console. There are several requirements for the physical machine that will be converted. First, this machine must be a member of the current domain or a trusted domain. VMM will connect to that machine to install a P2V agent and transfer the necessary information. Second, the source machine must be running a supported operating system. The supported operating systems for P2V are Windows Server 2003, Windows 2000 Server, and Windows XP Professional. If that source machine is running Windows Server 2003 or Windows XP, VMM will use the Volume Shadow Copy Service (VSS) to consolidate the hard drives and stream the data into virtual hard disks. This allows the machine to be converted without any downtime, so you don't have to schedule downtime for the server just to create the P2V image. For Windows 2000, a Windows PE boot disk is created to facilitate the P2V image creation. For this example, I'll use a Windows Server 2003 target.
The P2V process is started by choosing the "Convert physical server" option under Actions in the upper-right portion of the Administrator Console. This brings up the P2V Wizard, shown in Figure 5. The first page is the Select Source step, where the machine to be converted is identified. Enter the DNS name of that machine and the appropriate domain credentials to connect to and manage it. The next step allows you to give a name to the resulting VM.
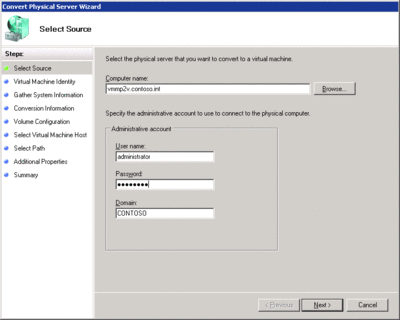
Figure 5** VMM's P2V function is wizard-based and is built into the Admin UI **(Click the image for a larger view)
The wizard then starts the process of gathering information from the source machine. When you click Gather System Information, VMM installs a P2V agent that will retrieve the necessary information about the source machine's operating system, hard drive, and network adapters. Clicking Next takes you to a validation screen to verify that there are no known issues to prevent conversion. If there are, possible resolutions will be presented.
Once the configuration information has been retrieved, you can select the hard disk partitions to convert. By default, the boot partition is selected and any other partitions that are present are made available. You can choose which partitions will be kept as part of the conversion. The P2V is a smart-copy process; what this means is it pulls over only the data on the specified partitions, as opposed to a fixed transfer of an entire hard drive image and size.
Finally, the wizard progresses to the standard VMM deployment steps, including the Virtual Server start-up configurations and the Intelligent Placement process described earlier. When the wizard is done, the Jobs window will pop-up, showing you the entire process and progress of the P2V.
By default, newly converted VMs will not start automatically (they are converted into a Stopped state), nor does the P2V process shut down or change the running status of the source machine. This is a non-destructive P2V process. Because the new VM will have the same computer name, IP address, and even MAC address of the original server, that machine must be shut down before the VM can be started. If you want the source machine shut down or the newly converted VM to start automatically, this can be done from the Windows PowerShell command line. As part of the process, it's a good idea to perform the P2V and then run the resulting VM in a test environment, making sure that everything converted successfully.
Virtual-to-Virtual Conversion
To perform the V2V, you need both a VMWare virtual machine (in the form of a VMDK file) and a valid VMM installation with a designated destination virtual machine host. The VMM V2V Windows PowerShell cmdlet new-v2v supports the following four VMDK file formats: monolithicSparse, monolithicFlat, twoGbMaxExtentSparse, and twoGbMaxExtentFlat. Most existing VMDK files will fall into one of these categories.
The V2V process only works on offline VMDK files. However, the P2V process may be used to convert VMware virtual machines that are currently running. VMware virtual machines consist of two main components—the VMDK files that are the virtual hard disks where the data is stored, and a VMX file that contains the virtual machine configuration information. The VMDK files and associated VMX can be placed in a library location that gives you a way to access and convert the VMware virtual machine without the necessity of having to grant access to the file from the origin server.
During the V2V process, the VMDK file will be converted to a VHD file, the guest operating system will be cleaned up to work with Virtual Server and a new virtual machine will be created to match the original configuration as closely as possible, making the changes necessary for the virtual hardware supported by Virtual Server. Note that each part of the conversion process can be managed separately through Windows PowerShell, which allows bulk format conversions prior to allocating hosts for the new virtual machines. In this example, though, we want to convert and deploy the VHD.
While V2V can be done through both the Administrator Console and via Windows PowerShell, we will use Windows PowerShell for this example. To start the V2V process, let's start a Windows PowerShell window with the VMM cmdlets loaded. This can be done by clicking on Start | All Programs | Microsoft System Center | Virtual Machine Manager 2007 | Windows PowerShell—Virtual Machine Manager.
The resulting window should have the title Windows PowerShell—Virtual Machine Manager. If it does not, the VMM cmdlets may not be loaded. Once Windows PowerShell is open, you can review the new-v2v command by running the following:
get-help new-v2v –full | more
This will provide you with the syntax and examples on how to perform a V2V. In the example that is given for this article, our VMM server will be called vmmserver.contoso.com, the destination virtual machine host will be called vshost1.contoso.com, and the VMDK is available from the library server vmmserver.contoso.com.
You start by identifying the context for the VMM server that will be used to perform the V2V, using the get-vmmserver command. As with all Windows PowerShell commands, get-vmmserver follows the verb-noun format and uses dashes for the parameters. The following line shows is the command we will use to identify the VMM server:
get-vmmserver –computername "vmmserver.contoso.com"
This sets vmmserver.contoso.com as the VMM server context for the commands to follow. The result of the above command is a detailed list of information about vmmserver.contoso.com. If the command was incorrect or the syntax was wrong, a red error message will describe the problem.
The next step is to identify the destination virtual machine host, the Virtual Server host that the converted VMDK/VHD will be assigned to. Let's go ahead and assign the virtual machine host value to the variable $vmhost, using the following command in Windows PowerShell:
$vmhost = get-vmhost –computername "vshost1.contoso.com"
This command doesn't produce any feedback in the command window but you can easily verify that the variable is correctly set by simply typing $vmhost at the Windows PowerShell prompt and then pressing Enter. This should display the information stored in $vmhost (detailed information about vshost1.contoso.com, similar to the information we had above for the VMM server).
In addition to the virtual machine host, you need to identify the library server where the VMDK file is located. The command is similar to the virtual machine host command that I used previously:
$library = get-libraryserver –computername "vmmserver.contoso.com"
As with $vmhost, entering $library on the command line will display the library server information.
Finally, you actually type the command to perform the V2V conversion. In order to accomplish this, you use the new-v2v command with the get-help function. In this command, you go ahead and identify the library server for the VMX/VMDK, the destination host, the name of the resulting VM, and the path for the converted VHD file.
For the command line, most of the references are done from the perspective of the destination host, in our case, vshost1.contoso.com, with the install path is given as a local reference for VSHOST1. The VMX path is from the perspective of the library server. The resulting command line in Windows PowerShell is as follows:
new-v2v –LibraryServer $library –vmxpath "\\vmmserver.contoso.com\MSCVMMLibrary\VMDKS\ConvertMe.vmx" –vmhost $vmhost -name "DemoV2V" –path "C:\VHDs"
As you can see, here we're converting the VMX/VMDK for \\vmmserver.contoso.com\MSCVMMLibrary\VMDKS\ConvertMe.vmx on the library server $library (VMMSERVER), deploying it to the host in the variable $vmhost (VSHOST1), with the name DemoV2V, to the path C:\VHDs on VSHOST1.
Once the command has been run, it's always a good idea to go back to the Jobs window in the VMM Administrator Console in order to view the progress. The VMX/VMDK will be converted and then copied to VSHOST1, where the resulting VHD will be added to the list of VMs as DemoV2V. When the process is completely finished, you will then be able to use VMM to start the new virtual machine and review the results.
Wrap-Up
As you see, System Center Virtual Machine Manager 2007 brings some great new features and capabilities to your virtual infrastructure. By reviewing the P2V and V2V processes, I hope I've shown how easy these are using Virtual Machine Manager.
VMM is designed to simplify an IT administrator's job when it comes to creating, deploying, and maintaining VMs. With the release of System Center Virtual Machine Manager 2007, I strongly recommend that Virtual Server 2005 administrators look into using Virtual Machine Manager to maintain their virtual machine hosts. For users of the new Windows Server virtualization in Windows Server 2008, Microsoft will provide support for Windows Server virtualization in the next version of System Center Virtual Machine Manager, which will be available after the final release of Windows Server 2008 virtualization.
For additional information on VMM, and to download a demo, please visit microsoft.com/SCVMM. For more information on all Microsoft virtualization products, visit microsoft.com/virtualization.
Edwin Yuen is the Technical Product Manager in the Windows Enterprise Management division for System Center Virtual Machine Manager. Edwin came to Microsoft with the July 2006 acquisition of Softricity. Edwin also has 13 years of technical consulting experience in both the commercial and federal space. He has a BS in electrical engineering from Johns Hopkins University.
© 2008 Microsoft Corporation and CMP Media, LLC. All rights reserved; reproduction in part or in whole without permission is prohibited.