Hey, Scripting Guy!In Scripts, as in Life, Looks Are Important
The Microsoft Scripting Guys
For hundreds, even thousands, of years, philosophers and sages have been telling us that we should look beyond physical appearance when judging someone or something. (Not that we should be judging people, mind you; after all, beauty is in the eye of the beholder.) You know what they say: True beauty comes from within, not from without, and who you are is far more important than what you look like.
To that, the Scripting Guys can only add one thing: hogwash.
That’s right, hogwash. The Scripting Guys are the first to admit that in a perfect world physical appearance would make no difference. However, we don’t live in a perfect world. If we did, then french fries and hot fudge sundaes would make up two of the major food groups. Like it or not, appearance is important. And that’s as true for your scripts as it is anything else.
The Scripting Guys are aware that few people are moved to tears by the sheer beauty of a VBScript script running in a command window. (Maybe Scripting Guy Dean Tsaltas is, but he’s the only one we can think of.)
On the other hand, it’s also true that in this high-tech world of ours, scripters are no longer limited to writing scripts that run in a command window. Thanks to HTML Applications (HTAs), scripters can call upon the power of DHTML to create GUIs for their scripts. These same HTML skills can be used to create Windows Vista™ gadgets, a new venue that has the potential to revolutionize system administration scripting as we know it. But guess what? As soon as you start talking about GUIs, any tired old notions about beauty being only skin deep immediately go out the door. For scripts running in a graphical environment, looks are every bit as important as function and performance.
And that’s a problem. After all, we’re scripters; what do we know about creating graphical user interfaces? Looks like we’re out of luck, aren’t we?
Maybe. But then again, maybe not. Did we just hear someone say, "Thank goodness for the Scripting Guys?"
No, really. Didn’t we just hear someone say that? Maybe they kind of mumbled it a little or something...
Well, it doesn’t matter. Someone should have said it because the Scripting Guys are here to help (whether you want our help our not).
To get you started in the wonderful world of GUIs, let’s take a look at the beginnings of a simple little HTA. (If you’d like more information on creating HTAs, see the HTA Developers Center.)
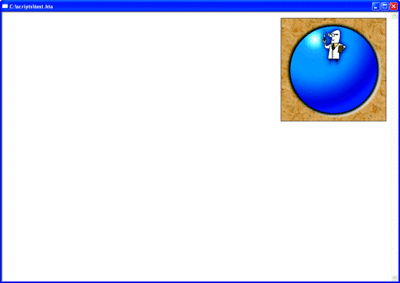
What we’ve got in Figure 1 is the first part of a fancy desktop information system. As you can see, we’ve started off by putting a nice little graphic in the upper right-hand corner of the HTA window. The idea is that when the HTA first loads up, it will retrieve the name of the logged-on user and then display his or her name and the computer name on top of this image. Later on we’ll add all sorts of other cool things to the HTA but, as they say, first things first.

Figure 1** The start of our really quite pretty HTA graphical interface **
No, we aren’t really sure who "they" is. Probably another one of those philosophers. Probably Voltaire. That sounds like the sort of thing Voltaire would say.
Granted, this is a pretty simple little application, and its...beauty...might not even move Scripting Guy Dean to tears. But it does serve as a useful demonstration tool, with a basic concept applicable to many different situations. After all, many of those high-falutin’ Windows Vista gadgets operate on a similar principle; they simply display a fancy graphic (say, a gauge or a dial) and then write some text over the top of that graphic. That makes it look as though you have a cool little gauge that displays available disk space when, as it turns out, all you really have is a generic graphic overlaid with some dynamic text.
OK, to tell you the truth that doesn’t make a lot of sense to us, either. But things should clear up a bit the further we get into this column.
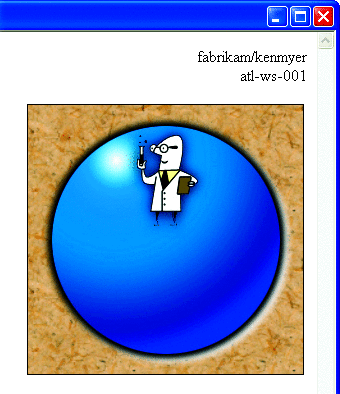
There’s just one problem with the notion that we can display a graphic and then write text on top of that graphic: it doesn’t work. Instead, with basic HTML tagging we get something that looks like Figure 2. Not exactly what we had in mind. Maybe Nietzsche, who said that "human beings can never hope to place text over the top of a graphic, at least not in an HTA," was right.

Figure 2** A first attempt at overlaying text **
Or maybe Nietzsche was wrong: did we just hear someone say—well, never mind. As it turns out, we can’t do what we want to using plain vanilla HTML; it just doesn’t work that way. Sure, in theory we could make our graphic a background graphic and then use tables and non-breaking spaces and all sorts of other little tricks to try to get the text to overlay the picture. But we say "in theory" for good reason; except for the simplest of cases, that strategy never works.
As it turns out, there’s a much better way to create fancy layouts in an HTA or Windows Vista gadget: Cascading Style Sheets, better known as CSS.
CSS is used to define the fonts, the margins and alignments, the colors, and other presentation aspects of a document. (This applies in particular to Web pages. However, because HTAs and gadgets are, at heart, nothing but Web pages, CSS applies equally well to them.) We can’t even begin to discuss all the possible things you can do with CSS, so for more information you might want to see the handy and thorough CSS reference documentation on MSDN®. For now, suffice it to say that we can use CSS to minutely control the layout of the HTA, including the ability to overlay one item (our text) onto another (our graphic).
We’ll explain how we do all of that. But before we launch into that explanation, let’s take a look at the code for a very simple HTA in Figure 3.
Figure 3 Finally, we get to the script...
<SCRIPT LANGUAGE=”VBScript”>

Sub Window_OnLoad
 Set objNetwork = CreateObject(“Wscript.Network”)

 strUser = objNetwork.UserDomain & “\” & objNetwork.UserName
 strComputer= objNetwork.ComputerName

 UserData.InnerHTML = “<p align = ‘center’> “ & _
 “<font style=’font-size:18pt;color:white’>” & _
 strUser & “<br>” & strComputer & “</font></p>”
End Sub

</SCRIPT>

<img src=“test2.jpg“ align=“right“>
<span id=UserData style=“position:absolute;left:770px;top:150px“></span>
As you can see, there’s really not much to this. We have a Window_OnLoad subroutine that (based on the name) runs automatically each time our HTA is started or refreshed. We’ll talk about this subroutine in a minute. In addition, we have two HTML elements: our graphic and a span. As you doubtless know, we use this bit of tagging to insert the graphic, using the align attribute to make sure that the picture appears on the right-hand side of the window:
<img src=”test2.jpg” align=”right”>
That brings us to the HTML tagging for the span:
<span id=UserData style=”position:absolute;
left:770px;top:150px”></span>
OK, so we’ve used a span tag here. What the heck is a span tag? Well, for all intents and purposes a span is simply a named area of your HTA; it’s a "marked off" section of the HTA window that we can identify programmatically (mainly because we gave the span the ID UserData). Once we’ve set up a span, we can write a subroutine that assigns text or HTML coding to it. In fact, not only can we do that, in our HTA we did do that.
But, like we said, we’ll talk about that later. Before we do that we need to look at the style parameter added to the span tag:
style=”position:absolute;left:770px;top:150px”
This parameter, as you might suspect, is the key to successfully positioning our dynamic text on top of the graphic. We’re actually specifying three separate style attributes here.
Position We’ve told our HTA that we want the position of our span to be, well, absolute. That essentially means that we always want the span to be in the same place, even if that means—as it does in this case—that the text gets written over the top of another item (such as, say, a graphic).
Left This simply specifies the position of the span relative to the leftmost edge of the HTA window. In this case we want the span to begin 770 pixels (770px) in from the left.
Top This setting is quite similar to the Left attribute, except this time we’re specifying the position of the span relative to the top edge of the HTA window. In this case we want to start at the top of the window and count down 150 pixels (150px) before beginning the span.
How did we know that we wanted to set the left side of our span to 770 pixels and the top side to 150 pixels? Well, to tell you the truth, we didn’t. Instead, we guessed; we put the graphic on the page and assigned values to the span’s Left and Top attributes. We then opened the HTA and looked at the results. As you might expect, we were off a bit, so we adjusted the values, refreshed the HTA, and looked again. We did this a few times until, like Goldilocks, we found something that was just right.
Note: you know Goldilocks and the three bears, their beds and chairs, the porridge that was too hot or too cold, and so on. And no, we’re not sure whether Goldilocks could be considered a great philosopher or not. But you could argue that, seeing as how she had no problem breaking into someone’s house, eating their porridge, sitting in their chairs, and sleeping in their beds, she definitely had a unique philosophy all her own.
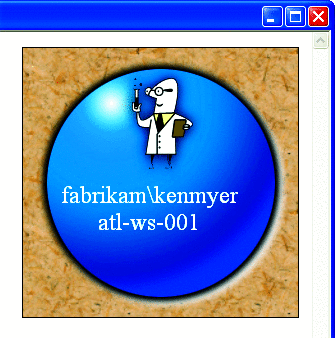
At any rate, Figure 4 shows what our HTA looks like now. Granted, it might not be a work of art, but then again, we’d like to see Picasso programmatically print information on top of a graphic.

Figure 4** Behold the power of style **
Speaking of which, how did we programmatically print information on top of a graphic? Well, we have good news for you: at long last it’s time to talk about our Window_OnLoad subroutine, shown in Figure 5.
Figure 5 Window_OnLoad subroutine
Sub Window_OnLoad
 Set objNetwork = CreateObject(“Wscript.Network”)

 strUser = objNetwork.UserDomain & “\” & objNetwork.UserName
 strComputer= objNetwork.ComputerName

 UserData.InnerHTML = “<p align = ‘center’> “ & _
  “<font style=’font-size:18pt;color:white’>” & _
  strUser & “<br>” & strComputer & “</font></p>”
End Sub
You know, now that we look at this subroutine a little more closely, we see that there really isn’t that much to talk about, is there? As you can see, we start off by creating an instance of the Wscript.Network object. We then use these lines of code to retrieve the user name and domain and the computer name:
strUser = objNetwork.UserDomain & “\” & _
  objNetwork.UserName
strComputer= objNetwork.ComputerName
That, of course, just happens to be the information we want written to our HTA window. All we need to do is combine the variables strUser and strComputer with a little HTML tagging, then assign the resulting string to the InnerHTML property of our span:
UserData.InnerHTML = _
  “<p align = ‘center’> “ & _
  “<font style=’font-size:18pt;color:white’>” _
  & strUser & “<br>” & strComputer & _
  “</font></p>”
Yes, we know that it’s a complicated-looking bit of code. But it’s really not all that bad. It looks complicated simply because we’re combining several items into a single string. We start with an opening paragraph tag, which specifies that we want to center the text in the paragraph.
“<p align = ‘center’> “
Next up is an opening font tag, which specifies that we should use 18-point white text:
“<font style=’font-size:18pt;color:white’>”
strUser is the variable holding our user name, in the format Domain\UserName. "<br>" inserts a line break. We insert this so that the user name appears on one line and the computer name appears on a second line. strComputer is the variable holding the name of our computer. Finally, we add the closing font and paragraph tags:
“</font></p>”
When you look at the pieces individually you can see that the code is nowhere near as complicated as you might have guessed.
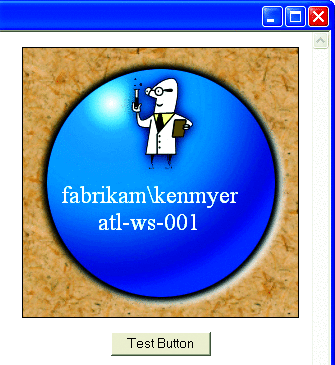
Incidentally, you can position pretty much any HTML element you feel like positioning. For example, suppose you’d like a button centered beneath the graphic. To do that, simply add this to your HTA code:
<input type=”button” value=”Test Button” style=”position:absolute;left:820px;top:300px”>
That should give you an HTA that looks like Figure 6.

Figure 6** Such a lovely button **
Again, you’ll have to play around with this a little to get the button positioned just right, but that shouldn’t take too long. In fact, if you’re willing to do the math you can probably determine the correct positioning ahead of time. All you need to know are the width and height of each object—something you can specify using the style parameter—and the width and height of the HTA window. By default, at least on the Scripting Guys’ test computer, HTAs are approximately 1020 pixels wide by 685 pixels high (of course, results may vary). If nothing else, you can start with those figures and then adjust them to suit your requirements.
That’s obviously an all-too-brief introduction to CSS, but it should get you started along the path to making your scripts beautiful. Philosophers may pooh-pooh those efforts and tell you that the true beauty of a script comes from within, not from without. But look at it this way. Who are the greatest philosophers of all time? That’s right: Plato, Socrates, Aristotle, those guys. With that in mind we’d like to pose a question: have you ever seen a photograph of any of those philosophers? Don’t you find it interesting that no photographs exist of the people who say that beauty doesn’t matter? Does that seem odd to you? Something to think about.
The Microsoft Scripting Guys work for—well, are employed by—Microsoft. When not playing/coaching/watching baseball (and various other activities) they run the TechNet Script Center. Check it out at www.scriptingguys.com.
© 2008 Microsoft Corporation and CMP Media, LLC. All rights reserved; reproduction in part or in whole without permission is prohibited.