The Desktop FilesDeploying Windows XP with the WAIK
Wes Miller
It's amazing (and daunting) just how different customers can be. In an ideal world, all customers would be in the same phase of deploying the same version of Windows all the time. It sure would make testing easier. But, of course, that isn't the case. While some of you are already in the throes of—or perhaps even done with—
your Windows Vista® deployments or are enthusiastically getting ready to deploy your first Windows Server® 2008 Read-Only Domain Controller (RODC) into production, there are just as many who remind me regularly (thanks) that you are also in the middle of long-planned deployments of Windows® XP and/or Windows Server 2003 R2.
The other day I received an e-mail message from a reader asking, "What about the Windows Automated Installation Kit (WAIK) and Windows XP? How do I use the WAIK when deploying Windows XP?" Well, I'm going to try and answer that.
Another Look at the WAIK
Just over a year ago, I wrote a column discussing the WAIK, the set of powerful tools that was designed to help you deploy Windows Vista (technetmagazine.com/issues/2007/01/DesktopFiles). The WAIK will now address Windows Server 2008 deployment as well, and those two operating systems have a new setup infrastructure—and the tools in the WAIK are largely meant to take advantage of them. And, for better or worse, versions of Windows prior to Windows Vista that use either unattended setup or Sysprep require you to use tools designed specifically for them. But I want to take another look at the WAIK to highlight the tools that you can use to help deploy Windows XP.
Windows PE 2.0 For some common ground, let's start by looking at my February 2008 column (technetmagazine.com/issues/2008/02/DesktopFiles) on dual booting with Windows PE 2.0 and Windows XP. Essentially, if Windows PE 2.0 works for you in that scenario, it will work here. The question to ask yourself is, "Will I be deploying Windows XP on any systems with less than 512MB of RAM or that don't support the Advanced Configuration and Power Interface (ACPI) with Windows Vista?" If the answer to either part is yes, you'll need Windows PE 1.6, and you'll have to verify that you have access to it as part of Software Assurance. Only Windows PE 2.0 and 2.1 are freely available today; versions 1.6 and earlier still require Software Assurance membership.
ImageX/WIM ImageX and the Windows Imaging Format (WIM) were both designed from the ground up to work with any and all versions of Windows beginning with Windows 2000, whether on NTFS or FAT volumes—so yes, absolutely you can use them in order to deploy Windows XP (or Windows Server 2003).
Windows Deployment Services Windows Deployment Services (WDS), which replaces Remote Installation Services (RIS), was originally shipped as an out-of-band (OOB) release in the WAIK 1.0 and was updated and integrated into Windows Server 2003 SP2. Now it's shipping with increased functionality in Windows Server 2008, but it is still very applicable to Windows XP deployment.
If you have a RIS server, or a WDS server running in legacy mode, this will not apply much to you. But if you've begun the transition to WDS running in mixed or native mode, then yes—you should look at WDS as potentially being a part of your Windows XP deployment scenario.
Windows System Image Manager (WSIM) WSIM is really only applicable to Windows Vista and Windows Server 2008 deployment. If you're deploying Windows Server 2003 or earlier, WSIM isn't going to be much help.
Windows XP Deployment Tools
Windows XP (like all versions of Windows from Windows NT® 4.0 through Windows Server 2003) can be deployed via either an unattend.txt file or an "image." For the purposes of this column, I'm going to gloss over unattended setup since it really is now a thing of the past. If you want to take advantage of the WAIK, specifically ImageX, you'll be doing image-based deployment. So instead of an unattend.txt, you need a Sysprep.inf—the answer file format for Sysprep.
When I use the term image here, I'm talking loosely about how to pick up the OS image. Historically, you'd most likely have used Ghost, PQDI, or other imaging tools. Before ImageX, Microsoft didn't provide any way to pick up the OS and applications you had Sysprep'd and copy them to one or more destination computers.
There are two important points to remember when you are building an image of Windows:
- You can't change the Hardware Abstraction Layer (HAL) except when moving between uniprocessor and multiprocessor systems. As I've mentioned in previously published columns, you can't safely change an image when going between ACPI and non-ACPI architectures.
- You can change mass-storage controllers. The idea that you can't is a common misconception. But in order to do this, you must use Sysprep to install any potential mass-storage controllers that target computers may need; after deployment, you use Sysprep to remove all but the driver that "stuck" on the target system. I'll get to that momentarily.
With these two issues in mind, you should be able to prep an image on one system and have it work on any target system that utilizes the same or a compatible HAL.
Tools of the Trade
Whenever you're working with Windows XP in an image-based deployment scenario, you will want to keep three items close at hand:
Ref.chm The unattended setup text file reference. Remember that the time to optimally configure optional components in any version of Windows prior to Windows Vista is before imaging. However, if you do need to install optional components after setup, you can do so by running sysocmgr.exe as outlined at support.microsoft.com/ kb/222444. If you're deploying Windows XP Tablet PC Edition, follow the steps at go.microsoft.com/fwlink/?LinkId=108589 to create a single image that installs the Tablet PC components on applicable systems.
Sysprep The Microsoft-supported way to make disk-duplicated systems. I still occasionally see some recommendations for third-party security identifier (SID) changers; as always, I recommend only using Sysprep, as the other tools tend to miss critical Windows SID locations (especially the ones that aren't out in the open).
Setup Manager The quickest and easiest way to create a sysprep.inf file. As always, make sure that you have the correct version handy—it should generally be the same as the version of Windows you are deploying (Windows XP SP2 with Windows XP SP2 deployment tools, for example).
You'll find all three of those items on the Windows XP CD. Updated versions are available at go.microsoft.com/fwlink/?LinkId=107541.
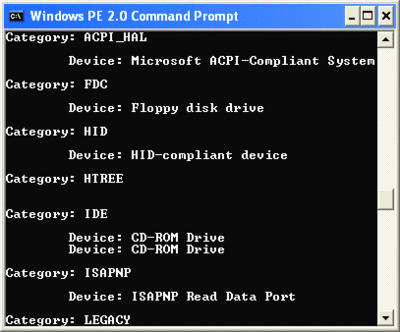
You'll also want to keep tap.exe handy. This utility is included with the Windows XP Embedded tools (go.microsoft.com/fwlink/?LinkId=108590), even in the free evaluation version. Under Windows PE, tap.exe will return information about all of the Plug and Play (PnP) devices Windows PE found; most interesting, it will tell you the HAL Windows PE chose for the device (see Figure 1). This is significant primarily because the logic Windows PE uses to select the HAL is the same logic a full Windows setup would use to determine which HAL to place—so tap.exe under Windows PE is a handy way to see what HAL Windows would recommend for a specific system.

Figure 1** Tap.exe utility can tell you which HAL Windows PE chose for a specific system **(Click the image for a larger view)
Creating the Image
You can work through the following steps to get started with your own Windows XP image to be deployed using ImageX (yes, you could use another imaging tool—but you'll soon see why ImageX is the ideal tool for this particular workflow).
The first step is to gather all the necessary tools and components, including Sysprep, Setup Manager, ImageX, and Windows PE (version 2.0 or 1.6, depending on your needs and what you have access to. Remember that if you are using version 2.0 with ImageX, you will need to use bootsect.exe with the /nt52 switch when creating your partition to ensure your boot code is compatible with Windows XP.)
Of course, you'll also need a PC with Windows XP (any SKU) installed on it, as well as the latest updates for Windows and any other installed software. Ideally, this system should never have been joined to the domain before—this reduces the likelihood of domain/network problems later. The system should have only imaging-safe applications installed, nothing that privately stores the machine name, SID, domain, or user-specific information that Sysprep will miss or be unable to replace at SID-changing time. In addition, it should use the HAL you expect to deploy most frequently. On newer hardware, this will generally be the ACPI multiprocessor (MP) HAL, due to the prevalence of both ACPI and multicore (and previously hyperthreading, which also used an MP HAL).
Now configure your Windows XP system as you want it to appear to your end users. Install all the applications you want the majority of users to have (and any that can't be installed unattended). Install or remove any Windows-optional components so the system will be set up as you want for your end users. Then configure the desktop. Log in as the Administrator and make any modifications you want to the profile, including the desktop background, screensaver, Start Menu, and so forth. By default (starting with Windows XP SP2), Sysprep will copy the settings from the Administrator account over to the Default User account for you.
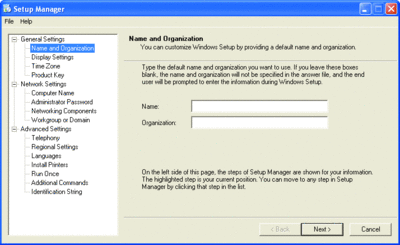
Next, run Setup Manager (see Figure 2), specifying that you want to create a new Sysprep unattend file and completely automate the setup. Note that as you're going through Setup Manager, you will need to enter a product key. If you don't have one handy or you want to script it later (and you don't have a Volume License key), you can specify the key provided in the default unattend.txt file on the Windows XP or Windows Server 2003 CD (which will allow setup to complete but will not allow activation).

Figure 2** Using Setup Manager to create a Sysprep answer file **(Click the image for a larger view)
You'll also need to provide a machine name. You may want to automate this later using SQL or some other mechanism, but for now just enter some value and then use scripting to replace the machine name before you run Sysprep, after the machine has had a WIM deployed to it.
Remember that if you provide a password for the Administrator account, it will only be applied if the existing Administrator account in the image does not have one. And note that the domain join section does not allow you to encrypt the domain join credentials. You should use the least privileged account possible to set up the machine account. Finally, I suggest using the Version String option in Setup Manager to track the "version" of the image you have just created.
Now take the Sysprep.inf file, place it in the C:\Sysprep directory with sysprep.exe and setupcl.exe, and add the following to the .inf file:
[Sysprep]
BuildMassStorageSection = Yes

[SysprepMassStorage]
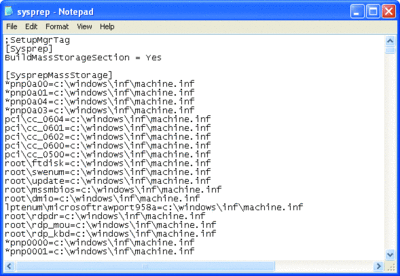
Then run Sysprep –bmsd. This will modify your sysprep.inf and add all of the mass-storage IDs your installation of Windows is aware of, as shown in Figure 3. If you want to add in other devices, you can, or you can add them to your Windows installation and rerun sysprep –bmsd.

Figure 3** Adding mass storage IDs to sysprep.inf **(Click the image for a larger view)
Next, copy your sysprep.inf file off to a share, then run sysprep.exe –factory and shut down your system. Reboot to Windows PE and connect to a UNC share (recommended) using this:
NET USE Y: \\myserver\myshare
/USER:DOMAIN\USER password
Now capture the image by using the following:
ImageX /capture C: Y:\NewImage.wim
"Factory Mode capture from 4/1/2008"
Then shut down the system.
You now have an image that is ready to be updated via factory mode. I'm not going to drill into the specifics of that here, but, in a nutshell, factory mode is the safest mode to keep your images in until they are ready to be imaged for deployment. For more information, consult the Windows XP deploy.cab documentation mentioned earlier.
When you are ready to prep the images for deployment—that is, once you're ready for a rollout—boot to Windows PE and use Diskpart to create the desired partition(s). Format the partitions using the format command, and use bootsect.exe as needed to apply the pre-Windows Vista boot code (/nt52). Now connect to a UNC share (or cd to wherever your image(s) are) using this:
NET USE Y: \\myserver\myshare
/USER:DOMAIN\USER password
Then apply the image as follows:
ImageX /apply Y:\NewImage.wim C: 1
Finally, reboot to Windows Factory Mode and make any necessary updates to your image (you will need to use a winbom.ini file here; see ref.chm in the deploy.cab for assistance). Winbom.ini should always contain the following lines, which tells it to reseal the image to be ready to run Mini-Setup on the next reboot:
[FACTORY]
ResealMode = Mini
When you're finished, shut down. Repeat the earlier steps you used to capture your image, but now modify the capture command to be:
ImageX /append C: Y:\NewImage.wim "Resealed
and ready for deployment – captured 4/4/2008"
By using /append, you will save considerable space. You've just combined your factory mode and resealed images together, so you can easily switch between them. You can also use /delete to drop any images along the way that you decide not to use. But remember that doing so won't save the space; it will just drop the reference to the specified volume image. You'll need to export all of the volume images you want to keep if you want to clean up the unused space.
Now you can see how the WAIK, although designed and supported primarily for Windows Vista and Windows Server 2008, can help you whether you are deploying the latest versions of Windows or earlier versions. Though you need to use a combination of Windows XP tools and the WAIK tools (primarily ImageX and possibly Windows PE 2.0), Microsoft now provides everything you need to get started rolling out any version of Windows.
Wes Miller is a Senior Technical Product Manager at CoreTrace (www.CoreTrace.com) in Austin, Texas. Previously, he worked at Winternals Software and as a Program Manager at Microsoft. Wes can be reached at technet@getwired.com.
© 2008 Microsoft Corporation and CMP Media, LLC. All rights reserved; reproduction in part or in whole without permission is prohibited.