Geek of all TradesControl Network Access Using DHCP Enforcement
Greg Shields
Contents
The Goals for a NAP
Implementing DHCP NAP to Enforce WSUS Updates
Those darn users are getting smarter all the time. They've figured out how to turn off their firewalls—always on the nastiest of coffee-shop networks. They keep their laptops away from the office during your monthly patch cycle, because they believe your patches caused their last blue screen. They even disable antivirus and anti-spyware utilities at the slightest hint of a slowdown in performance. Your users take these steps because they think they're helping themselves, when in fact they're hurting the security of your business' network.
A correctly configured and patched computer is a healthy computer, but keeping those computers healthy is a hassle. If only there was a way you could enforce your security policies. Enforcement guarantees that your desktops and laptops have the right firewall configuration. Enforcement assures that computers that lack the right patches can't access your network. Enforcement means that not running antivirus or anti-malware means not connecting to your pristine LAN.
That kind of security policy enforcement is available today with Network Access Protection ( NAP ). NAP is a component that arrives with Windows Server 2008 Network Policy and Access Services. It uses services on both servers and clients to routinely check the status of a client's compliance to your security policies. If those clients aren't configured properly, NAP can automatically restrict their network access until they are remediated. Even better, NAP can automatically remediate the bad clients, forcing those with bad configurations back into line with established security policies.
NAP is a powerful tool that is considered a best-in-class solution by independent analysts like Forrester, who positions NAP in its upper-right "leaders" quadrant. It is a cost-effective solution, because implementing NAP in your network today requires no extra software purchase as it is already a part of your Windows and Active Directory investment. NAP's functionality is already available with every edition of Windows Server 2008. It is designed for massive scalability and is capable of supporting large enterprises with complex needs and scores of clients.
But if NAP is so great, why don't more small environments take advantage of it? Likely, many jack-of-all-trades administrators either aren't aware of what it can do, or are put off by its apparent complexity. That's understandable. If you read through the documentation on NAP, you could be overwhelmed by all the moving parts required for its different mechanisms for enforcing security configurations. IPSec, 802.1x, VPN, and TS Web Access are all NAP enforcement mechanisms that require extra components you might not have in your environment today. However, it is likely that you already have what you need to implement its DHCP-based enforcement.
It is that easy-to-install and easy-to-use DHCP enforcement mechanism I want to show you in this month's column. While each of the others are admittedly more powerful in how they assure client configurations, each also requires more-complex technologies, such as certificate services infrastructures, or deep knowledge of network devices to implement successfully.
Let's start small, and work our way up.
The Goals for a NAP
Before we get into the click-by-click, let's consider some of the goals you probably have for securing your network. You want to ensure that computers are updated with the right patches. You want your on-the-road laptops to get the right security settings when they return. And you certainly need to defend against rogue computers plugging into your network and infecting your servers and workstations.
If all of these goals are met, if your computers are correctly patched and have the right firewall and anti-malware settings, you can generally consider the machines to be healthy. Healthy computers tend to have the right protections in place to stay healthy, and they probably aren't spreading malware around your network.
NAP's job is to monitor and enforce the health of the machines on your network. When a computer plugs in, NAP asks the question, "Are you healthy?" If the computer responds in the affirmative, NAP grants that computer full access to your network. If the client can't answer or answers in the negative, it is instead relocated to a special "remediation" network. There, the only resources available to the computer are those necessary to make it healthy again: a Windows Server Update Services (WSUS) server for applying patches, an antivirus server for downloading the most-recent signature files, and so forth. NAP can also watch the computers on your network, recognize when their health degrades, and quickly fix them when it does.
NAP's enforcement mechanisms are related to the ways in which computers gain access to your network. Computers connect to your 802.1x-capable network switches or wireless access points for a physical connection. They then request an address from your DHCP server. Outside computers may connect through a VPN server or a TS Web Access Web site. Communicating with your domain may require IPSec authentication.
As noted, NAP's DHCP enforcement mechanism is the easiest to configure and use; essentially, your DHCP server becomes NAP's gatekeeper. Computers that connect to your network must first request an address from DHCP. This is where the "Are you healthy?" question is asked by the NAP-enabled DHCP server. If the computer responds correctly, DHCP gives it an address with full network access. If the computer doesn't know how to answer or if it answers incorrectly, DHCP instead gives it a special address for remediation.
To further simplify our example, I'll instruct NAP to only monitor clients for WSUS patches. In this case, clients will be considered unhealthy only when they aren't talking to WSUS or don't have the right patches. As you'll discover later on, I can do this because Microsoft includes a built-in Security Health Validator that enables these checks to be run.
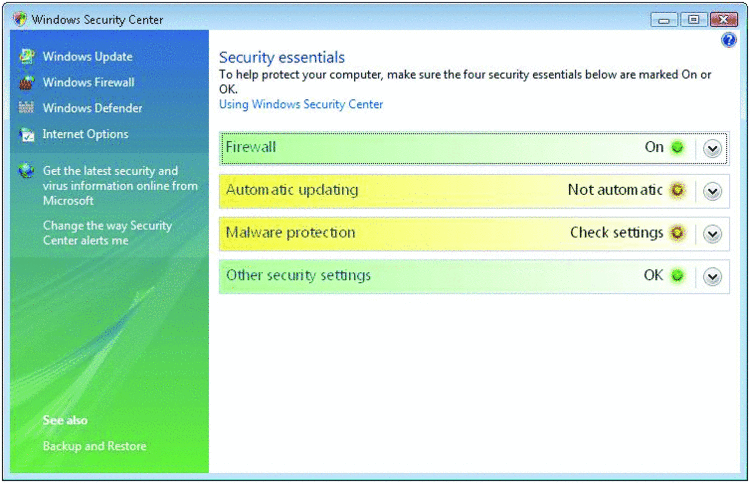
Determining a computer's health with that built-in Security Health Validator requires that two client components work together, the NAP client, which is natively available with Windows Vista, Windows Server 2008, and Windows XP Service Pack 3, and the Windows Security Center, which is available in the Control Panel (see Figure 1). Whereas the NAP client's job is to interface with the NAP server infrastructure, determine the client's state, and do the actual enforcement, it is the job of the Windows Security Center to identify and report when security configurations are out of whack. We'll configure both client pieces as well as the server components in the next section.

Figure 1 The Windows Security Center
Implementing DHCP NAP to Enforce WSUS Updates
Let's assume your network and domain are already in place, and your environment includes a Domain Controller named \\server1. You also have a Windows Vista laptop named \\client1 to use in testing your NAP implementation. You have just built a Windows Server 2008 computer named \\nps that will host your DHCP and NAP services. It will also host your WSUS database, as it will later operate as the remediation server for computers that are missing patches. In this example, I am collocating each of these services on the same computer, but it is possible to locate each on its own computer. For DHCP enforcement to work, you must run it on top of Windows Server 2008.
On the server \\nps, use Server Manager to install the DHCP Server, Network Policy and Access Services, and WSUS roles. Configure DHCP with a small scope for testing and configure WSUS with the necessary configuration that makes sense for your environment.
Next, create a Global Group in your domain called NAP Client Computers. In this group you will later add the names of the computers whose health you want NAP to monitor. For this example, that computer will be \\client1.
NAP's DHCP enforcement can hand out addresses in a completely different and isolated subnet to unhealthy computers, but for simplicity we will only change the computer's DNS domain name. Here, DHCP will tell healthy computers their DNS suffix is contoso.com, while unhealthy computers will instead get unhealthy.contoso.com. Be aware that this keeps the example simple, but doesn't necessarily isolate unhealthy computers. Once you understand the basic concepts, you can later go back and implement subnet isolation.
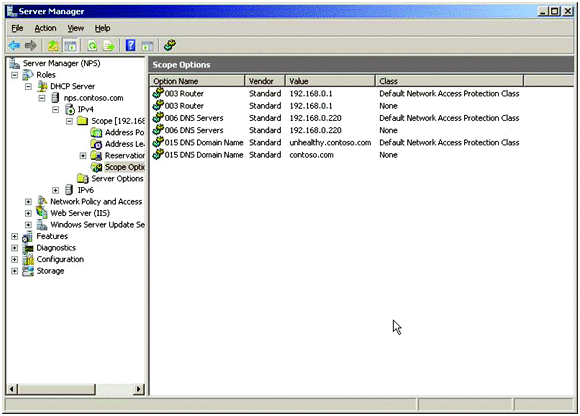
Configure your DHCP scopes with the above DNS suffixes. Do this in the DHCP console by right-clicking on Scope Options and choosing Configure Options. In the resulting window, click the Advanced tab where you'll see two user classes of interest. The Default User Class represents your set of healthy computers. These computers should get full access and the contoso.com DNS suffix under option 15. The Default Network Access Protection Class represents your unhealthy computers, and should get the DNS suffix unhealthy.contoso.com for option 15. You should probably also enter information for your DNS server under option 6 and default gateway information in option 3. When all that's done, the result should look similar to Figure 2. At this point you can NAP-enable the DHCP scope by right-clicking the scope itself and viewing Properties. Under the Network Access Protection tab, click Enable for this scope.

Figure 2 DHCP’sDefault NAP Class must be confi gured
This completes your configuration of DHCP services. The next step is to configure NAP itself using the Configure NAP wizard. Find the link of the same name in Server Manager's right-pane when you navigate to Network Policy and Access | NPS ( Local ). For this example, configure the wizard's multiple pages as follows:
Select Network Connection Method for Use with NAP. Select DHCP for your Network connection method. The wizard will then automatically populate the Policy name box with NAP DHCP.
Specify NAP Enforcement Servers Running DHCP Server. If your DHCP services were on different servers than your NAP server, you would enter those server names here. For our example, NAP and DHCP are collocated, so you can safely leave this box empty.
Specify DHCP Scopes. Enter the DHCP scopes you intend to enable for NAP. By leaving this box blank, all DHCP scopes are used.
Configure User Groups and Machine Groups. In this dialog box, add the NAP Client Computers Global Group you created earlier. This instructs the NAP policy to manage enforcement for only the computers in this group. Other computers are left alone.
Specify a NAP Remediation Server and URL. This page accomplishes two things. First, it identifies the remediation servers charged with fixing unhealthy clients. In this example, the remediation servers will be \\server1 for domain services and \\npsfor WSUS services. Click the New Group button and create a new group that includes these servers. Second, the page exposes a Troubleshooting URL. This URL is displayed in a balloon tip on unhealthy computers that are remanded to your isolated network for remediation. The Web site, which you must build yourself, can contain instructions on what is happening to the client or instructions for manual remediation. For this example, we'll leave the URL blank.
Define NAP Health Policy. This final screen displays a link to the Windows Security Health Validator, which will be customized next, and provides settings for auto-remediation and network access restrictions. Leave the default settings for each of these here.
The next step is the fun part. Here, you need to configure the components of the Windows Security Health Validator ( WSHV ) you want to use for enforcement. The default WSHV includes a number of Windows Security Center components that can be monitored.
Windows firewall. Is there a firewall on the system that has registered with the Windows Security Center? Is that firewall enabled for all network connections?
Virus and Spyware Protection. Are antivirus and anti-spyware applications installed on the computer, and have they been registered with the Windows Security Center? Are their applications turned on and currently using up-to-date signatures? The WSHA treats antivirus and anti-spyware applications separately, allowing you to enforce either or both on targeted systems.
Microsoft Updates. Has the computer been configured to check for automatic updates either through Windows Update or a local WSUS server? If so, how many hours ago did the computer check for updates? Are all available updates installed? What level of update criticality—important, critical, and so on—must be installed for a computer to be considered healthy?
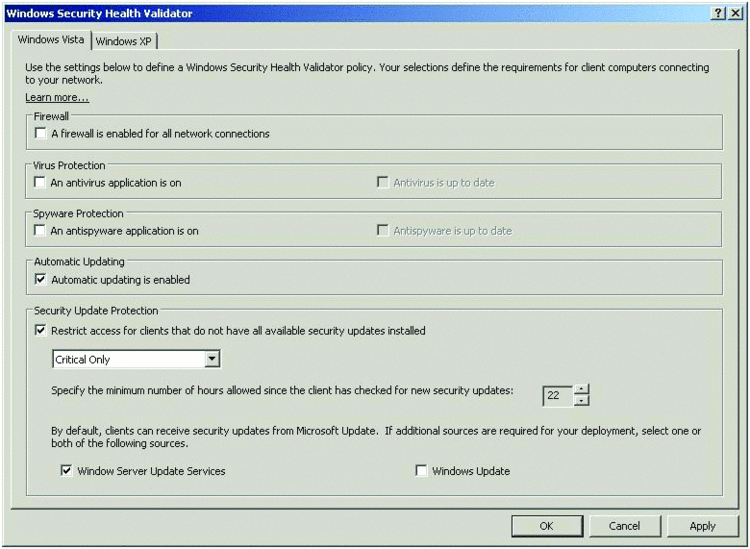
In Server Manager, navigate to Network Policy and Access Services | NPS (Local) | Network Access Protection | System Health Validators and double-click the Windows Security Health Validator. In the resulting screen, click Configure to see a screen like the one in Figure 3.

Figure 3 The default Windows Security Health Validator
Select the areas you want NAP to manage. Note that any third-party firewalls, antivirus, or anti-spyware applications must register with the Windows Security Center or provide their own add-on components to be monitored by NAP. For this example, we'll check only the boxes indicated in Figure 3. This instructs NAP to ensure that Automatic Updating is turned on for all client systems and that all Critical updates are installed. If a client cannot meet both conditions, it will be automatically moved to the remediation network where the WSUS server can automatically resolve the problem and bring the computer back to health.
Finally, there are three settings to be configured that are applied through Group Policy. Create a new Group Policy Object (GPO), link it to the domain, and open it for editing.
- Enable the Network Access Protection Agent and set it to Automatic. Do this under Computer Configuration | Policies | Windows Settings | Security Settings | System Services.
- Enable NAP's DHCP Quarantine Enforcement Agent, which you'll find under Computer Configuration | Policies | Windows Settings | Security Settings | Network Access Protection | NAP Client Configuration | Enforcement Clients. Double-click the agent and in the resulting screen choose to Enable this enforcement client. To apply this setting, right-click on the NAP Client Configuration node and choose Apply.
- Enable the Windows Security Center found in Computer Configuration | Policies | Administrative Templates | Windows Components | Security Center.
One final step: Close the Group Policy Management Editor and in the policy's Security Filtering, replace Authenticated Users with the NAP Client Computers group created earlier. You can now begin adding domain computers to the NAP Client Computers group to start their participation in NAP enforcement. Once Group Policy applies to the computers, their interactions with DHCP will involve the NAP health checks we discussed here.
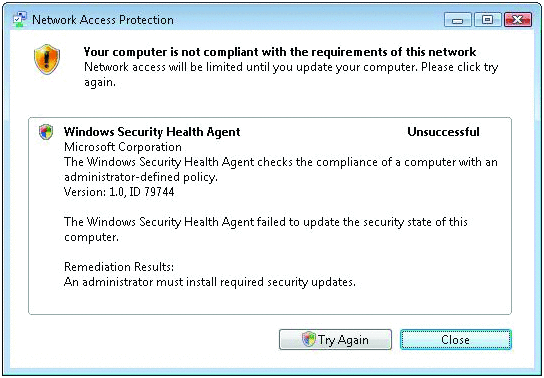
You can verify NAP client status using napstat.exe. Running this tool from a command line results in a system tray icon as well as a balloon tip that provides information about the client's enforcement status. Clicking that balloon displays a status window like the one in Figure 4, which indicates that the client is not compliant because it has not installed the proper security updates. At this point, because NAP has identified the client as unhealthy, DHCP will have renegotiated its lease and changed the DNS suffix to unhealthy.contoso.com.

Figure 4 An unhealthy NAP client without the proper security updates installed
There are obviously many more ways in which you can tailor your NAP implementation to provide additional security. Creating a completely isolated remediation network for unhealthy clients is one option. Configuring additional enforcement parameters in the WSHV or adding new third-party SHVs are others. If you dig around in the Network Policy and Access Services node in Server Manager, you'll find a host of additional options for customizing NAP to meet your needs.
Greg Shields, MVP, is a partner at Concentrated Technology. Get more of Greg's Jack-of-all-Trades tips and tricks at www.ConcentratedTech.com.