Troubleshoot Skype for Business Online sign-in issues for admins
This article will begin by asking you questions about your installation and the symptoms you're experiencing. Then we'll take you through a series of troubleshooting steps and configuration checks that are specific to your situation.
The amount of time you spend will depend on the type of Microsoft 365 installation you have, and the root causes of your sign-in issues.
One user, or a few users here and there affected
Access to Microsoft 365 on the web
If the affected users can sign in to Microsoft 365 portal at here, go to Valid Skype for Business user.
If the users can't sign in to Microsoft 365, see the Can't sign in to Microsoft 365 section.
Can't sign in to Microsoft 365
If the users can't sign in to Microsoft 365, ask them to try the troubleshooting steps suggested in You can't sign in to Microsoft 365, Azure, or Intune.
If the issue still exists, contact support.
Valid Skype for Business user
Check that the affected users have a valid Skype for Business license with the following steps:
Sign in at admin.microsoft.com with your admin account.
Go to Users > Active users, select the user that you want to check the license status.
In the right pane, select Licenses and Apps.
Verify that the user is licensed for Skype for Business Online.
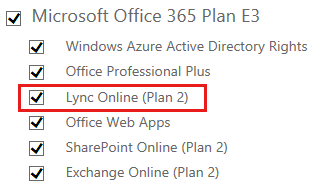
Your user license screen may be different from this example.
Wait 30 minutes, and then ask the user to try signing in again.
If this method doesn't resolve your issue, sign in on another device.
Sign in on another device
If you are able to sign in to Skype for Business Online on another computer, or on a tablet or smartphone, go to the Type of device section.
If you aren't able to sign in to Skype for Business Online on another device, go to the Sign in on to another network section.
If you don't have another device available right now, go to the Type of device section.
Type of device
Choose the type of device that is having difficulty signing in:
- Windows computer, laptop, or tablet
- Mac computer or laptop
- Smartphone or tablet
- iPad or Android tablet
Synchronize your system clock with the network (Windows computer or laptop)
Make sure the system clock shows the correct time, and then try signing in again. To update your computer's system time, follow these steps:
Windows 8
Go to a web site that shows Coordinated Universal Time (UTC).
Go to Setting > PC Settings > Time and Language.
Note your UTC offset, and compare your device's time to that shown on the website.

If you need to update your device's time:
- Turn off Set time automatically and tap Change.
- Update the time and tap Change.
- Try signing in again.
Windows 7
Go to a web site that shows Coordinated Universal Time (UTC).
Go to Control Panel > Date and Time, and note the UTC offset for your location.
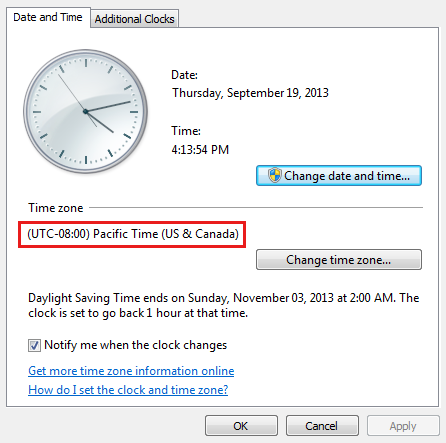
If you need to, choose Change date and time and update your computer's clock.
Try signing in again.
If the problem isn't solved, go to the Determine Lync client version (Windows) section.
Determine Lync client version (Windows)
If you're using the desktop version of Skype for Business, find out if it's Skype for Business 2010 or Skype for Business 2013. To do this, click the arrow next to the Options button , and then go to Help > About Microsoft Skype for Business.
Choose your version of Skype for Business:
Microsoft 365 Desktop Setup (Lync 2010)
Make sure that Microsoft Online Services Sign-in Assistant is running on Windows Services by following these steps:
(These steps are for Windows 10)
- Right-click the Start button and select Run.
- Type
services.mscand select OK. - In the Services window, check whether the Status of Microsoft Online Services Sign-in Assistant is listed as Running.
Delete Lync 2010 sign-in information
Make sure that previously saved sign-in information isn't blocking your current sign-in attempt.
If the issue still exists, clear the Clear the DNS cache (Lync 2010) section.
Clear the DNS cache (Lync 2010)
Make sure that previously save network information is not blocking your sign-in attempt, and then try signing in again. To do this, follow these steps:
Windows 8
Clear the DNS cache (summary): run the Command prompt app as an administrator, and enter
ipconfig /flushdns.Clear the DNS cache (details):
- Swipe in from the right or point to the upper right of the screen.
- Choose Search, and then type command.
- Select the Command prompt app, and then swipe up from the bottom or right click for options.
- Choose Run as administrator, and then choose Yes.
- Enter
ipconfig /flushdns.
Windows 7, Windows Vista, Windows XP, Windows Server 2008, or Windows Server 2003
- Click Start, and in the Search programs and files box, enter cmd.exe.
- Right-click cmd.exe in the search list, and then click Run as administrator.
- Enter
ipconfig /flushdns.
If the issue still exists, go to the Configure connection settings manually (Lync 2010 and Skype for Business 2015) section.
Configure connection settings manually (Lync 2010 and Skype for Business 2015)
Ask the user to manually add Skype for Business server settings and try signing in again.
Manually add Skype for Business server settings:
Go to Lync options
 > Personal.
Under My account, click Advanced, and then click Manual configuration.
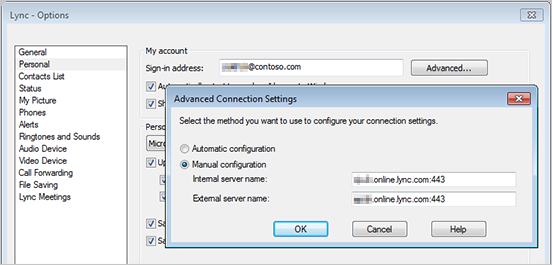
Enter sipdir.online.lync.com:443 in both boxes, and then click OK > OK.
Sign out, and then try signing back in.
If the issue still exists, contact support.
Update Skype for Business 2015
Make sure the user has the most current version of Skype for Business 2015. If this method doesn't solve the issue, go to the Delete Skype for Business 2015 sign-in information section.
Delete Skype for Business 2015 sign-in information
Make sure that previously saved sign-in information isn't blocking the sign-in attempt. Ask the user to follow these steps:
Sign out and delete sign-in information.
Click the status menu below your name, and then click Sign Out.
On the sign-in screen, click Delete my sign-in info.
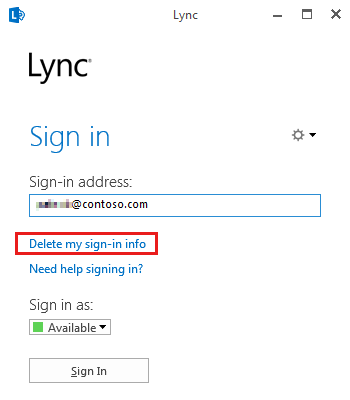
Delete cached sign-in credentials.
Find your local AppData folder and delete it:
%LOCALAPPDATA%\Microsoft\Communicator\<sip_address@contoso.com>.Try signing in again.
If the issue still exists, go to the Configure connection settings manually (Lync 2010 and Skype for Business 2015) section.
Update Skype for Business Windows Store app
Make sure you have the most current version of Skype for Business Windows Store app:
On the Start screen, tap Store.

Search for Skype for Business, and install the update if one is available.
Try signing in again.
If the issue still exists, go to the Delete your sign-in information (Skype for Business Windows Store app) section.
Delete your sign-in information (Skype for Business Windows Store app)
Make sure that previously saved sign-in information isn't blocking your sign-in attempt. To do this, follow these steps:
On the Skype for Business Windows Store app sign-in screen, tap Delete my sign-in info.
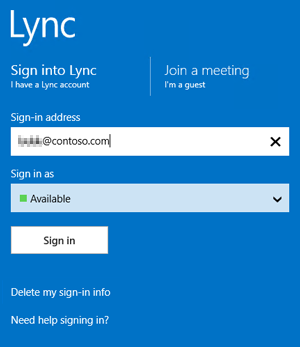
Try signing in again.
If the issue still exists, contact support.
Synchronize your system clock with the network (Mac computer or laptop)
Make sure the system clock shows the correct time, and then try signing in again. Ask the user to follow these steps:
- Go to a web site that shows Coordinated Universal Time (UTC).
- Go to Apple
 > System Preferences.
 - In the Date & Time pane, click the Date & Time tab.
- Note the UTC offset for your location.
- If you need to, update your computer's clock, and then try signing in again.
If the issue isn't solved, go to the Update Lync for Mac 2011 section.
Update Lync for Mac 2011
Make sure the user's computer has the most recent version of Lync for Mac 2011.
If this method doesn't solve this issue, go to the Delete Lync for Mac 2011 sign-in information section.
Delete Lync for Mac 2011 sign-in information
Make sure that previously saved sign-in information isn't blocking the current sign-in attempt.
Delete the following data:
Users/Home Folder/Library/Caches/com.microsoft.LyncUsers/Home Folder/Documents/Microsoft User Data/Microsoft Lync History
delete any corrupted or cached certificates.
- Open the Keychain Access certificate management utility. To do this, in Finder, click Applications, click Utilities, and then click Keychain Access. Or, search for Keychain Access by using Spotlight.
- In the left pane, click login, and then click Certificates.
- In the right pane, find any certificate named Unknown or Communications Server, select it, and then delete it. You may have to unlock your keychain by using your password.
- Close Keychain Access.
- Restart Lync for Mac.
If the issue still exists, go to the Configure connection settings manually (Lync for Mac 2011) section.
Configure connection settings manually (Lync for Mac 2011)
Ask the user to manually add Lync server settings and try signing in again.
- Click Advanced.
- Under Authentication, clear the Use Kerberos check box.
- Under Connection Settings, click Manual configuration.
- In both the Internal Server Name box and the External Server Name box, type or paste
sipdir.online.lync.com:443. - Click OK.
If the issue still exists, contact support.
Update Skype for Business on the smartphone or tablet
Ask the user to go to the app store for their device and check for updates to the currently installed version of Skype for Business.
If the issue isn't solved, go to the Configure connection settings manually (Skype for Business for mobile devices) section.
Configure connection settings manually (Skype for Business for mobile devices)
Ask the user to manually add Lync server settings and try signing in again.
- On the sign-in screen, tap More Details (Windows) or Show Advanced Options (iPhone, iPad, or Android).
- Turn off Auto-Detect Server.
- In both the Internal Discovery Name and External Discovery Name boxes, enter
https://webdir.online.lync.com/Autodiscover/autodiscoverservice.svc/Root. - Click Sign In.
If the issue still exists, contact support.
Sign in on to another network
If users can sign in on to a different network, for example, at home, or at a public wireless access point, verify internal network server setup. If users can't, go to the Directory synchronization section.
If users don't have access to a different network right now, verify internal network server setup.
verify internal network server setup
Make sure your organization's firewall isn't blocking Lync traffic. To do to this, run the Lync Online Transport Reliability IP Probe (TRIPP) tool.
Check for blocked ports or URLs:
- On the affected network, go to the TRIPP tool address that is nearest to the users physical location:
- Amsterdam, NL:
http://trippams.online.lync.com - Blue Ridge, VA:
http://trippbl2.online.lync.com - Dublin, IE:
http://trippdb3.online.lync.com - Hong Kong Special Administrative Region:
http://tripphkn.online.lync.com - San Antonio, TX:
http://trippsn2.online.lync.com - Singapore:
http://trippsg1.online.lync.com
- Amsterdam, NL:
- Click Start Test.
- If any of the tests fail, correct your internal server settings, and then rerun the TRIPP tool to verify your changes.
- Try signing in again.
For more information about the TRIPP tool, see You can't connect to Skype for Business Online, or certain features don't work, because an on-premises firewall blocks the connection.
If the issue isn't solved, does your organization have an internal firewall, proxy server, or DNS server? If yes, verify internal DNS autodiscover settings. If no, go to the Directory synchronization section.
Verify internal DNS autodiscover settings
Make sure your internal DNS server has the CNAME and SRV records required for internal user sign-in
The following tables list Internal Lync autodiscover settings.
| Type | Host name | Destination | TTL |
|---|---|---|---|
| CNAME | sip.yourDomainName.com |
sipdir.online.lync.com |
1 hour |
| CNAME | lyncdiscoverinternal.yourDomainName.com |
webdir.online.lync.com |
1 hour |
| Type | Service | Protocol | Port | Weight | Priority | TTL | Name | Target |
|---|---|---|---|---|---|---|---|---|
| SRV | _sip | _tls | 443 | 1 | 100 | 1 hour | @ | sipdir.online.lync.com |
If the issue still exists, see the Directory synchronization section below.
Directory synchronization
Find out if you've set up directory synchronization:
In the Microsoft 365 admin center, go to User and groups.
Check the status of Active Directory synchronization.
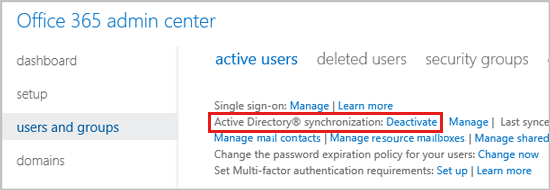
If your organization synchronizing Active Directory with Microsoft 365 is using the Windows Azure Directory Synchronization Tool, go to Single sign-on section. If not, contact support.
Single sign-on
Is your organization using single sign-on with Microsoft 365? If yes, go to the Active Directory Federation Services (AD FS) configuration section.
If your organization isn't using single sign-on with Microsoft 365, see the Duplicate or conflicting Active Directory entries section.
Duplicate or conflicting Active Directory entries
If you had a previous version of Skype for Business Server, or a current Skype for Business installation that's not configured for hybrid, then existing user attributes carried over from your on-premises Active Directory can conflict with the online values and cause sign-in issues.
To make sure that obsolete or duplicate Active Directory entries are not causing your sign-in issues, use the Active Directory Service Interfaces Editor (ADSI Edit) to:
- Check for duplicate SIP addresses.
- Make sure the
msRTCSIP-UserEnabledattribute for affected users is set to TRUE.
If the issue still exists, contact support.
Active Directory Federation Services (AD FS) configuration
Check for known Active Directory Federation Services (AD FS) issues that might prevent single sign-on from working as expected. For details, see Enterprise single sign-on users in Microsoft 365 can't sign in to Lync Online from inside their corporate network.
If this method doesn't solve this issue, go to the Hybrid Deployment with on-premises Skype for Business Server section.
Hybrid Deployment with on-premises Skype for Business Server
You have a hybrid deployment if you've set up a shared SIP address space with Skype for Business Online, and your on-premises Lync server shares a domain with your Microsoft 365 organization.
If you have a Skype for Business Server 2015 and Skype for Business Online hybrid deployment, go to the Skype for Business users enabled on-premises and moved to the cloud section. If you don't have, go to Duplicate or conflicting Active Directory entries.
Skype for Business users enabled on-premises and moved to the cloud
Make sure the users have been:
- Enabled for Skype for Business on the on-premises Skype for Business Server.
- Licensed for Skype for Business in Microsoft 365.
- Moved to Skype for Business Online.
If the issue still exists, contact support.
Everybody in a specific group or at a single location affected
Custom domain
Microsoft 365 creates a domain for you when you sign up (the domain name includes .onmicrosoft.com). But most companies prefer to use their own domain, like fabrikam.com, for their business email addresses and website.
If your current domain name ends in .onmicrosoft.com, you don't have a custom domain.
Are you using a custom domain with Microsoft 365? If yes, go to the Office version section. If no, go to the Access to Microsoft 365 on the web section.
Office version
To check your Microsoft 365 subscription, sign in and go to Admin > Licensing.
What type of Microsoft 365 subscription do you have?
Custom domain status (Small Business)
To set up your custom domain, sign in and click Email address in the Getting Started pane. (If you don't see the Getting Started pane, click Setup > Open the Getting Started pane.) Learn more.
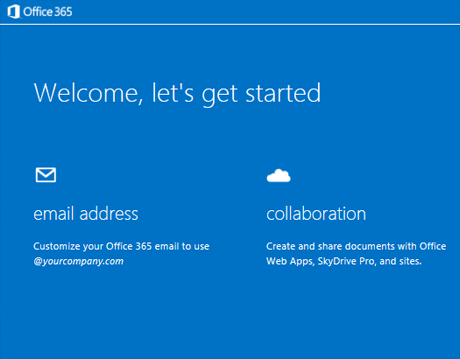
Have you already set up your custom domain? If yes, go to Test your custom domain (Small Business) section. If no, go to the Set up your custom domain (Small Business) section.
Test your custom domain (Small Business)
Now make sure everything works as expected by running the domain troubleshooter in the Microsoft 365 admin center.
If you discovered any network setup issues, resolve them, and then try signing in again.
Run the domain troubleshooter:
Go to the Microsoft 365 admin center and click Domains.
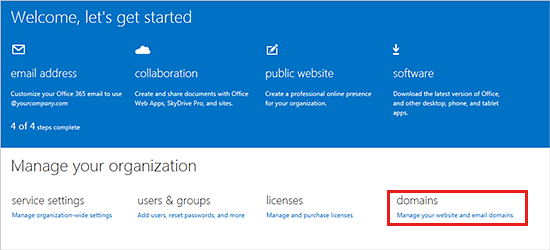
Select your custom domain name, and then click Troubleshooting.
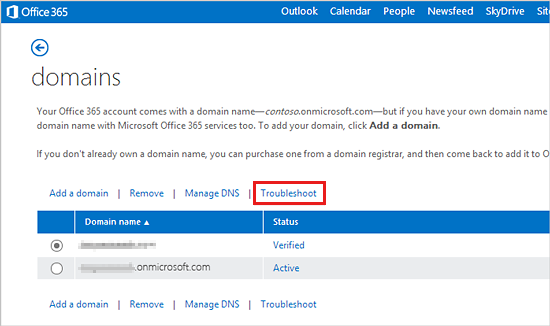
If you discovered any network setup issues, resolve them, and then try signing in again.
If this method doesn't solve the issue, go to the Access to Microsoft 365 on the web section.
Set up your custom domain (Small Business)
It's best to take the time and set up your custom domain now. That way we can check for additional issues that might cause sign-in errors in the future.
To set up your custom domain, sign in and click Email address in the Getting Started pane. (Go to Setup > Open the Getting Started pane if you don't see it.) Learn more.
Don't worry, we'll save your place, and you can start where you left off. Just click Save current progress at the bottom. Then, test your custom domain (Small Business) section.
Skype for Business Server and Skype for Business Online hybrid deployment
You have a hybrid deployment if your on-premises Skype for Business server shares a domain with your Microsoft 365 organization, and you've set up a shared SIP address space with Skype for Business Online.
Do you have a Skype for Business Server 2015 and Skype for Business Online hybrid deployment? If yes, go to the Verify your Skype for Business Server hybrid deployment setup section. If no, go to the Custom domain status section.
Verify your Skype for Business Server hybrid deployment setup
Make sure your Skype for Business Server deployment is set up to work with Skype for Business Online and Microsoft 365. For details, see Planning for Skype for Business Server 2015 Hybrid Deployments and Determine DNS Requirements.
Test your Lync Server hybrid deployment setup:
- Test your setup with the Lync Server Remote Connectivity Test.
- If necessary, correct any reported issues, and then try signing in again.
If the issue still exists, go to the Access to Microsoft 365 on the web section.
Custom domain status
To set up your custom domain, sign in and go to Admin > Setup.
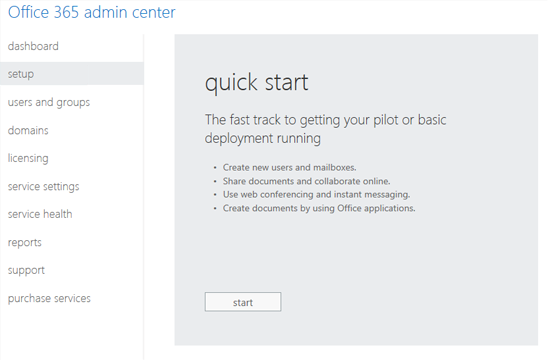
Have you already set up your custom domain? If yes, go to Test your custom domain. If no, go to the Set up your custom domain section.
Test your custom domain
Now make sure everything works as expected by running the domain troubleshooter in the Microsoft 365 admin center.
Run the domain troubleshooter:
Go to the Microsoft 365 admin center and click Domains.
Select your custom domain name, and then click Troubleshooting.
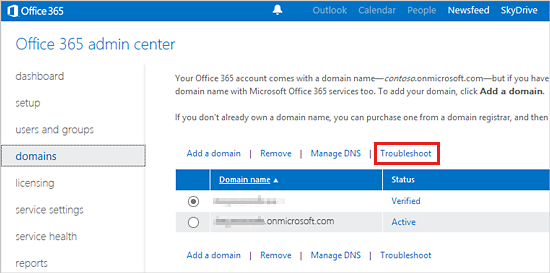
If you discovered any network setup issues, resolve them, and then try signing in again.
If you discovered any network setup issues, resolve them, and then try signing in again.
If the issue still isn't solved, go to the Access to Microsoft 365 on the web section.
Set up your custom domain
It's best to take the time and set up your custom domain now. That way we can check for additional issues that might cause sign-in errors in the future.
To set up your custom domain, sign in and go to Admin > Setup.
Don't worry, we'll save your place, and you can start where you left off.
Now make sure everything works as expected by running the domain troubleshooter in the Microsoft 365 admin center.
Run the domain troubleshooter:
Go to the Microsoft 365 admin center and click Domains.
Select your custom domain name, and then click Troubleshooting.

If you discovered any network setup issues, resolve them, and then try signing in again.
If you discovered any network setup issues, resolve them, and then try signing in again.
If the issue still isn't solved, go to the Access to Microsoft 365 on the web section.
Everybody in my organization affected
Check for a service interruption
In the Microsoft 365 admin center, click Service health. A green check mark next to Skype for Business Online indicates no service interruptions.
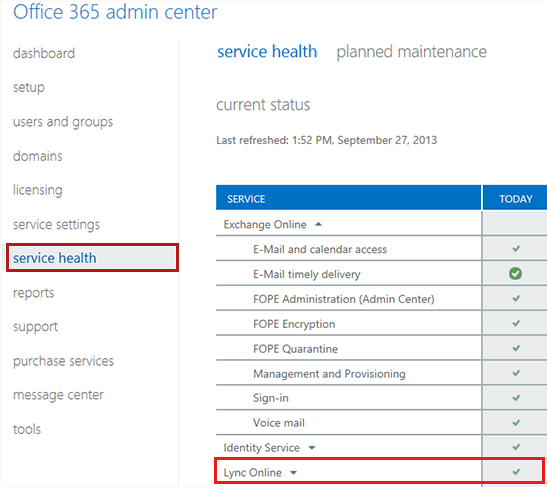
Is a service interruption preventing you from signing in? If yes, go to the Service interruption section. If no, go to the Custom domain section.
Service interruption
What to do if there's a service interruption:
- Save your place in this guide by clicking Save current progress at the bottom of the page.
- In the O365 admin center, click the service interruption indicator

- Note the time of the next scheduled status update, and check back periodically until service is restored.
- If you still cannot sign in to Skype for Business after the interruption has been resolved, return to this guide and click No to continue.
We're sorry for the inconvenience. Wait until the service interruption is resolved, and then try signing in again.
If the issue still exists, go to the Custom domain section.
Contact support
We're sorry, but we couldn't resolve your sign-in issue. Contact support for further assistance.